Smooth Operator
(BluuGnome version of the Fiddlestick)
Detailed How To
Smooth Operator Caution / Warning
The Smooth Operator is a fun to use retrievable anchor that can be
useful in a few situations. The Smooth Operator is an advanced tool
that has proven reliable when used properly and with attention to
detail. There are risks associated with the use of the Smooth
Operator.
Before using a Smooth Operator, educate yourself on the proper use
and possible pitfalls. Practice and gain an understanding of the
Smooth Operator in a safe setting BEFORE use in the real world. Pay
close attention to every aspect of the process, use good judgment at
all times and discontinue use if you, or anyone with you, is not
comfortable with the situation. As with any anchoring system, there
is potential for failure where injury or death may occur. The user
assumes all risk and liability from use or misuse of the Smooth
Operator.
The Smooth Operator is not designed for shock loads.
Avoid situations where the Smooth Operator can experience a shock
load from a fall. Do not ascend on a Smooth Operator.
General BluuGnome Gear - Warning / Legal Notice
***WARNING***
Canyoneering, climbing, mountaineering, rappelling and related
activities in any form are inherently dangerous. Engaging in
Canyoneering or related activities can damage gear, damage personal
property and can cause serious injury and/or death to you, and/or
others.
BluuGnome, BluuGnome.com, any person or entity associated
with BluuGnome in any way, its owners or heirs will be referred to
herein as BluuGnome. Any equipment, gear, products, or merchandise
associated with BluuGnome in any way will be referred to herein as
BluuGnome Gear.
By purchasing, using or misusing BluuGnome Gear you
agree to the following:
BluuGnome Gear must be used in accordance
with the manufacturer’s instructions and only for the specified
purpose it was designed for. Prior to use you are responsible to
read and fully understand all information associated with BluuGnome
Gear; learn proper techniques and procedures for the activities you
are engaging in; get instruction on the safe and proper use of
BluuGnome Gear; know, respect, and accept the risks and limitations
of BluuGnome Gear; educate those associated with you during the use
of BluuGnome Gear.
By purchasing and/or using BluuGnome Gear, you
assume personal responsibility for any and all damages or injuries
of any kind, including death, resulting to you and/or others while
using or misusing BluuGnome Gear. You acknowledge and accept the
potential risks involved with the use or misuse of BluuGnome Gear.
You assume responsibility for any harm, loss, damage, property
damage, personal injuries, or death to you or others resulting from,
arising out of or in and way related to your use or misuse of
BluuGnome Gear.
You and your heirs further agree to hold harmless,
indemnify, protect and defend BluuGnome against any incident or
action involving or arising out of use or misuse of BluuGnome Gear.
You and your heirs hereby waive, release and discharge forever
BluuGnome from any and all liabilities, claims, demands or actions
whatsoever for any harm, loss, damage, property damage, personal
injuries or death to you or others due to use or misuse of BluuGnome
Gear.
Inspect BluuGnome Gear before each use and discontinue use if
it appears damaged in any way. Check hardware for cracks, fissures,
dents, loose parts, excessive wear and overall smooth operation.
Check sewn goods for abrasion, frayed stitching and overall
integrity. Destroy retired gear to prevent future use. Do not use
equipment with unknown history.
How to use a Smooth Operator (more detail)
Locate a suitable anchor.
The Smooth Operator is a wonderful tool that opens a wide range of
possible anchors. Trees, rocks, arches or existing prebuilt
anchors work. As with any anchor be sure what you are
anchoring to is very secure.
When selecting your anchor be aware that the rappel rope will need
to pull easily and cleanly around the anchor. In most cases
the rope should pull very easily around the anchor after the Stein
Knot has been released. However some situations can cause the
rope to stick. If you are not sure if the rope will flow
around the anchor, test the flow of the rope around the anchor with
a short test pull. One of the common features that can cause a
rope to stick is a V shaped notch which can
easily stick if the rope.
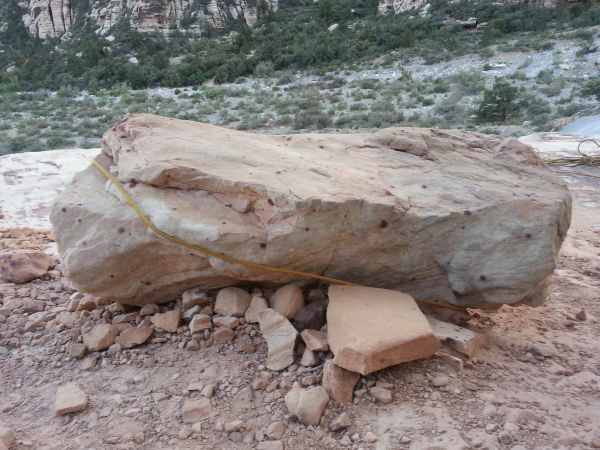 Be very careful not to run the rope through a V shaped groove.
Here is an example of a V shaped groove.
The V shaped groove can prevent a rope from pulling around an anchor.
Note the groove on the lower right side the rope is running
through.
Be very careful not to run the rope through a V shaped groove.
Here is an example of a V shaped groove.
The V shaped groove can prevent a rope from pulling around an anchor.
Note the groove on the lower right side the rope is running
through.
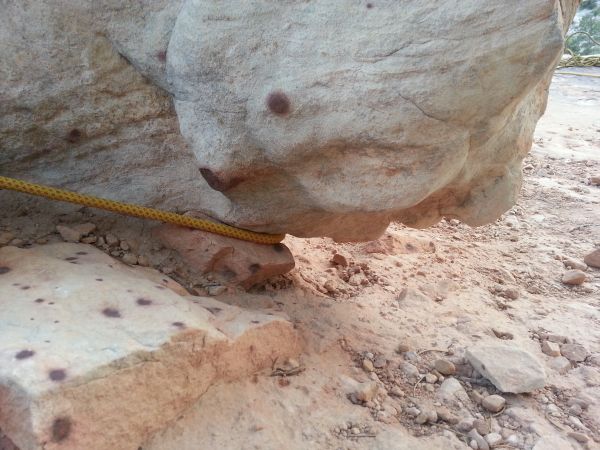 Here is a closer look at the groove the rope is running in. Avoid running the rope through
grooves like this.
Here is a closer look at the groove the rope is running in. Avoid running the rope through
grooves like this.
Webbing can be useful at times.
There are times when webbing is helpful for Smooth Operator use. If
it is not possible for the rappel rope to easily pull around your
chosen anchor you can leave a piece of webbing around the anchor
then set the Smooth Operator up on the loop of webbing. When doing
this no rapid is needed since only a short section of rope will be
pulled through the webbing during the pull. Webbing can
be left on trees if there is concern of damaging the tree from rope
pull. Webbing can be used to make a knot chalk and the
Smooth Operator then rigged on the webbing. If a cairn or deadman
anchor is used webbing can be set on the anchor the Smooth
Operator
rigged on the webbing.
Look at the area between the anchor and the top of the
rappel. Both the rappel rope and
the pull line with Smooth Operator will need to pull cleanly over this
area and down the rappel. Also take note of heavy vegetation or other
obstructions which may tangle the rope or pull line during the
pull. A Smooth Operator can also get stuck if it falls into cracks or over
choke stones. These possible sticking points are something you
should always be looking for and try to avoid.
Wrap the rappel rope around the anchor.
Wrap one end of the rappel rope around the anchor with one side left
short and the rest of the rope sitting at the top of the drop. The
short end should be left just long enough for rigging the
Smooth Operator and stone knot.
Evaluate where you will place the stone knot and Smooth
Operator.
 Placing the stone knot close to the anchor is desirable to reduce
the amount of rope that needs to be pulled around the anchor after
the Smooth Operator has been removed.
Placing the stone knot close to the anchor is desirable to reduce
the amount of rope that needs to be pulled around the anchor after
the Smooth Operator has been removed.
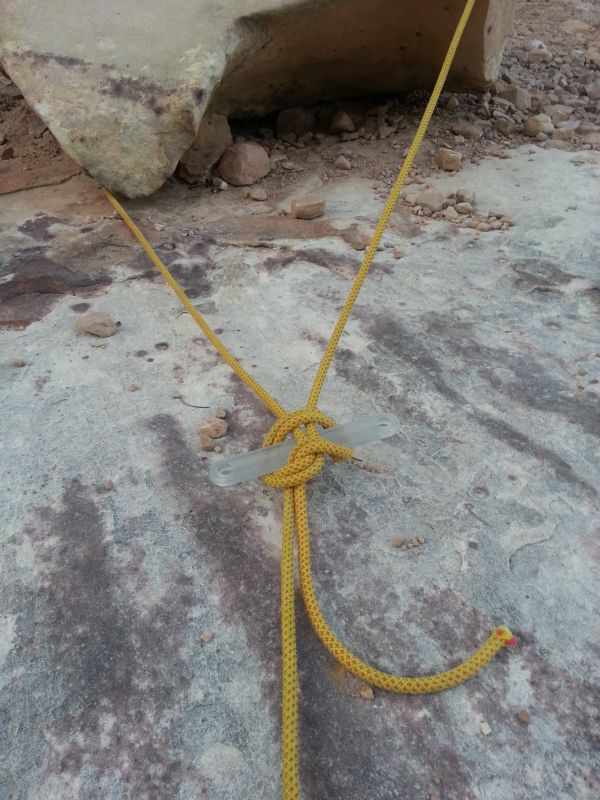
Placing the stone knot close to the anchor is desirable so there
will be less tail to pull around the anchor when pulling.
However if the anchor is large, placing the stone knot close to the
anchor can cause the stone knot to spread and be less stable. If
this is an issue, tie the stone knot farther from the anchor to
reduce the angle.
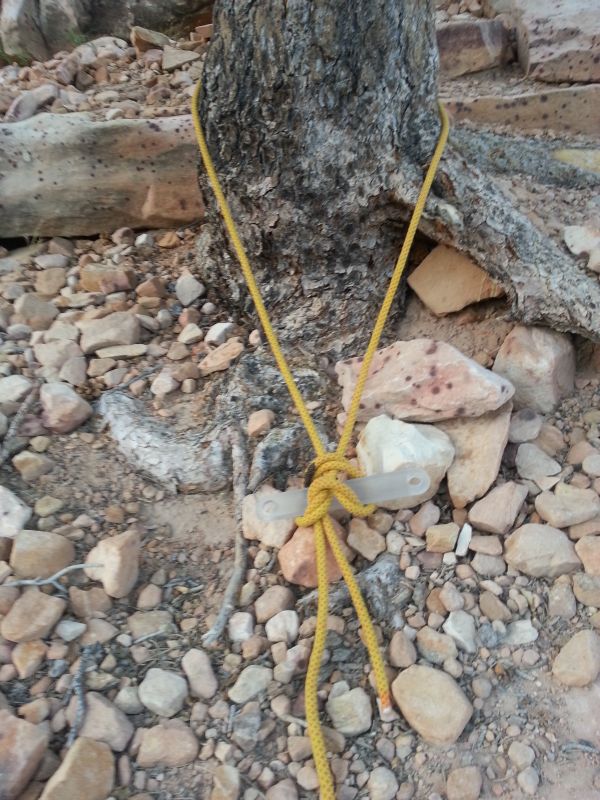
If the anchor is of large diameter try moving the Smooth Operator
and stone knot away from the anchor to reduce the angle of the rope
strands exiting the top of the stone knot.
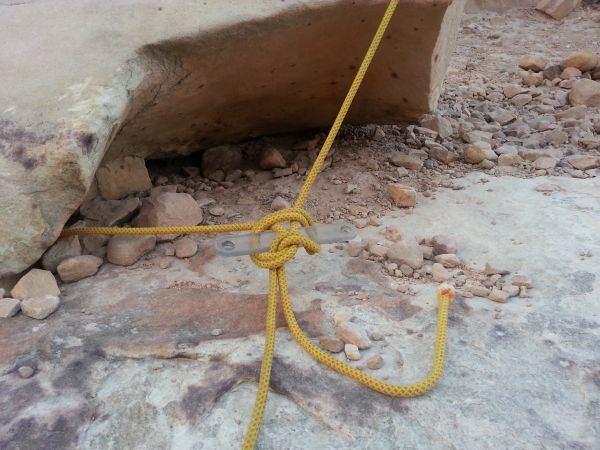 The Smooth Operator rigged close to a large diameter anchor.
Note
the wide angle of the rope at the top of the knot which works to
force the knot apart.
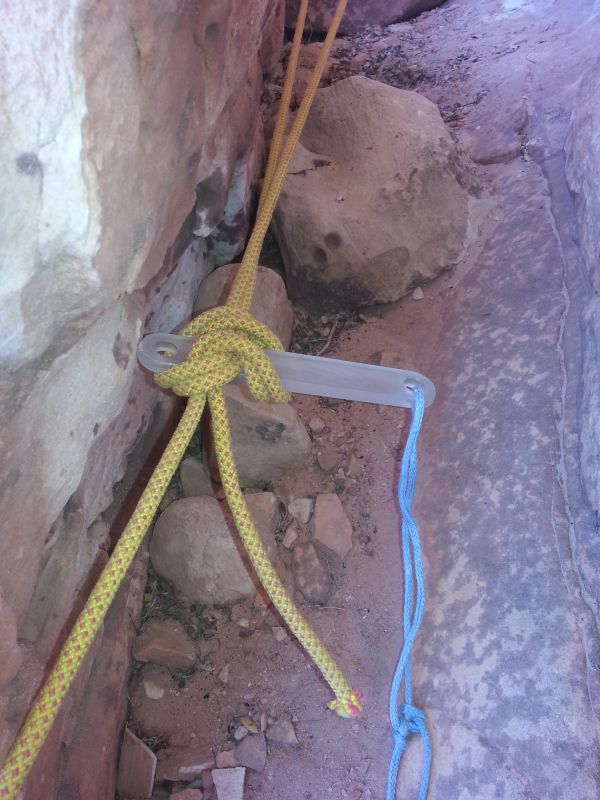
 the Smooth Operator rigged farther away from the large diameter
anchor which reduces the angle of the ropes.
the Smooth Operator rigged farther away from the large diameter
anchor which reduces the angle of the ropes.
Here is a video showing the difference between
setting a Smooth Operator close to or far from a large diameter anchor.
The
Smooth Operator should also be place where it will be suspended in
free space if possible. Suspending the Smooth
Operator in
free space will keep the Smooth Operator from banging into things as the
rope is moved during rappel. Banging into things could force
the Smooth Operator into an unsafe configuration. If the
Smooth Operator
cannot be rigged in free space try to position it so there will be
minimal or no force pushing on the ends of the Smooth Operator so it does not
get forced through the stone knot.
 Try to avoid placing the Smooth Operator next to rocks or canyon walls
where the rope can pull it into the wall.
Try to avoid placing the Smooth Operator next to rocks or canyon walls
where the rope can pull it into the wall.
 After the safety carabiners are removed the Smooth Operator can be
moved within the stone knot if it is pulled into the wall.
After the safety carabiners are removed the Smooth Operator can be
moved within the stone knot if it is pulled into the wall.
Here is a video showing why you should avoid placing the
Smooth Operator by walls or rocks.
In some cases the anchor is set a long way back from the top of the
rappel and there are a lot of rocks or vegetation between the anchor
and the top of the rappel. In this case the rocks and
vegetation could stick the rope or pull line during the pull.
Sometimes it may be necessary to place the stone knot
close to the top of the rappel to minimize the possibility of
sticking the rope. The downside with this is leaving more tail
to pull up and around the anchor creating a more difficult pull and
possibly adding to potential rope grooves.
When possible try to rig the stone knot and Smooth Operator where it can
be easily seen from the start of the rappel. It is good
practice if the Smooth Operator is set so each person can
view and evaluate it as they begin the rappel. This is
especially true for the last man down.
Tie a stone knot in the rope and insert the
Smooth Operator.
The basic overview of how to tie the stone knot for use with the
Smooth Operator is shown here but is intentionally a little vague.
If you don't know how to tie the stone knot for use with the
Smooth Operator, check out the
Smooth Operator Stone Knot
page.
If you already know how to tie the stone knot, you are
encouraged to check out the
Smooth Operator Stone Knot page any way.
There are some interesting bits of information on the Smooth
Operator
Stone Knot page that some experienced users may not know. Like why the UP position is preferred and how to tie
the stone knot so it doesn't leave a twist in the rope after the
Smooth Operator is pulled.
Tying the stone knot properly and cinching the stone knot down
tightly over the Smooth Operator are VERY important in
keeping things safe. For a little insight about this see the
page about pull forces
for the Smooth Operator. Cinching the knot down tightly is
more important than one might think.
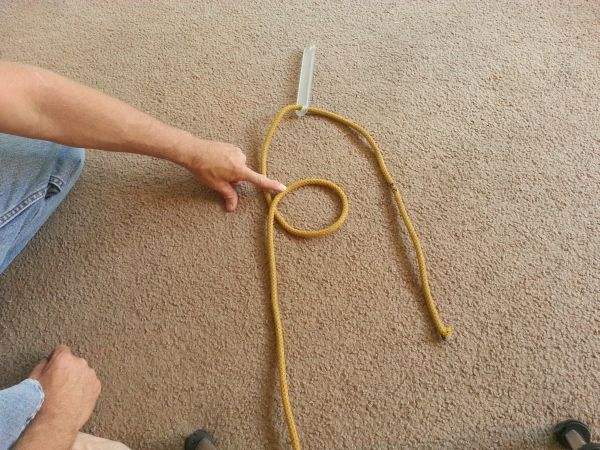
The basics of tying the stone knot for the Smooth Operator look like
this.
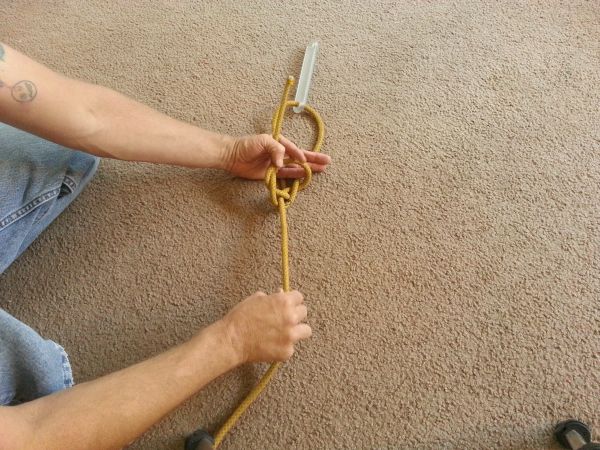
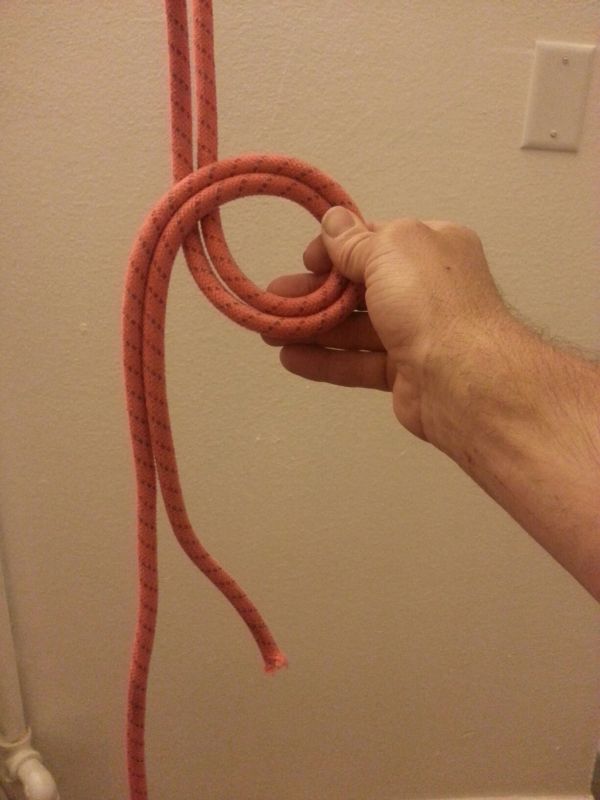 Make the loop by twisting the rope.
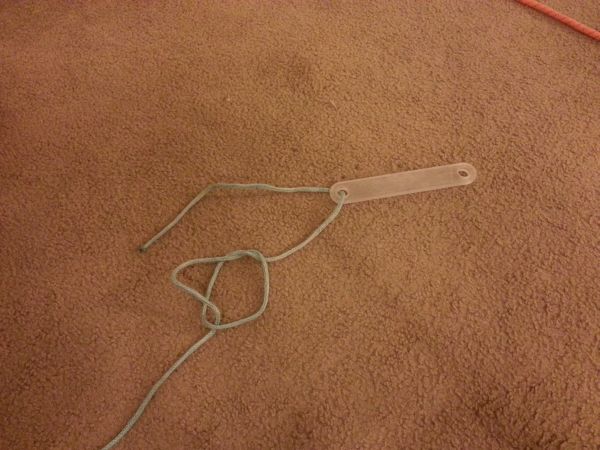
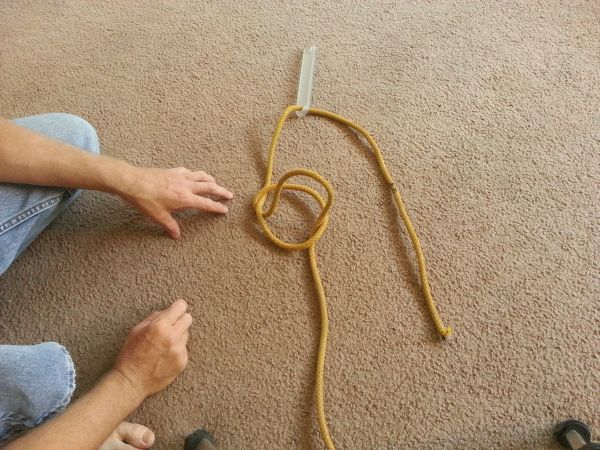
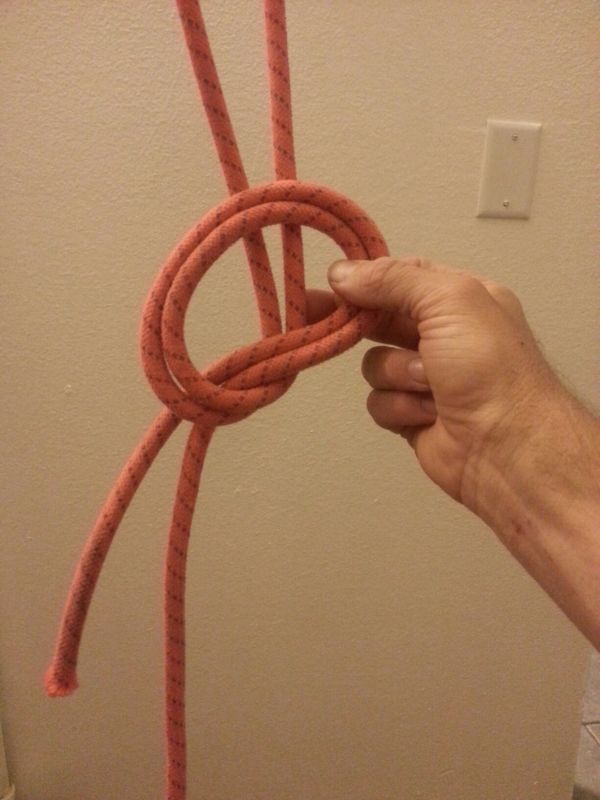 Fold the loop up so the two strands above
the knot can be pulled through the loop.
Fold the loop up so the two strands above
the knot can be pulled through the loop.
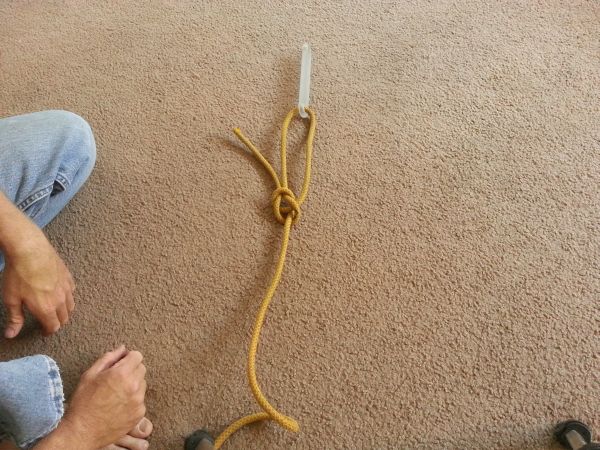
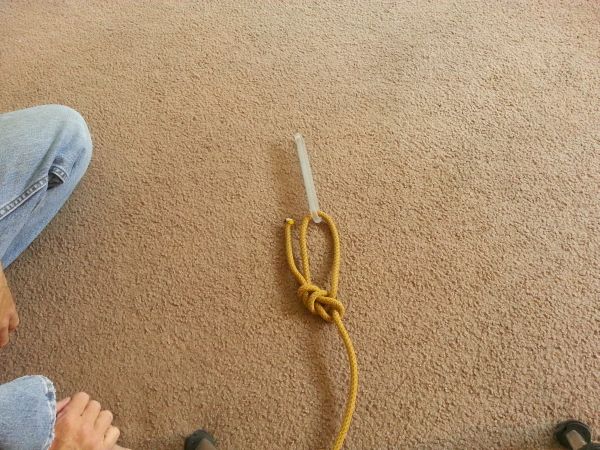
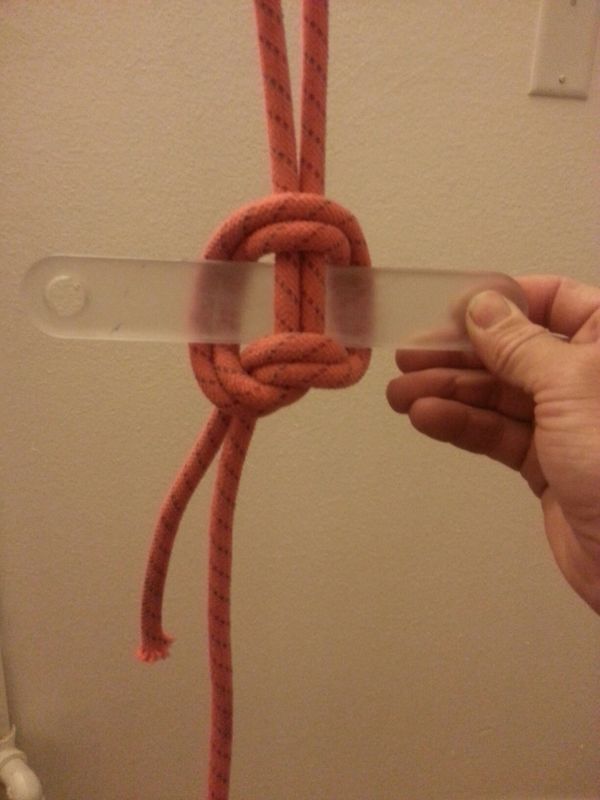 Insert the Smooth Operator and cinch the stone knot down on the
Smooth Operator.
Insert the Smooth Operator and cinch the stone knot down on the
Smooth Operator.
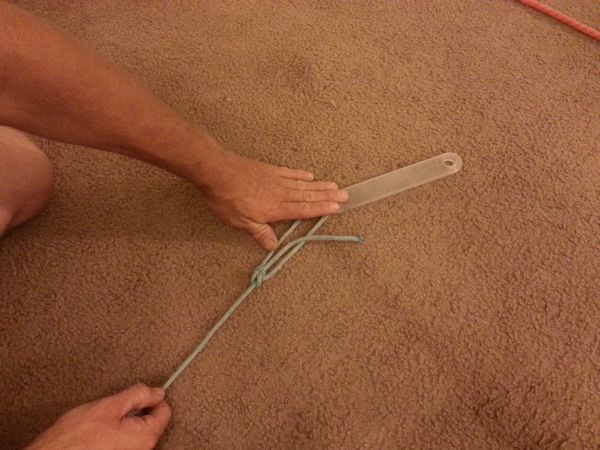
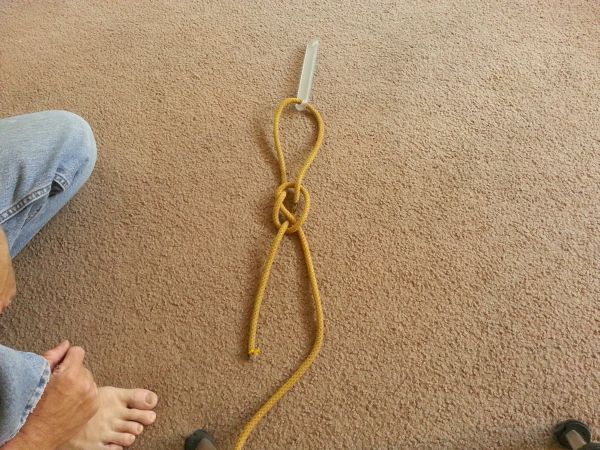
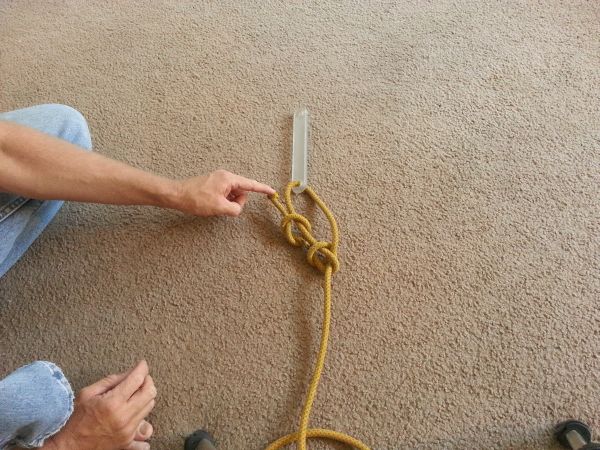
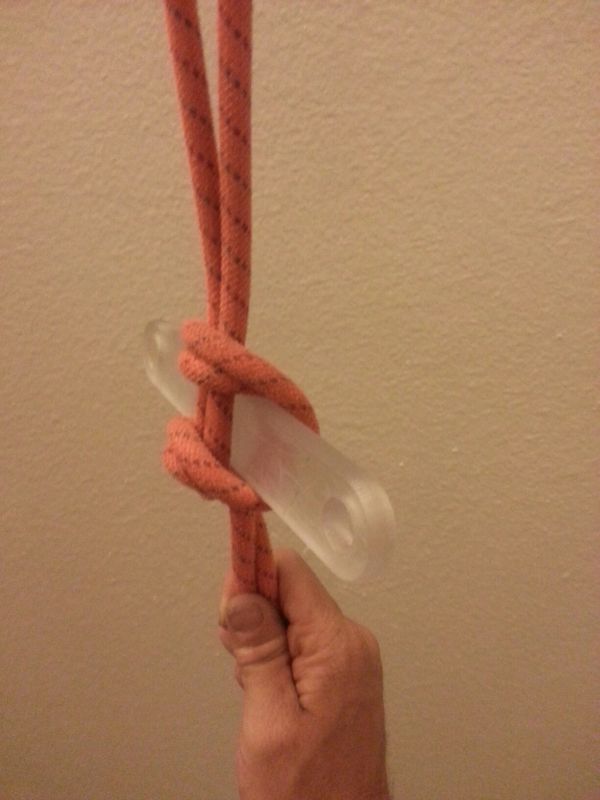 Side view of a stone knot tied with the center strands flat.
The outer strands bend to wrap around the Smooth Operator.
Side view of a stone knot tied with the center strands flat.
The outer strands bend to wrap around the Smooth Operator.
As the stone knot gets cinched down it is very important to keep the
center two strands as straight as possible reducing the amount they
bend around the stick as they pass through the knot. The outer
strands of the knot should do the bending to wrap around the Smooth
Operator.
More information on why
this is important is on the
Smooth Operator Stone Knot page.
Connect the Safety Carabiners.
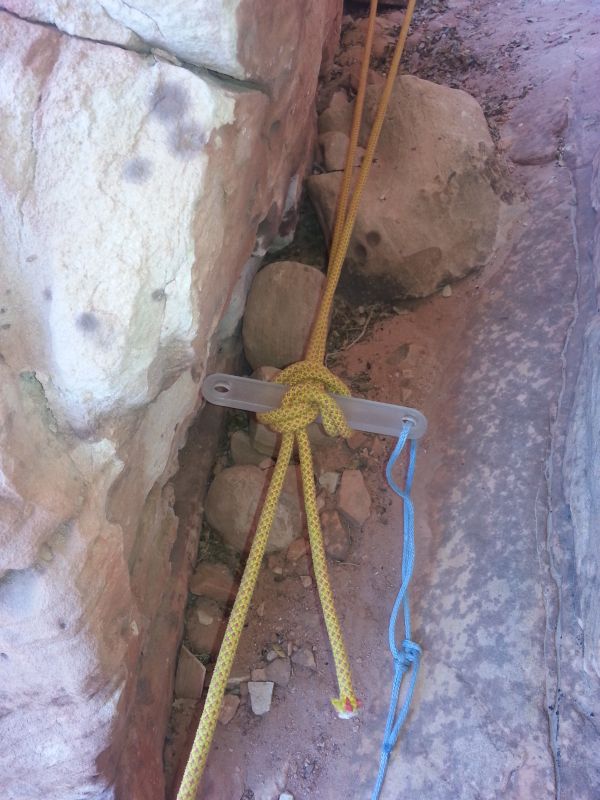
 Smooth Operator in the stone knot with both safety carabiners
attached. This prevents the Smooth Operator from pulling in either
direction.
Smooth Operator in the stone knot with both safety carabiners
attached. This prevents the Smooth Operator from pulling in either
direction.
After the stone knot has been cinched down, clip a carabiner in each
of the holes of the Smooth Operator then clip each of them to one of the
strands of rope above the knot. This keeps the Smooth Operator securely locked in the stone knot
preventing pull in either direction.
While both safety carabiners are in place the Smooth Operator can
not be pulled from the stone knot in any direction.
The last man down will need to remove both safety carabiners before
beginning their rappel and will need to be monitor their movements
to prevent an accidental pull.
Note:
This is the portion of the operation where the Smooth Operator
differs from the Fiddlestick.
A Fiddlestick does not have holes
at each end. Rather than attach safety carabiners at each end
the technique used with the Fiddlestick is to place a carabiner inside the
stone knot with the stick then clip it to the rope. To remove the
safety carabiner the last man needs to loosen the stein knot to remove the
carabiner then re-cinch the stein knot. Loosening the re-cinching the
stein knot creates a situation where the last man down is rappelling on a
knot that has been partially re-rigged before rappelling. Rappelling
on a partially re-rigged knot is similar to rappelling on partially tested
rigging.
The Smooth Operator has
elongated holes in each end and is rigged as shown above with one carabiner
in each hole then individually clipped to separate ropes above the stein
knot. Before the last man rappels they must remove both safety
carabiners. Removing the safety carabiners from a Smooth Operator does
not interact with or effect the knot in any way. The stein knot (stone
knot) remains tightly cinched from the previous rappellers. The last
man down then rappels on a stein knot that has been cinched and tested by
previous rappellers - and has been left undisturbed before the last man
begins the rappel.
Rather you use the Smooth Operator
or the Fiddlestick the last man down will remove all safety carabiners then
rappel.
Below is a quick video
showing the difference in rigging between a Smooth Operator and a
Fiddlestick.
Tie the pull line to the Smooth Operator.
Do not use a pull line that weighs
more than 8 pounds, the lighter the pull cord the better. Anything more than 8 pounds is not safe. Ropes
or 6mm cords are good for most drops, but for very long drops
1/8 inch Dyneema may be a good choice since it is much
lighter. For information on why
I decided on this rule see the page about Smooth Operator
pull forces. Weigh your ropes at home and see what you have.
Some rappel ropes can weigh 8 pounds or more for a 200 foot length.
CAUTION: Keep in mind that wet and sandy ropes will
add weight to the ropes dry weight.
If using Dyneema cord as the pull line:
Some people like the 1/8 inch Dyneema pull line which is thin and
light (but strong) compared to ropes or most pull cords. There are a couple of downsides to using the Dyneema cord.
Dyneema has a low melting point (about 300 degrees Fahrenheit) so it cannot be used
as an emergency rappel rope nor can it be used for lowering.
The heat caused from friction during rappelling or lowering can melt
the Dyneema causing a catastrophic failure. However
Dyneema is awesome for a Smooth Operator pull line.
Dyneema cord is slick! Overhand knots and
double fisherman knots have been known to slip undone when tied with
Dyneema cord. For Dyneema pull cords the preferred knot is a bowline
with a couple half hitches tied in the tail to back it up. I
have not yet found a universally accepted knot for use with Dyneema
cord and use the bowline because it was recommended to me and has
been working very well.
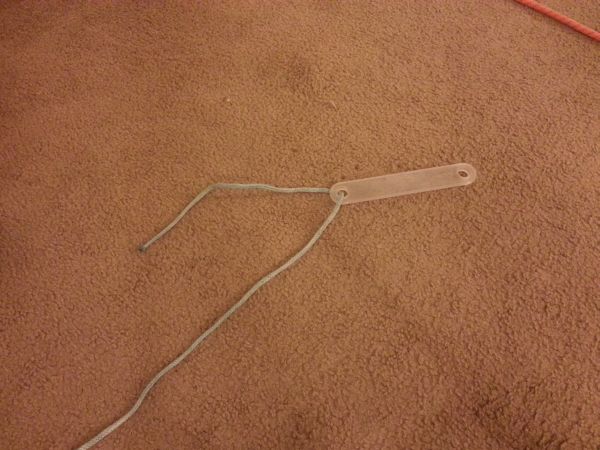 1.)
Insert the end of the pull line through the hole in the
Smooth Operator.
1.)
Insert the end of the pull line through the hole in the
Smooth Operator.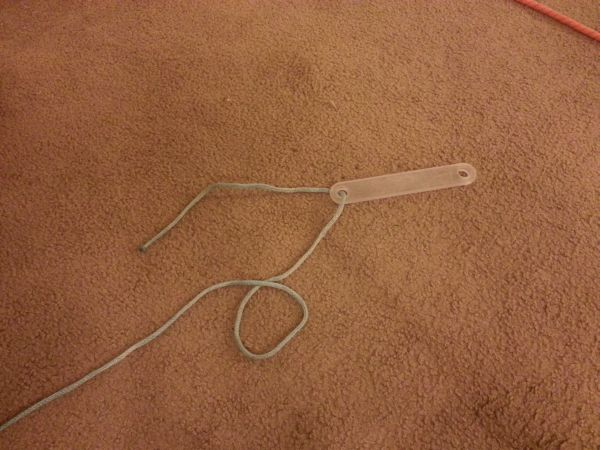 2.)
Form a loop in the pull side of the line.
2.)
Form a loop in the pull side of the line.
 3.)
Pull a bight of the pull side of the line through the loop.
3.)
Pull a bight of the pull side of the line through the loop.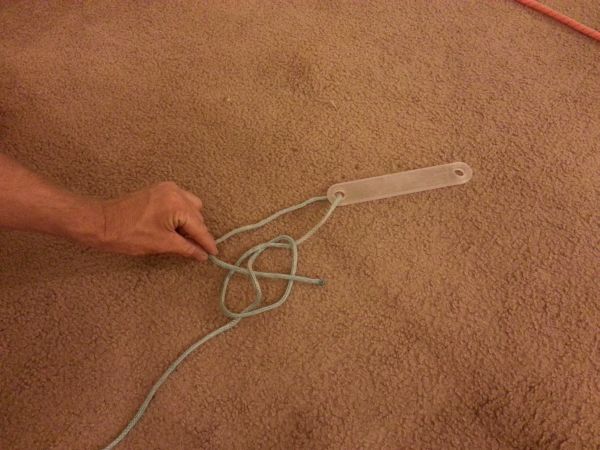 4.)
Insert the tail of the rope through the bight you pulled
through. Do not insert the tail through the loop, just through
the bight.
4.)
Insert the tail of the rope through the bight you pulled
through. Do not insert the tail through the loop, just through
the bight.
 5.)
Pull on the pull line and the Smooth Operator to tighten the bowline
knot. Note it does not yet look like a bowline knot.
5.)
Pull on the pull line and the Smooth Operator to tighten the bowline
knot. Note it does not yet look like a bowline knot.
 6.) As the knot is cinched down it will roll upward and fall take
the shape of a bowline knot. You may need to use a finger to
assist the knot in flipping up.
6.) As the knot is cinched down it will roll upward and fall take
the shape of a bowline knot. You may need to use a finger to
assist the knot in flipping up.
After the bowline is tied it is a good idea to add a backup to the
bowline by using the tail to tie an overhand knot around part of the
bowline. I did not show this step in the pictures.
Here is a video of the bowline being tied in the Dyneema cord.
If using a larger diameter pull cord or rope:
Larger rope and pull cords are not slick like Dyneema so most knots
work well. While most knots work well for larger ropes and
pull cords the bowline is still the go to knot.
But it is important to cinch the bowline knot down
tight. A loosely tied bowline knot tied in stiff rope then pulled
through a constriction during the pull can act as a slip knot and
cinch up to the Smooth Operator creating a larger profile and
increasing the risk of getting they system stuck. If this happens
the bowline knot will still be secure and continue to hold. To
prevent the bowline knot from cinching, make sure it is tied
tightly.
Here is a video showing how a loosely tied bowline knot in stiff
rope can act as a slip knot when pulled through a constriction.
The bowline knot is an easy knot to tie after you practice it a
little.
 1.)
Insert the end of the pull line through the Smooth Operator.
1.)
Insert the end of the pull line through the Smooth Operator.
 2.)
Form a loop on the standing end (not the tail end).
2.)
Form a loop on the standing end (not the tail end).
 3.)
Fold the loop over and pull a bight of rope through. The rope
pulled through should be the standing end (not the end toward the
Smooth Operator).
3.)
Fold the loop over and pull a bight of rope through. The rope
pulled through should be the standing end (not the end toward the
Smooth Operator). 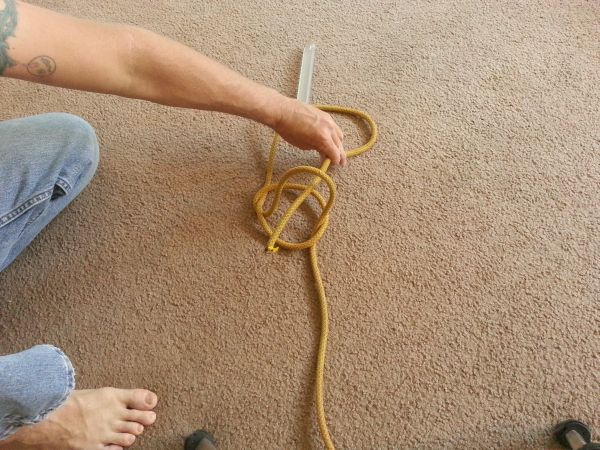 4.)
Insert the tail of the rope through the bite. Do not place the
tail through the loop but only through the bite of rope.
4.)
Insert the tail of the rope through the bite. Do not place the
tail through the loop but only through the bite of rope.
 5.)
Begin to cinch the knot down by pulling on the standing end.
5.)
Begin to cinch the knot down by pulling on the standing end.
As the knot starts to tighten up it will not look like a bowline
knot..... yet.
 6.)
As the knot is tightened further it will want to roll upward
toward the Smooth Operator and form into a bowline knot. You
may need to assist the knot in rolling upward. Continue to
tighten the knot by pulling on the standing end. At the
same time use your other hand to help roll the knot over up
toward the Smooth Operator.
6.)
As the knot is tightened further it will want to roll upward
toward the Smooth Operator and form into a bowline knot. You
may need to assist the knot in rolling upward. Continue to
tighten the knot by pulling on the standing end. At the
same time use your other hand to help roll the knot over up
toward the Smooth Operator.
 7.)
After the knot has rolled upward it will take on the familiar
bowline knot shape. Cinch down the knot tightly by pulling on
all four strands.
7.)
After the knot has rolled upward it will take on the familiar
bowline knot shape. Cinch down the knot tightly by pulling on
all four strands.
 8.)
Tie a backup in the tail by adding a half hitch around part of the
loop. I prefer to tie the overhand so that the tail ends
pointing up toward the Smooth Operator. This is kind of like tying
a stopper knot.
8.)
Tie a backup in the tail by adding a half hitch around part of the
loop. I prefer to tie the overhand so that the tail ends
pointing up toward the Smooth Operator. This is kind of like tying
a stopper knot.
 9.) Cinch down the overhand / stopper knot backup and the bowline
knot.
9.) Cinch down the overhand / stopper knot backup and the bowline
knot.
Video of how to tie the bowline knot on the Smooth Operator using rope.
There are other knots that work well for attaching a rope to a
Smooth Operator. For some information on how to tie some of
these check out Smooth
Operator Pull Cord Knots page.
Rather using the bowline knot or one of the other knots, leave at least 4 inches of
tail on the knot after it is tied. Make sure the tail is short
enough that it cannot extend up to the Smooth Operator when the rope is
being pulled. Keeping the tail so it will not reach the
Smooth Operator during pull will reduce the chances of the tail and the
Smooth Operator trying to feed through a constriction at the same time.
In order to leave the tail at least 4 inches long and still not
reach up to the Smooth Operator during the pulling process a larger loop
is made in the rope where tied to the Smooth Operator.
Throw the rappel rope over the drop.
The safest time to throw the rappel rope over the drop is after the
Smooth Operator has been inserted in the stone knot, both safety
carabiners have been inserted and the pull line has been attached.
Adding a Backup.
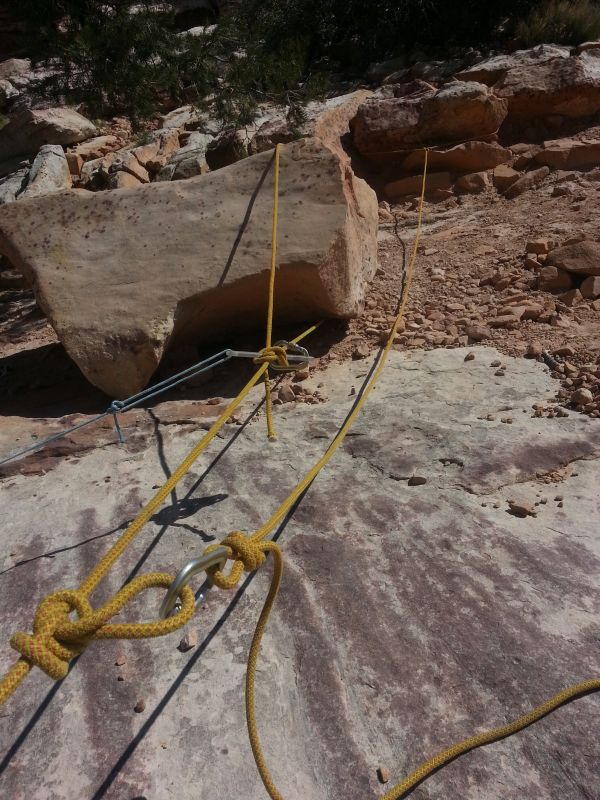 To backup the Smooth Operator tie a an alpine butterfly knot on the
rappel rope then clip another rope into the loop and attach it to a
backup anchor. Note the main rope is loaded while the backup
line has a small amount of slack.
To backup the Smooth Operator tie a an alpine butterfly knot on the
rappel rope then clip another rope into the loop and attach it to a
backup anchor. Note the main rope is loaded while the backup
line has a small amount of slack.
In some cases you may be unsure about your chosen anchor and want to
test it. If this is the case backing up the
anchor is a good idea for the first few people. To add a
backup to the Smooth Operator system, tie an alpine butterfly knot in the
rappel rope just below the stone knot. The loop created by the
alpine butterfly can be used to backup the system. A separate
rope is then clipped to the loop in the alpine butterfly and tied to
another anchor or to a person as a backup.
When setting the backup rope, remember you do not want it too tight
or too loose. If the backup rope is too loose and the main
anchor fails the backup anchor will experience a shock load.
If the backup rope is too tight it will share the load with the
main anchor which will not test the anchor. Set the backup
rope so it has as little slack in it as possible while still not
taking on any of the load.
A backup system, if used, is for all but the last man. The
last man down will need to remove the backup system before
rappelling.
Observe the Smooth Operator as the first person rappels.
As the first person starts the rappel, those at the top can watch the stone knot and
Smooth Operator. Ensure the stone knot cinches down well under
load and that the Smooth Operator is placed well. Also watch the
Smooth Operator to see if it
bangs into things or if it twists. Banging into things could
force Smooth Operator into an unsafe configuration. If the
Smooth Operator and stone knot twist a lot this could create a tangle in
the rappel rope or pull line making for a difficult or impossible
pull. If you do not feel comfortable with the way the
Smooth Operator is behaving try rearranging things
a bit.
Deploy the Pull Line.
The pull line should be dropped to the bottom of the rappel and
can be thrown or carried down. The pull line should be set in
place before the last person goes down and while the safety
carabiners are still rigged in the Smooth Operator. If
the rappel is convoluted with stages, vegetation choke stones or other
obstructions, consider carrying the pull line down and setting it in
place.
To keep things neat and clean it is good practice for the next to
last person to set the pull line. The last man should not have
to do anything to the pull line other than avoid it while on rappel.
Last Man Down.
The last person to rappel has had the opportunity to watch the
performance of the Smooth Operator and stone knot while everyone else in the party has
rappelled on it. The stone knot has also been cinched tighter
and tighter on the Smooth Operator with each person who rappelled
before.
Before rappelling, the last person removes both safety carabiners from
the Smooth Operator and ensures the Smooth Operator is centered in the stone
knot. It can be easy to forget to do this. If
you forget to remove the carabiners you will not be able to pull the
rope or pull line down!
 Last person removes both safety carabiners then rappels down.
The last person should not have to do anything with the pull
line.
The pull line should have already been set by those
who rappelled first.
Removing the safety carabiners makes it possible to pull the
Smooth Operator out from the bottom of the rappel so the last person
should be careful not to accidentally pull on the pull line
during rappel.
After removing both safety carabiners the last person rigs their
rappel device to the rope then checks to be sure the tail of the
stone knot and the pull line are unobstructed and tangle free, then
rappels. While rappelling,
avoid interacting with the pull line, the previous person should
have already placed it where it needs to be.
Caution:
With the Smooth Operator technique the moment of greatest risk is
while the last man is on rappel and
the rope is unweighted during the rappel. Once the safety
carabiners have been removed there is potential for the Smooth
Operator
to be accidentally pulled from the knot. The last man
down needs to pay careful
attention to their actions. The
Smooth Operator is very difficult to pull from the stone knot while the
rappel rope is weighted with the weight of the rappeller. The
Smooth Operator is much easier to pull free while the rope
is not weighted. While rappelling last, pay attention to
situations where the rope will become unweighted. If you stand
on a ledge to readjust things, are crossing a pothole or long
vertical section on a multi stage rappel you will likely unweight
the rope at some point. While the rope is unweighted try to
use smooth movements and avoid doing things that will pull on the
pull line or create significant movement in the rope at the top up
by the Smooth Operator.
Pulling the System Down after rappel.
After everyone is down it is time to do the fun part, pull the
Smooth Operator out. Be
sure the rappel rope is unweighted (it is very difficult to pull
Smooth Operator from the stone knot when weighted). Start pulling
on the pull line with a slow steady force and begin increasing the
force until you feel the Smooth Operator pop out of the Stone knot.
When the Smooth Operator pulls free it will sometimes fly out of the
knot and over the rappel sailing to the bottom. Don't look up
at the wrong moment..... no one likes getting hit in the eye with a
Smooth Operator.
The pull line will fall separately from the rappel rope. After the pull
line has been pulled, pull the rappel rope. The rappel rope
should pull very easily since only a few feet of rope needs to be
pulled around the anchor before the rope falls. In some cases
the rappel rope will fall at the same time the pull line is pulled.
Note:
When using 1/8 inch Dymeema pull line, be aware it
can tangle. If both the rappel rope and the Dyneema pull line
fall at the same time they can easily get tangled if not treated
properly. If the rappel rope does not fall when the Dyneema
line is pulled, consider getting the Dyneema pull cord put away
before pulling the rappel rope down. This may prevent a
frustrating situation where the two become tangled.
Put your Smooth Operator away.
Congratulations you have just Went Smooth off a rappel.
The Smooth Operator does not have a permanently attached cord.
One of the advantages of this is making it easier to stow when not
in use while in canyon. A permanently attached cord can get
caught on things so most people wrap the cord around the stick then
put it in their pack. With no permanently attached cord simply
clip the Smooth Operator to a carabiner on your harness and go.
When the Smooth Operator is needed again it is on your harness and
easily accessible (not zipped up in a pack pocket).