Stone Knot for Smooth Operator
- Smooth Operator is the -
-
BluuGnome Version of the Fiddlestick -
Stone Knot (aka Stein Knot)
When the Smooth Operator is rigged for rappel it is placed in a stone
knot. There are a few variations of the stone knot.
The one described here is the stone knot tied in the UP position.
The stone can also be tied in the DOWN position, but is not
recommended.
Note:
Both the UP and the DOWN position
stone knot can be made to work equally well, in fact it is
essentially the same knot just with a different end held up toward
the rappel.
The process of tying the stone knot in the UP position is more
likely to put the knot in a configuration that is NOT prone to
sticking.
The process of tying the stone knot in the DOWN position is more
likely to put the knot in a configuration that IS prone to sticking.
Either the UP or the DOWN version of the knot can be worked into a
configuration where it will not stick.
But the user may need to put a little more effort into the tying
process to make the DOWN version work reliably.
With that in mind it is good practice to always tie the stone knot
in the UP position.
The reason for the UP stone knot being preferred will be more clear
after you have read this page and watched the videos.
Tying the stone knot for use with a Smooth Operator in the UP
position.
1. Wrap the rope around an anchor.
2.
Make a loop in the rope with a twist of your hand.
3.
Fold the loop up so you can draw a bight formed by the two strands
above the knot through the loop you just made.
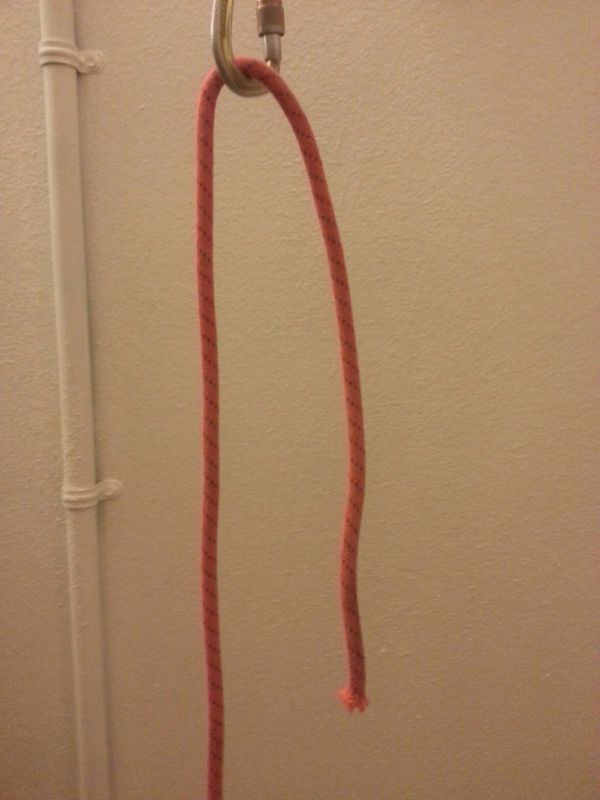 Wrap the rope around the anchor.
The carabiner represents the anchor.
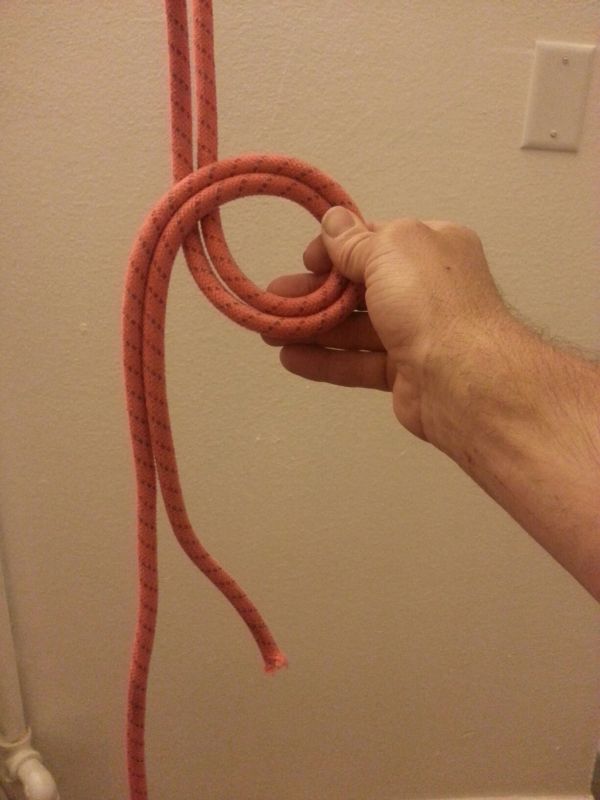 Make the loop by twisting the rope.
 Fold the loop up so the two strands above
the knot can be pulled through the loop.
Fold the loop up so the two strands above
the knot can be pulled through the loop.
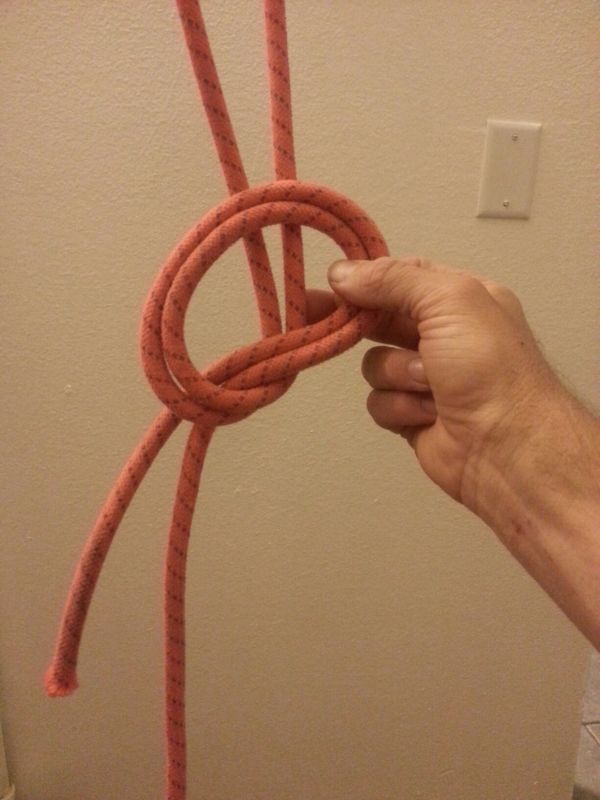
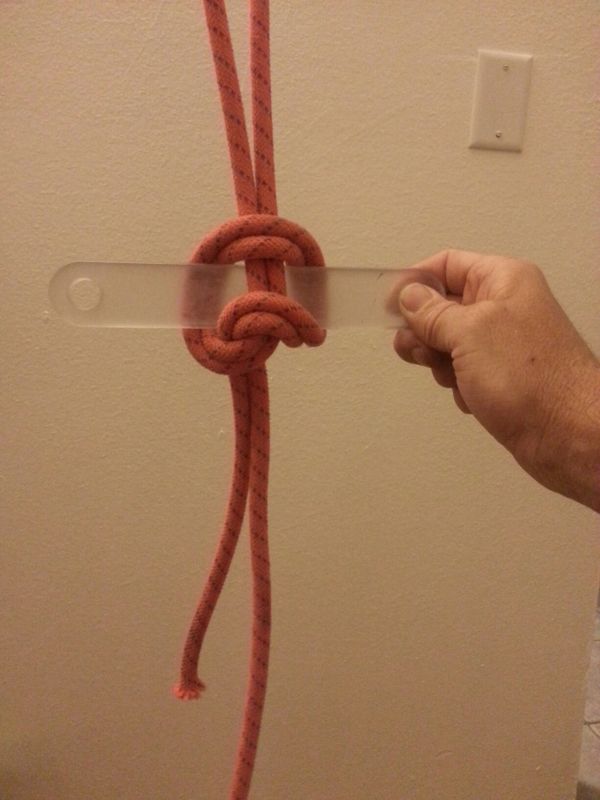
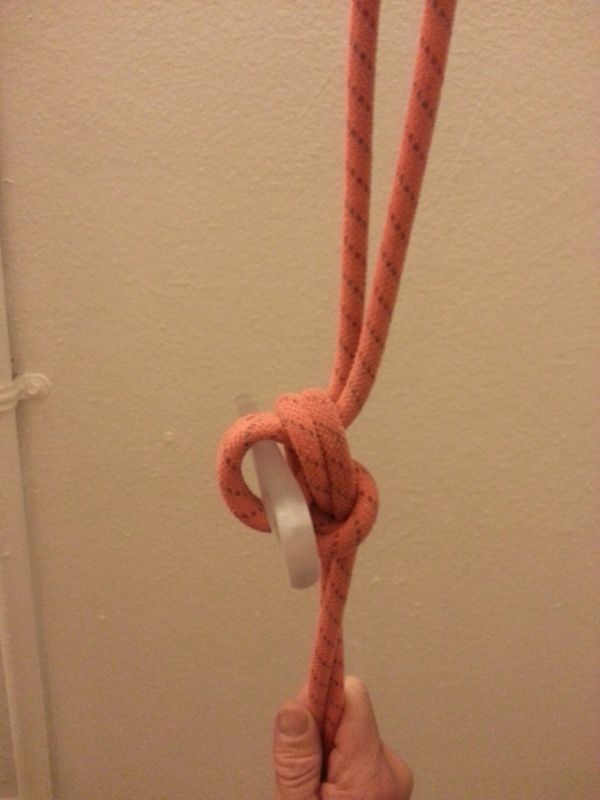
4. Place the Smooth Operator through the loop made by the middle two
strands.
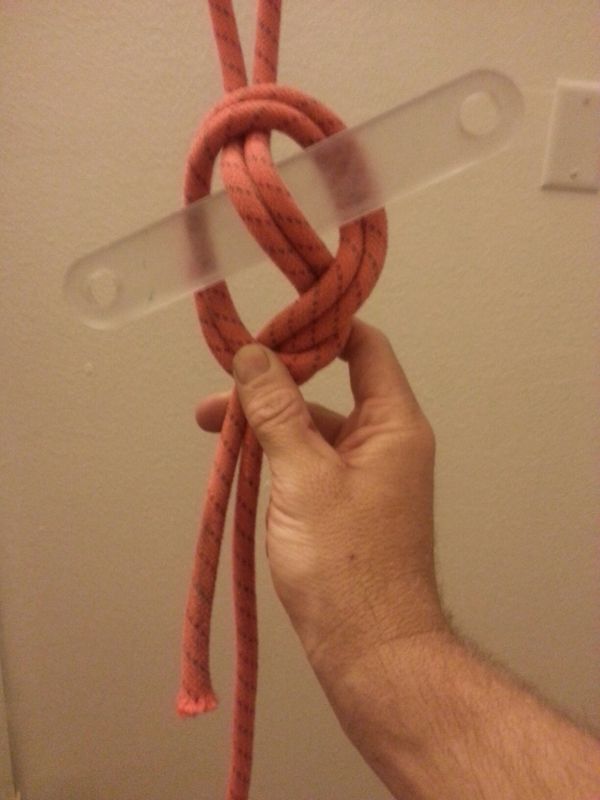
5. Cinch down the knot. It is important to make
the center two strands flat while the outer strands wrap around the
Smooth Operator.
 Place the Smooth Operator through the loop that was pulled through the
loop. The Smooth Operator should be placed as shown to keep the
center two strands in the loop.
Place the Smooth Operator through the loop that was pulled through the
loop. The Smooth Operator should be placed as shown to keep the
center two strands in the loop.
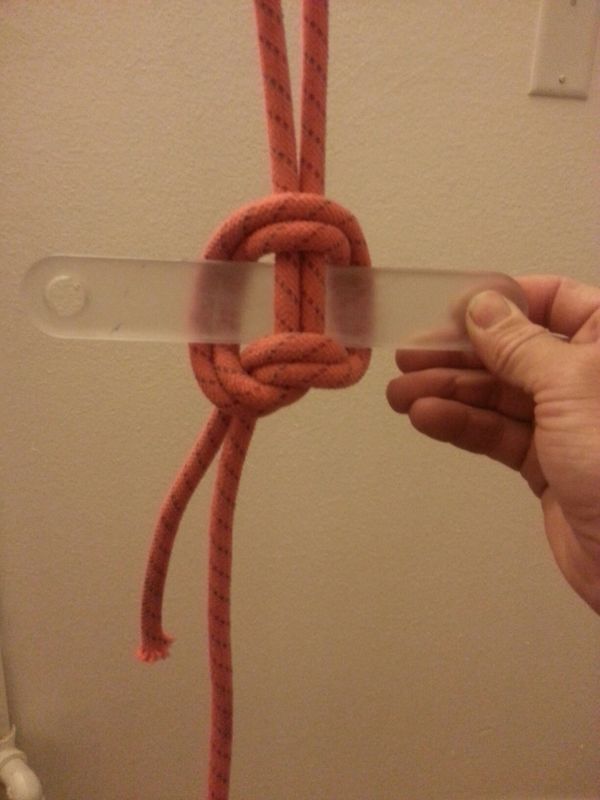 Cinch the knot down on the Smooth Operator. While cinching the
knot down be sure the center two strands are flat as shown and the
outer strands bend to wrap around the stick.
Cinch the knot down on the Smooth Operator. While cinching the
knot down be sure the center two strands are flat as shown and the
outer strands bend to wrap around the stick.
If you tie the stone knot as shown and are sure to keep the center
two strands flat the release of the stone knot will release reliably.
The DOWN version of the stone knot is tied the same way with one
difference. When folding the loop so that two strands can be
pulled through the loop, fold the loop downward so the two strands
below the knot can be drawn through the loop. The Up and down
versions are the same knot but are suspended from the opposite ends
of one another. If you were to tie a DOWN version
of the stone knot then spin it around upside down, you would have an
UP version of the knot.
 When folding the loop to pull the lower strands through the loop the
stone knot will be tied in the DOWN position.
When folding the loop to pull the lower strands through the loop the
stone knot will be tied in the DOWN position.
As noted above, when tying a stone knot for use with a Smooth
Operator
it is good practice to always tie the stone knot in the UP position.
Avoid tying the stone knot in the down position. But before trying to explain why the UP version is preferred over the
DOWN version it is important to note a finer point of tying the
stone knot for use with a Smooth Operator.
Keeping the center strands of the stone knot straight is
very important when using the Smooth Operator. It is very important to
be sure the center two strands of the stone knot are as straight as
possible (not bending around the Smooth Operator) and let the outer
strands wrap around the stick instead.
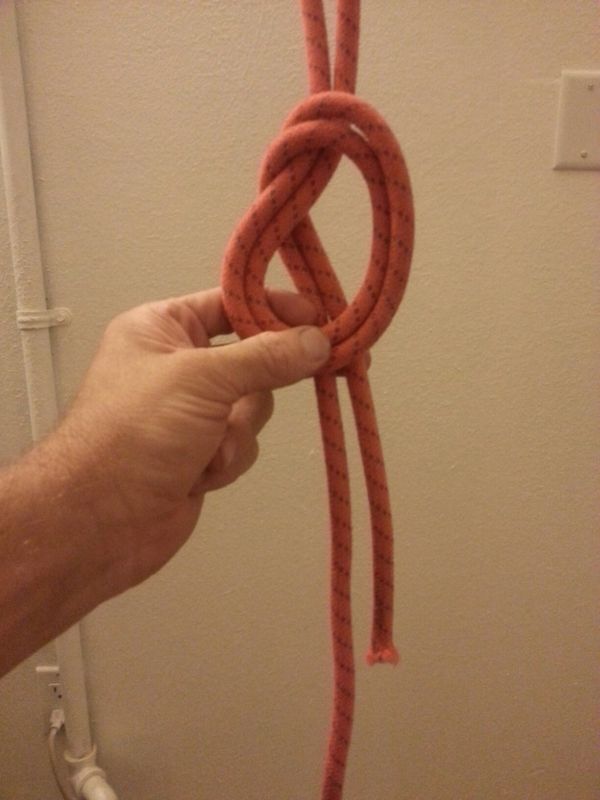
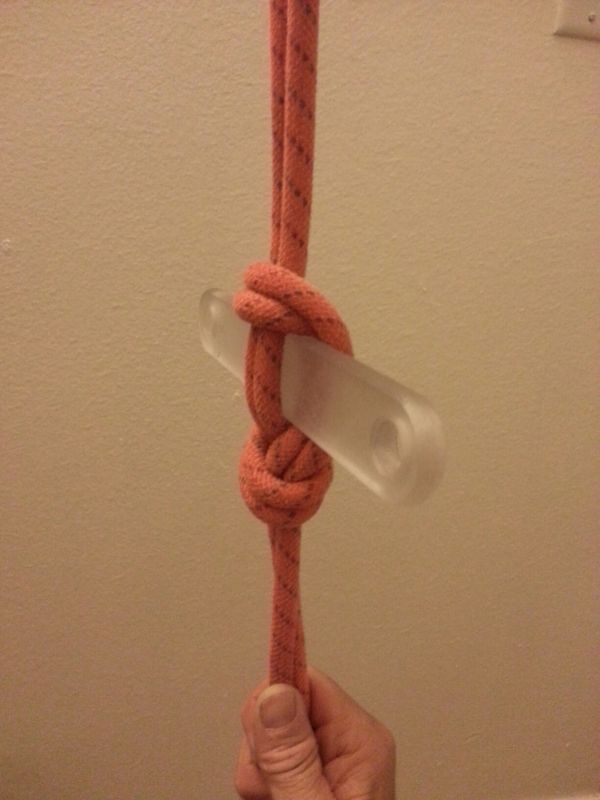
 Front view of a stone knot tied with the center strands flat.
The outer strands bend to wrap around the Smooth Operator.
Front view of a stone knot tied with the center strands flat.
The outer strands bend to wrap around the Smooth Operator.
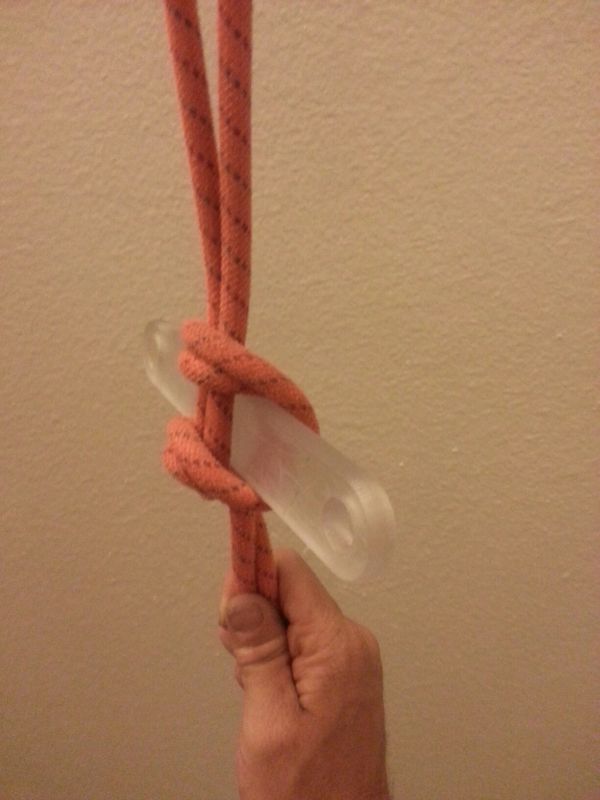 Side view of a stone knot tied with the center strands flat.
The outer strands bend to wrap around the Smooth Operator.
Side view of a stone knot tied with the center strands flat.
The outer strands bend to wrap around the Smooth Operator.
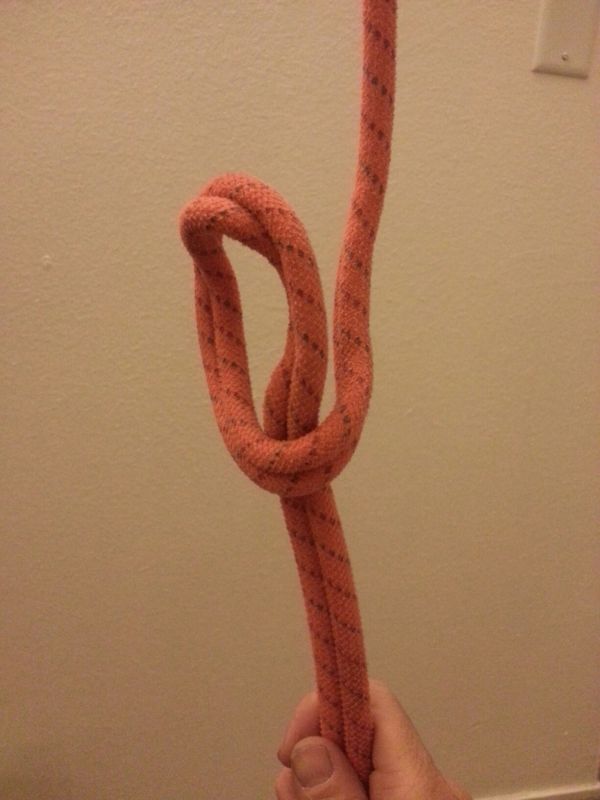
Below shows the stone knot tied improperly. A bight can be
formed if the center strands are allowed to wrap around the
Smooth Operator. The bend shown is a slightly exaggerated to
demonstrate what can happen. If you are not paying attention to
this when tying the stone knot it is possible to make a bight more
severe than the one shown. Notice the bight left behind after the
Smooth Operator is removed. Pulling
this bight through the stone knot can be difficult and can become
extremely difficult or impossible with wet, sandy ropes or
when pulled over a sharp edge.
 Side view of a stone knot tied with the center strands wrapping
around the Smooth Operator forming a bight.
Side view of a stone knot tied with the center strands wrapping
around the Smooth Operator forming a bight.
 The bight remains after the Smooth Operator has been removed.
 As the rope is pulled from the bottom of
the rappel the stone knot may cinch down on the bight making the
pull very difficult.
As the rope is pulled from the bottom of
the rappel the stone knot may cinch down on the bight making the
pull very difficult.
Below shows the stone knot tied properly with the center strands
flat and the outer strands bending around the Smooth Operator.
When tied in this manner the stone knot releases and falls apart
easily. Notice how the knot looks like nothing more than a
couple of bends after the Smooth Operator is removed. After the
Smooth Operator has been removed it takes very little pull on the rope
to straighten the loops and allow the rappel rope to be pulled
around the anchor.
 Side view of a stone knot tied properly with the center strands
straight. The outer strands wrap around the stick.
Side view of a stone knot tied properly with the center strands
straight. The outer strands wrap around the stick.
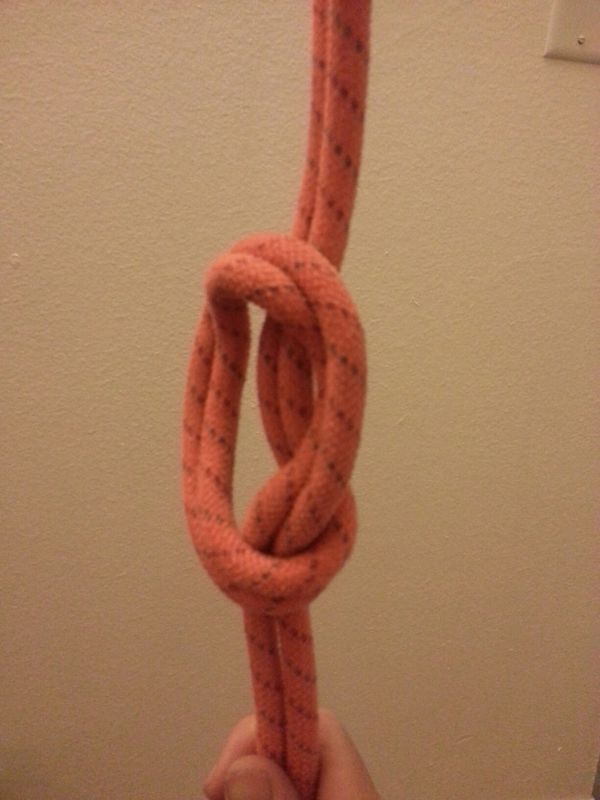 After the Smooth Operator is removed the stone knot looks like a couple
of bends in the rope.
After the Smooth Operator is removed the stone knot looks like a couple
of bends in the rope.
 Very little force is required to straighten the bends and allow the
rope to be pulled around the anchor for retrieval..
Very little force is required to straighten the bends and allow the
rope to be pulled around the anchor for retrieval..
So why is it best to always tie the stone knot in the UP
position?
The answer is in how the user interacts with the knot while cinching
the knot down. With extremely supple rope the stone knot can
be cinched by simply pulling down on the lower strands. If the
rope is supple enough to cinch down completely by just pulling down
on the center strands below the knot then the stone knot cinches with approximately
equal bending by the center strands and the outer strands.
Below are two videos showing an UP stone knot and a DOWN stone knot
being cinched in this manner and the resulting bends in the stone
knot.
Stone knot tied in the UP position and cinched by pulling only on the lower strands.
Stone knot tied in the DOWN position and cinched by pulling only on the lower strands.
Most ropes however are not so supple and more effort needs to be put
into cinching down the stone knot. The most natural way to get
a good cinch in a hurry is to place a hand over the top of the knot
with the upper strands running between your fingers, then pull down.
If you do this while also pulling down on the lower ropes the knot
is more likely to cinch correctly. However in some cases a
user can pull down on the knot while applying little to no force on
the lower ropes. It is this motion where the trouble gets introduced when tying the
stone knot in the DOWN position.
If the stone knot is tied in the DOWN position and you cinch the
knot by pulling down on the top of the knot and not pulling on the
lower strands, the stone knot naturally cinches with the
center strands forming a bight and the outer strands remaining
pretty straight. This can make pulling the stone knot free
from the bottom of the rappel difficult. Below is a video
demonstrating this.
Stone knot tied in the DOWN position and cinched by pulling down on the top of the knot only.
If the stone knot is tied in the UP position and you cinch the knot
by pulling down on the top of the knot and not pulling on the lower
strands, the stone knot naturally cinches with the center
strands remaining pretty straight and the outer strands bend to wrap
around the stick. Below is a video demonstrating this.
Stone knot tied in the UP position and cinched by pulling down on the top of the knot only.
ALWAYS tie the stone knot in the UP position.
The stone knot can be made to work reliably if tied in the UP or the
DOWN position IF you always make sure the center strands are
straight and not bent into a bight. This takes more attention
to detail when tying the stone knot in the DOWN position.
If you tighten the DOWN version of the stone knot by pulling down on
the lower strands it will usually be ok. However if you
tighten the DOWN version of the stone knot by only pulling down on
the top of the stone knot you will likely create the dangerous bight
in the center strand and you will need to work the knot to remove
the bight.
If you always tie the
stone knot in the UP position, you increase the odds of the knot
naturally falling into a configuration that allows the knot to fall
apart easily after the Smooth Operator is removed. No matter how you cinch the UP version of the stone
knot the center strand remains relatively straight and does not form a bight.
The videos below demonstrate how the stone knot pulls apart when
tied in the various ways. Rather the UP or DOWN version of the
knot is tied the stone knot will release easily IF the center
strands are kept straight and do not form a bight. If a bight
is formed in the center strands, that bight will need to be pulled
through the stone knot after the Smooth Operator has been pulled out of
the knot. Pulling the bight can be very difficult with wet
sandy ropes or when the rope is pulled over edges or around corners.
Smooth Operator rigged in an UP stone knot with center strands straight
showing how it easily releases when the Smooth Operator is removed.
Smooth Operator rigged in an DOWN stone knot tied center strands
straight showing how it easily releases when the Smooth Operator is
removed.
Smooth Operator rigged in an UP stone knot tied center strands forming a
bight showing the difficulty of release when the Smooth Operator is
removed.
Avoiding twisted ropes - a finer point.
After removing the Smooth Operator from the stone knot the
rope is ready to be pulled down from the bottom of the rappel. When
pulling, the short end of the rope will need to travel up and around the
anchor before falling over the rappel. There are circumstances where a
single twist in the rope can cause the pull to become difficult or
impossible. Most people have at one time or another had difficulty
pulling their ropes and found that after taking a twist out of the rope the
pull becomes very easy. With that in mind keeping twists out of the
rope can be important in some situations.
With most knots it is good practice to dress the knots
well and have no extra twisting inside the knot. Doing this makes the
knot stronger, reduces tangling and makes the knot easier to visually
inspect.
The stone knot when used with the Smooth Operator is
counter intuitive when it comes to rope twists. In the examples above
on tying the stone knot the ropes were kept dressed well within the knot to
make the pictures easy to follow visually on this page. However if you
dress a stone knot well and make sure there are no twists within the knot you
WILL have a 360 degree twist in the rope after the Smooth Operator has been
pulled and the stone knot undone.
In most cases the single twist will not be much of an
issue. In a few cases it could mean the difference between an easy
pull and getting your rope stuck. With that in mind it is good to know
how to tie the stone knot so it will not be twisted when released. Making
a point of tying it that way to form a habit may serve you well.
To keep the twists from appearing after the stone knot
is undone there needs to be twists inside the knot. Unfortunately this
makes the knot difficult to visually inspect for rope twist issues. With
the added twists inside the knot it is difficult to visually make sense of
it. Trying to manually add the twists into the knot can be problematic
since it is possible to introduce the twists in the wrong direction adding to the twist effect after releasing the stone knot.
The simplest solution seems to be is keeping the
rope held in position with one hand and tying it with the other hand.
While tying the stone knot this way you need only be sure that any generated
twists are forced into the knot and not allowed to migrate outside the knot
while cinching. This is difficult to put into words and a set of
pictures. Hopefully the below video will help clarify this.