Canyoneering Route Description
Hidden Canyon - 3A III
Zion National Park, Utah.
10-11-08, 4 people, 1 Day (Travel time in route 8.5 hours)

Time Required - 7.5 to 9.5 hours
Distance - 5.8 miles Total, 1.7 miles Technical
Rappels - 7 Rappels, Longest Rappel 100 feet.
Elevation Range - 6880 - 4360 Feet
Shuttle Required -Yes 21.5 Miles Vehicle - Passenger
(maybe a little extra clearance)
Permit Required - Yes
Rappelling and anchor gear, Ropes and or pull cords for rappels up
to 100 feet and 50 feet of 1 inch webbing for sling placement.
WARNING
It has been brought to my attention that the trail system has
changed since I had written the route description back in 2008.
On July 12, 2014 I decided to take a hike to go investigate. I
found that the trails have indeed changed and the old trail is very
difficult to locate since it has been covered over and camouflaged
to allow the regrowth of vegetation. I have updated this route
description July of 2014 to reflect the changes and left notes about
the old trail system to help reduce future confusion.
I have heard stories of people following this route description and
accidentally dropping into Grotto Canyon. The confusion was
due to the trail system being changed and not matching with the
route description. The new trail system route make Hidden
Canyon just that..... Hidden. Since the new trail system makes
Hidden Canyon difficult to see it can be easy to just keep walking a
long ways until you see Grotto Canyon off in the distance and
mistakenly think it is Hidden Canyon.
Please be aware that things change over time. Man can move
trails or anchors and mother nature can re-arrange things.
Nothing is forever. While navigating your way to, through and
out of a canyon, there is only one person who is ultimately
responsible for your safety, including proper navigation. That
person is YOU!
While navigating to a canyon, use GPS, map, satellite imagery,
written beta or any other navigation technique you prefer.
While navigating keep track of where you are and where you are
trying to go. I try to be as accurate as possible and strive
to give directions that can be followed with or without GPS, but
this is NOT a substitute for using your own navigation skills to
double check things to be sure you are dropping into the correct
canyon.
For details on the new route and notes about what the old route was,
see the approach portion of this route description and refer to the
accompanying maps.
Hidden Canyon is a fun and scenic canyon with little to no water.
Good choice for cooler weather as the season comes to a close (at
least for those that do not like cold weather).
The route description here is for starting from the Stave Spring
Trailhead. I have not found an official name for the trailhead
but some rangers refer to it as Stave Springs. You could also start the route from the Weeping
Rock Trailhead to make this a loop route but would add a lot of distance to
your approach and significant elevation gain.
This canyon does not have the typical sandstone slot that a lot of
the Zion canyons have. Don’t let that discourage you from doing
this canyon thinking it isn’t as scenic as others in Zion. This
canyon has a charm all its own. Other than the 7 rappels, you will
spend a lot of time down climbing as you descend the canyon.
There are also a couple nice arches along the route.
To get to the Trailhead
Note:
These directions are for the Stave Springs Trailhead entry.
Other possible starting points would be the East Rim trailhead
or the Weeping Rock trailhead. If Weeping Rock is used there is
no need for a shuttle since you start and finish in the same
place but the approach route will be longer and have a
significant increase in elevation gain.
The last part of the drive into Stave Springs Trailhead is dirt
but is usually passable by passenger car.
From the East Gate of Zion National Park, travel 2.4 miles east
on highway 9 to the turn for North Fork (wEngDP-01) and turn
left (north) onto the North Fork Road. Follow the paved
North Fork Road for 5.3 miles to the turn for the Ponderosa
Ranch (wEngDP-02) and turn left (west) to go into Ponderosa
Ranch.
As you enter the Ponderosa Ranch follow the paved road staying
right at all turns. About 1000 feet after entering
Ponderosa Ranch the paved road will end and a dirt road will
begin (wEngDP-03).
Follow the dirt road 0.3 miles to a junction with a sign for
observation point (wEngDP-04), at this junction continue to the
right / straight ahead to continue west following the sign
toward Observation Point. About 0.22 miles farther is a
Tee in the road (wEngDP-05) where you will turn left (southish)
and not follow the sign to Observation Point. About 100
feet past the left turn is a fork in the road where you will
take the right fork. Drive about 0.6 miles to a triangular
junction (wHiddnDP01) and turn left. In about 200 feet you
will Tee into Pine Street where you will turn right to travel
west on Pine Street. Drive west about 0.5 miles to the
Stave Springs Trailhead (tStaveSpring).
Just before reaching the trailhead is a gate as you re-enter the Zion Park boundary.
You can drive past the gate, but be sure to close the gate
behind you. If there is rain fall the last section of road from the gate to the trail head may be difficult for some vehicles. If that is the case find a convenient place to park near the gate and walk to the trailhead. Keep in mind this is private property and try to be thoughtful when choosing a parking spot.
To leave the Exit Vehicle / Escape Pod
The exit vehicle can be parked at the visitor center. Once the
route is complete, take the Zion shuttle to the visitor center
to the exit vehicle.
GPS coordinate information listed at the bottom. For information about waypoint naming and map symbols, refer to the
Glossary page.

Click the links for maps of the route.
Map of the drive into the route.
Map of the entire route.
Map of the technical section.
Map of the OLD trail and the NEW trail differences.
The Approach:
From the Stave Spring Trailhead (tStaveSpring), follow the trail west
about 0.6 miles to the junction with the East Rim Trail (jStaveEastRimTrl). At the
junction for the East Rim Trail, turn left and continue south on
the East Rim Trail.
About 0.3 miles farther is another
trail junction (jDeerTrpMntTrl). At this junction turn right
and walk south on the Deer trap Mountain Trail.
About 1.1 miles farther will be the junction for the Cable Mountain
trail (jCableMntTrl). Stay left / straight to continue southwest on
the Deertrap Mountain Trail - passing the Cable Mountain junction.
Navigation - Note about old trail system:
Sometime between 2008 when I first visited Hidden Canyon and 2014
the trail system has changed.
About 0.5 miles after passing the Cable Mountain Junction is where
the old and new trails diverge (jDeerTrapOld1). It is unlikely you will
see both trials since the old trail has been covered and disguised
to allow vegetation to regrow and cover the old trail. The old trail
veers to the right (more west) while the new trail is clear and easy
to follow veering left (more southwest).
This note is here to make you aware that the trail system has
changed and you will likely never see the old trail. However
if you happen to mistakenly find your way onto the old trail the
rest of the directions here will not make sense.
If you happen to follow the old trail you will follow the trail down
into a meadow like area and eventually get to a set of 3 or 4
switchbacks about 0.8 miles after leaving the new trail (see the
attached map). The switchbacks will have small logs staked
down to form steps on your way up the switchbacks. If you find
the switchbacks with logs staked down you will know you have made it
onto the old trail. The new trail does not have these
switchback with staked down logs. If you find yourself on the
old trial you can easily get to Hidden Canyon by hiking up to the
top of the switchbacks with log steps, then at the top of the log
steps (jOld-jHiddenCyn ) leave the trail and route find your way
about 400 feet north west to the head of Hidden Canyon (yHiddenTp).
See the
accompanying maps to help clarify this.
After passing the spot where the old and new trials diverge
(jDeerTrapOld1) you will likely be following the new trail since it
is the clearest and most obvious route. Continue to follow the
new trail as it travels southwest then starts to bend left and
travel more south. 700 to 800 feet after the trail begins to
travel south, you will need to leave the trail and route find your
way over to the top of Hidden Canyon. The point you leave the
trail (jHiddenCyn) is about 1 miles after passing the cable mountain
junction.
The spot where you leave the trail (jHiddenCyn) does not have a
noteworthy landmark to help identify it so a GPS is helpful but not
mandatory. To get to Hidden Canyon turn right and walk west
down the dirt slope. A little over 100 feet from the trail you
will be at the top of a sandstone cliff band. If you left the
trail at the correct location you should find a section of slickrock
with gentle enough slope to allow and easy walk / scramble down to
the bottom of the cliff band. If you left the trail in the
wrong spot you may find yourself cliffed out and will have to wander
along the cliff band a bit to find the way down. Remember that
part about a GPS being helpful?
Note:
Before leaving the trail you may want to take a look west to get a
view of where you need to route find to. The image below shows
a view from the trail over to Hidden Canyon and may be useful for
navigation.
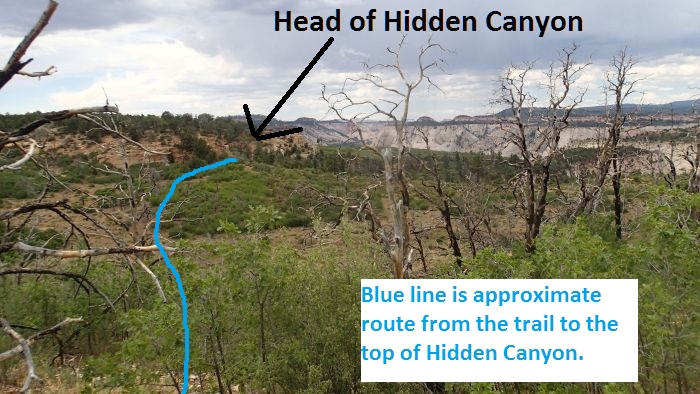 View from the trail over to the top of Hidden Canyon. The blue line shows the approximate route over to the top of Hidden Canyon.
It is about 0.2 miles over to the top of Hidden Canyon.
View from the trail over to the top of Hidden Canyon. The blue line shows the approximate route over to the top of Hidden Canyon.
It is about 0.2 miles over to the top of Hidden Canyon.
At the bottom of the cliff band, route find your way about 0.2 miles
over to the top of Hidden Canyon (yHiddenTp). The point marked
as the top entry for Hidden Canyon is a flat rock area on a dirt
slope that is on the southeast side of the head of Hidden Canyon.
The Canyon / Technical Section:
From this
rock area, travel about 200 feet to the northwest down the dirt
slope to the obvious mouth of the canyon where where you
will find the top of rap 1.
Rap 1 (dHiddenR1) is anchored from one of several pine trees and drops
about 100 feet down a rock face. The ledge at the bottom of the
Rap 1 has a bolt and anchor. The anchor is not needed but can
be used to tie in if you intend to be on the ledge for a while.
From this ledge is an easy down climb about 10 feet to the
canyon floor.
Starting form just below rap 1 to the end of the canyon are many
down climbs. There are very few sections in the canyon with any
significant distance of easy walking.
Rap 2 (dHiddenR2) is a little over 500 feet from rap 1. After down climbing
a boulder you will find a 40 foot drop with no apparent anchor
to rappel from. When you find this turn around and look back
under the boulder you just down climbed. There will be a single
bolt and hanger for Rap 2 RDC on the wall. Rap 2 is anchored
from this hanger and drops about 35 feet on the up canyon side
of the boulder you are standing on. After finishing Rap 2 walk
under the boulder you rapped from to continue down canyon.
Rap 3 (dHiddenR3-4) is a little over 1000 feet down canyon from rap 2. Rap 3
is anchored from a small boulder and drops about 35 feet. Rap 3
is like rap 2 in that it drops on the up canyon side of a
boulder then you walk under it down canyon to continue the
route.
Rap 4 is about 30 feet from the bottom of rap 3. Rap 4 is
anchored from a boulder a few feet over the edge and is a 2
stage rap. It would be easy to get to the bottom of the first
stage and think the rap is over. Remember to look down canyon
when you finish a rap to see if you still need the ropes.
The first stage of Rap 4 drops about 20 feet. There is
about 50 horizontal feet from the bottom of stage 1 to the top
of stage 2. Stage 2
then drops another 15 feet or so. The total rope distance
for Rap 4 is about 85 feet.
Rap 5 (dHiddenR5) is about 500 feet past rap 4. Rap 5 drops 30 feet and is
anchored from a tree about 10 feet up canyon.
After rap 5, travel LDC on a faint path leading up the left wall
to avoid a couple down climbs. This path will soon have a steep
drop on the right to the canyon floor. Soon you will find
webbing on a tree at the edge of the drop. This will be the
anchor for Rap 6.
Rap 6 (dHiddenR6) is about 200 feet from rap 5 and drops about 60 feet to
the canyon floor. The start for Rap 6 is a bit awkward.
Despite the awkward start I found this to be the most enjoyable
rap in the canyon. It has a good view up and down canyon and
just feels good (once actually on rappel). The tree looks like
it still has a good root system but does have some sections
dying off. An alternate anchor might be a good idea sometime in
the future.
Shortly after rap 6 is a drop with a large choke stone wedged
between the walls overhead and just down canyon from the drop.
Just before getting to this drop follow another faint path LDC
up the left wall of the canyon. A few feet beyond the choke
stone is a large pine tree. This is the anchor for rap 7.
The path continues beyond this tree and ends at the top of a
natural arch. There are options to rap from either side of the
arch but the tree near the choke stone is a bit safer. Another plus to using
this anchor as opposed to rapping off the arch is staying off
the arch. Maybe it will last longer if we stay off it.
Rap 7 (dHiddenR7) is anchored from the tree just down canyon from the choke
stone mentioned above and drops about 60 feet to the canyon
floor below. This is the last rappel for the canyon.
Beyond rap 7 the canyon is still full of down climbs. About 0.4
miles down canyon from rap 7 is a path RDC going up along the
right wall (wHiddenRP-1). This path leads up then back down and drops back to
the canyon floor a few hundred feet down canyon. Taking this
path is a great way to bypass some down climbs.
Shortly after the path that climbs up and over, the canyon
starts to open up in a few spots and travel becomes easier.
There are still lots of down climbs though. About 0.25 miles
beyond the climb around is a natural arch LDC on the canyon
floor (sHiddenArch1). It is large enough to walk under and is tucked away on
the side around some small trees. It feels leprechaun like.
The Exit:
About 0.25 miles from the arch the canyon opens up a little more
and a clear defined trail emerges (yHiddenBt). This well maintained trail
leads to the East Rim Trail. Along the way are chains and steps
cut in the cliff as you work to the East Rim Trail.
Once on the East Rim Trail follow it a little more than a half
mile down to the Weeping Rock trailhead where the route ends.
Downloadable GPX files
available at
BG-Gear Store
(easier than manual entry and a great way to support
Bluugnome).
Waypoint naming convention and map symbol information can be found on the Glossary page.
Elevations are approximate.
BEFORE
manually entering coordinates set your system to WGS84 datum and Lat/Lon hddd.ddddd° coordinate format.
Inconsistent datum's and coordinate formats will result in location errors.
Click to show / expand the list of waypoints below........
| Hidden Canyon (1) - Drive to Trailhead |
- wEngDP-01
Lat/Lon (WGS84): N 37.23934
W -112.83230
Elev: 5,869 Feet
Turn to the North Fork off Highway 9.
- wEngDP-02
Lat/Lon (WGS84): N 37.27285
W -112.87304
Elev: NaN Feet
Turn left, to the Ponderosa Ranch.
- wEngDP-03
Lat/Lon (WGS84): N 37.27303
W -112.87625
Elev: NaN Feet
Pavement Ends.
- wEngDP-04
Lat/Lon (WGS84): N 37.27489
W -112.88006
Elev: NaN Feet
Continue straight. Sign saying Observation Point.
- wEngDP-05
Lat/Lon (WGS84): N 37.27583
W -112.88405
Elev: NaN Feet
Turn right at Tee in the road. Toward Observation Point.
- wHiddnDP01
Lat/Lon (WGS84): N 37.26880
W -112.89025
Elev: NaN Feet
On the way into Stave Springs Trail Head turn left at this triangular junction and drive about 200 feet to Pine Street. Turn right onto Pine street to travel west to Stave Springs Trailhead.
- tStaveSpring
Lat/Lon (WGS84): N 37.26759
W -112.89948
Elev: 6,450 Feet
Some rangers refer to this as the Stave Springs Trailhead. Have not found official name for it.
|
| Hidden Canyon (2) - Approach |
- tStaveSpring
Lat/Lon (WGS84): N 37.26759
W -112.89948
Elev: 6,450 Feet
Some rangers refer to this as the Stave Springs Trailhead. Have not found official name for it.
- jStaveEastRimTrl
Lat/Lon (WGS84): N 37.26605
W -112.90779
Elev: 6,390 Feet
Junction to the Stave Springs Trail off of the East Rim Trail.
- jDeerTrpMntTrl
Lat/Lon (WGS84): N 37.26206
W -112.90624
Elev: 6,460 Feet
Junction for the Deertrap Mountain Trail.
- jCableMntTrl
Lat/Lon (WGS84): N 37.25266
W -112.91699
Elev: 6,880 Feet
Trail Junction for the Cable Mountain Trail.
- jHiddenCyn
Lat/Lon (WGS84): N 37.24486
W -112.92891
Elev: 6,800 Feet
Leave the trail approximately here to route find your way over to the top of Hidden Canyon. Hidden canyon is about 0.2 miles to the west of this point. There are no helpful landmarks for this point so a GPS is helpful but not manditory.
Leave the trail here and travel west a little over 100 feet to the top of the cliff band. If you left the trail in the correct spot you will find a slope gentle enough to allow you to walk / scramble down to the bottom fo the cliff band. If you left in the wrong spot you may be cliffed out and need to wander along the top of the cliff band to find the way down.
- yHiddenTp
Lat/Lon (WGS84): N 37.24559
W -112.93216
Elev: 6,730 Feet
Flat rock area on dirt sloped entry on the southeast side of the head of Hidden Canyon. Find your way about 200 feet northwest down the dirt slope to the first rap in Hidden Canyon.
|
| Hidden Canyon (3) - The Canyon and Exit |
- yHiddenTp
Lat/Lon (WGS84): N 37.24559
W -112.93216
Elev: 6,730 Feet
Flat rock area on dirt sloped entry on the southeast side of the head of Hidden Canyon. Find your way about 200 feet northwest down the dirt slope to the first rap in Hidden Canyon.
- dHiddenR1
Lat/Lon (WGS84): N 37.24594
W -112.93271
Elev: 6,640 Feet
Rap 1 in Hidden Canyon. 100 feet Anchored from Pine Tree.
- dHiddenR2
Lat/Lon (WGS84): N 37.24775
W -112.93348
Elev: NaN Feet
Rap 2 in Hidden Canyon. 35 feet Anchored from small boulder.
- dHiddenR3-4
Lat/Lon (WGS84): N 37.25028
W -112.93412
Elev: NaN Feet
Raps 3 - 4 in Hidden Canyon.
Rap 3, 35 feet anchored from small boulder.
Rap 4, 2 stage (20 and 15 feet) with 50 feet between stages.
- dHiddenR5
Lat/Lon (WGS84): N 37.25205
W -112.93475
Elev: NaN Feet
Rap 5 in Hidden Canyon. 30 feet Anchored from tree in the wash.
- dHiddenR6
Lat/Lon (WGS84): N 37.25252
W -112.93490
Elev: 5,800 Feet
Rap 6 in Hidden Canyon. 60 feet Anchored from tree. Awkward start.
- dHiddenR7
Lat/Lon (WGS84): N 37.25364
W -112.93527
Elev: 5,650 Feet
Rap 7 in Hidden Canyon. 60 feet Anchored from Pine Tree. Natural arch just down canyon.
- wHiddenRP-1
Lat/Lon (WGS84): N 37.25914
W -112.93632
Elev: 5,300 Feet
Climb around large area of canyon RDC. Nice path leading up and over.
- sHiddenArch1
Lat/Lon (WGS84): N 37.26304
W -112.93761
Elev: 5,230 Feet
Arch large enough to walk under LDC on the canyon floor. Feels very leprechaun like.
- yHiddenBt
Lat/Lon (WGS84): N 37.26776
W -112.93824
Elev: 5,180 Feet
Bottom exit for Hidden Canyon.
- jHidnCynTrlBt
Lat/Lon (WGS84): N 37.26949
W -112.93615
Elev: 4,760 Feet
Junction off the Observation trail where the Hidden Canyon trail starts.
- tObpntWpRk
Lat/Lon (WGS84): N 37.27053
W -112.93855
Elev: 4,371 Feet
Trail head for Weeping Rock and Observation Point.
- wBusStpWeepRock
Lat/Lon (WGS84): N 37.27098
W -112.93942
Elev: 4,360 Feet
Weepeing Rock and East Rim trail bus stop.
|