Canyoneering Route Description
Heaps Canyon - 4B IV (or V)
Zion National Park, Utah.
2007-06-23, 4 people, 3 Day (Travel time in route 37.2 hours)
- Mostly full water conditions, via bottom up route

2011-10-14, 4 people, 3 Day (Travel time in route 17.75 hours) - Full water
conditions, via bottom up route
2014-08-16, 5 people, 1 Day (Travel time in route 17.1 hours) - Full water
conditions, via bottom up route
2018-07-07, 5 people, 1 Day (Travel time in route 15.9 hours) -
Low water conditions, via bottom up route
2019-10-12, 6 people, 1
Day (Travel time in route 18.2 hours) - Very low water conditions,
via top down route
2021-05-22, 6 people, 1 Day (Travel time in
route 16 hours) - Mostly full water conditions, via top down
route
2022-06-05, 4 people, 1 Day (Travel time in route 15.75
hours) - Full water conditions, via top down route
2023-07-09, 6
people, 1 Day (Travel time in route 12 hours) - Full water
conditions, via top down route
Bottom - Up Route:
Time Required - 15 to 25 hours
Distance - 10.5 miles Total, 3.1 miles Technical
Rappels - 25 Rappels, Longest Rappel 290 feet.
Elevation Range - 7357 - 4280 Feet
Shuttle Required -No Vehicle - Passenger
Permit Required - Yes
Top - Down Route:
Time Required - 15 to 25 hours
Distance - 12.9 miles Total, 3.1 miles Technical
Rappels - 25 Rappels, Longest Rappel 290 feet.
Elevation Range - 7470 - 4280 Feet
Shuttle Required -Yes 36.6 Miles Vehicle - Passenger
- Possible High Clearance Permit Required - Yes
Rappelling and anchor gear, Ropes and or pull cords for rappels up
to 290 feet and 120 feet of 1 inch webbing for sling placement. Wet
suits are a MUST in Heaps Canyon. Wet suits required even in
hot weather, Heaps can get very cold.
Do not underestimate Heaps Canyon. The overall route is long
tiring and in canyon there can be many potholes to work through,
logs to climb over or rappel from and lots of very cold water.
Good physical fitness is required to make it through Heaps. When
full of water the potholes can be splashy fun but still wear you
down. In low water conditions there will be multiple potholes
to escape testing the groups skill.
The final
rappel sequence is a series of 3 rappels in
a row, 50 feet, 150 feet and the final rap of almost 300 feet. The
last rap offers incredible views you will remember for a lifetime
and drops you right next to the Upper Emerald Pool, sometimes by unsuspecting tourists
so be mindful of not dropping anything. Once down to the Upper Emerald
pools, it is a little over a mile trail to the Zion Lodge where you
can catch the shuttle back to the visitor center.
Be prepared with pot hole escape tools and knowledge of how to use
those tools. Knowing how to do a pack drag anchor can also
prove helpful. It is a very good
idea to plan ahead and work out your sequence for the final 3 raps.
The last two raps have only enough room for two people comfortably
or 3 people cramped in and clipped to the anchor.
Note / Warning:
The beta here is for Heaps Canyon when in full water
conditions. If the water levels drop the route becomes much
more difficult. If you happen to be there in full water
conditions, try looking into the potholes you
are swimming over and consider how many of those would be very
difficult to get out of as water levels drop. Bring skilled team
mates and be
prepared for possible pothole escapes in case water levels are low.
Note:
Conditions change in many ways.
Water levels can be high or low drastically changing the difficulty.
Logs wash in and out. Over the years I have seen logs come and
go changing the obstacles and sometime rappel counts. People
have added bolts in places also changing difficulty and rappel
counts.
Heaps canyon is a challenging canyon and I am happy to have had it
as my second canyon ever. Quite a jump from Fat Man's Misery!
Seeing it a few years later reminded me that we kind of bit off more
than we could chew. Overwhelming and fun, but looking back, maybe it was
not the smartest choice as a second canyon, but I would not
trade it for the world! The complete shock of
hard work is part of what got me hooked on canyoneering.
To get to the Trailhead
There are a couple of options for the approach to the drop into Phantom Valley.
Top-down starting from at the West
Rim trailhead by Lava Point or bottom-up starting from the Grotto
bus shuttle stop on Floor of
the Valley road.
The top-down route is about 8.3 miles from the West Rim
trailhead to the drop-in to Phantom Valley with an elevation
range of about 590 feet (7470 feet through 6780 feet). The
top-down route is 2.3 miles longer but with significantly less
elevation change but comes with a 36.6 mile car shuttle.
If you have someone willing to drop you off at the top you can
avoid the need to drive up after canyon to get your shuttle
vehicle.
The bottom-up route is about 6
miles from the Grotto shuttle stop to the drop-in to Phantom
Valley with an elevation range of about 3,050 feet (4318 feet
through 7357 feet). The bottom up route is more work due
to elevation gain but does not involve a car shuttle.
Bottom - Up Route:
Park your car at the Zion Visitor Center and take the Shuttle to
the Grotto shuttle stop.
Top - Down Route:
36.6 miles car shuttle.
From the South Gate of Zion National Park (by the Zion Visitor
Center), drive about 14 miles
west on highway 9 to the turn off for the Kolob Reservoir Road.
Follow the Kolob Reservoir Road 20.1 miles to the turn off for
Lava Point (extLavaPoint). Turn right and follow Lava Point
Road 2.2 miles to the West Rim Trailhead (tWestRimN). There are
few roads around Lava Point which may mislead but there are
signs to point you toward the West Rim Trailhead at Lava
Point.
To leave the Exit Vehicle / Escape Pod
Bottom - Up Route:
No exit vehicle is needed. When you exit at the Zion
Lodge, ride the shuttle back to your car at the Visitor Center.
Top - Down Route:
When you exit at the Zion Lodge, ride the shuttle back to your
car at the Visitor Center. Then drive back up to the West
Rim trailhead to retrieve your entry vehicle.
GPS coordinate information listed at the bottom. For information about waypoint naming and map symbols, refer to the
Glossary page.

Click the links for maps of the route.
Map of the overview (top down and bottom up routes).
Map of the bottom up route and canyon.
Map of the technical section.
Map of the technical section zoomed in a bit.
The Approach - Bottom - Up Route from The Grotto Shuttle
Stop:
After getting off the shuttle at the Grotto stop (wBusStpGrotto),
walk across the road and start down the trail to Angel's Landing.
The trail starts out flat and easy for a while but soon starts to
climb switchbacks as it climbs to Refrigerator Canyon. Continue on
the trail through Refrigerator Canyon. Next will be a series of 21
short but steep switch backs called Walter's Wiggles (sWaltrsWiglsTp).
A short distance after getting to the top of Walter’s Wiggles you
will come to Scout’s Lookout which is about 2.1 miles from the
trailhead. From Scout's Lookout follow the signs pointing to the
West Rim Trail (not Angel's Landing).
As you continue up the West Rim Trail you will come to a section of
slick rock where it would be easy to lose the trail. A few sign
posts along the slick rock with a boot print on them have been
placed to mark the way over to the continuation of the trail. After
crossing the trail less slick rock area, the trail will begin to
descend again. About 1.2 miles after Scouts Lookout the trail will
have a bridge that crosses a stream.
As you continue on from the bridge the trail will slowly begin to
climb again through wide open spaces with lots of views to take in.
About 0.75 miles after crossing the bridge the trail will begin to
get steeper as it starts into an area with more vegetation (some of
which had recently burned in a fire). The trail will no longer be
in a wide open area but will have walls on both sides.
The trail will start up a series of gentle switch backs with an
overall direction of southwest. About 1 mile after crossing the
bridge is where the switch backs will top out at an area kind of
like a saddle. At this saddle the trail will turn from an overall
direction of southwest and start up northeast (yBehuninTp).
Continue up the trail which is cut into the side of a huge cliff
heading northeast for about 0.5 miles to the next trail junction.
The trail junction (jTelphnCynTrl2) is where the Telephone Canyon
trail and the Cabin Spring trail both meet the West Rim Trail.
If you need water Cabin Springs is about 300 feet down a trail. It
is a good spot to filter water. If you stay quiet and keep an eye
out you may get to see a variety of animals looking to get some
water after you leave. Be sure to check with the back country desk
before starting your trip to see if there is water flowing at the
spring. There are times when there is little or no flow.
Note:
From the junction, look toward the trail down to Cabin Spring then
look slightly left. The trail immediately left is the trail to
Telephone Canyon. The trail immediately left of that is the
continuation of the West Rim Trail. The trail just left of
that is a short trail over to camp site number 2.
The Telephone Canyon trail has closed to general hiking for short
periods of time after fires in the area. The trail is beginning to get overgrown and is easily un-noticed
from the junction to Cabin Spring.
From the trail junction for Cabin Springs (jTelphnCynTrl2) follow the West Rim Trail west.
From here the trail continues to climb but not as steep. About
1.4 miles after the junction for Cabin Spring will be the junction
for a short trail over to West Rim Camp 3 (jWestRimCamp3) then a
little over a hundred feet farther will be the junction to West Rim
Camp 4 (jWestRimCamp4).
When you reach to junction for West Rim Camp 4 (jWestRimCamp4), you
will turn left (south) and leave the trail. From the junction
to camp 4, turn left (south) and walk off trail about 0.3 miles to
the start of a ridge (yHeapsPvTp) dropping down south from the rim.
This ridge drops down south from the rim down into Phantom Valley
and is the start of the technical portion of the Heaps via Phantom
Valley Route.
The Approach - Top - Down Route from The West Rim Trailhead
by Lava Point:
From the West Rim Trailhead (tWestRimN) at Lava Point, follow the West Rim Trail south east. Continue past the
junction to the Wildcat Canyon Trail (jWldCatCny) about 500 feet into the
trail and past the junction to Sawmill Springs (jSawMillSpg) at about 0.9
miles. About 5.2 miles from the trailhead is the junction to Potato Hollow
(jPotatoHollow).
Continue on the West Rim trail 1.5 miles to the junction of the
northern end of the Telephone Canyon Trail (jTelphnCynTrl1).
Continue south on the West Rim Trail 1.6 miles to the junction for
the West Rim Camp 4 (jWestRimCamp4).
When you reach to junction for West Rim Camp 4 (jWestRimCamp4), you
will turn right (south) and leave the trail. From the junction
to camp 4, turn right (south) and walk off trail about 0.3 miles to
the start of a ridge (yHeapsPvTp) dropping down south from the rim.
This ridge drops down south from the rim down into Phantom Valley
and is the start of the technical portion of the Heaps via Phantom
Valley Route.
The Canyoneering / Technical Section:
When you get to the start of the ridge that leads down into Phantom Valley (yHeapsPvTp),
route find your way down the crest of the ridge along use trails
through the vegetation for about 200 feet to the top of rap 1.
Rap 1 (dHeaps-R1) is anchored from a small tree on the crest of the
ridge and drops about 60 feet down featured almost vertical wall
with a lot of loose rock along the way.
After rap 1 continue down the ridge. Slightly let (east)
of the ridge of the crest seems to be the easiest travel.
About 200 feet down the ridge from rap 1 is a down climb of about 8
feet (wHeapsRP-01). The down climb has a few good hand and
foot holds. Rap 2 is about 250 feet down the ridge after the
down climb. Shortly before getting to rap 2 is a section of
the ridge where you will be walking on a knife edge like crest with
big drop off on either side. As work along the knife edge look
for a large obvious tree just right (west) of the ridge crest which
is where rap 2 will be anchored from.
Rap 2 (dHeaps-R2) is about 450 feet down the ridge from rap 1, is anchored from
an obvious large tree just right (west) of the ridge crest and drops about
200 feet down a mostly vertical wall with. At the top of rap 2
be very careful of the loose and brittle rock. Looking down
from rap 2 you should be able to note a large dead tree (snag)
directly below. Rappelling down to this tree will give a 200
foot rappel. It is possible to shorten this rappel by
traversing over to the side but this will leave you on a steep
section of slick rock to scramble down.
At the bottom of rap 2 look for a use trail dropping down through
the vegetation to the south. Follow the use trail as it winds
along and makes its way down to a wide open slick rock ridge below
(wHeapsRP-02). This ridge is just the continuation of the
ridge you were rappelling off of but on a gentle angle making for an
easy walk.
Follow south down the slick rock ridge about 0.8 miles to one of
many confluences in the Heaps drainage. There are multiple
spots to drop down off the slick rock ridge and into the drainage
below and on the right (west). Where ever you decide to drop
off into the drainage below just continue down the water course
until you reach a confluence (wHeapsRP-03). I reference this
confluence as nothing more than a navigation aid to keep give this
written route description meaning.
Note:
If you planned to camp in Phantom Valley, there are a lot of nice
spots to set up camp and be near water if there have been recent
rains.
About 600 feet down canyon of the confluence is a drop in the water
course (wHeapsRP-04) that is bypassed on a ledge LDC.
About 0.3 miles farther down canyon is where the Heaps Canyon starts
to narrow up where there is some rock debris to scramble over.
About 150 feet down canyon of the boulder debris is the start of the
first narrows where there is a down climb (wHeaps-Nrws1Tp) of about 12
feet down into a narrow corridor. The narrow corridor is about
80 feet long and can have water a little over waist high if full of
water. At the other end of the corridor the canyon takes a
sharp left.
About 40 feet down canyon is a down climb over log debris to a pool.
If the canyon is full of water the down climb will be about 8 feet
to the water. The pool is about 25 feet long where you will
find rap 1 on the other side.
Rap 3 (dHeaps-R3) is anchored from a single bolted hanger LDC about head
high and is a two stage rap with a total length of about 50 feet.
The first stage drops about 40 feet down a sloped wall to a pool of
about 15 feet to swim then down a second stage of about 8 feet to a
pool. The second stage may be a little longer in lower water
conditions.
The pool at the bottom of rap 3 is about 25 feet long with a sloped
slide / down climb at the other end of about 8 feet down to another
pool. The second pool below rap 1 is about 15 feet long and
has a down climb on the other side of it. The down climb out
of the second pool goes down through an arch to a larger pool below.
The down climb through the arch is a sloped slide down climb of
about 10 feet down to a pool when the canyon is full of water.
The pool below the arch is about 20 feet long where you will find
rap 4 on the other side.
Rap 4 (dHeaps-R4-5) is anchored from two bolted hangers RDC about head
high. One of the anchors is pretty old. Rap 4 drops about
25 feet down a sloped wall to a pool. On the other end of the
pool is a log jam to climb up where rap 5 starts from the top of the
log jam.
Rap 5 is anchored from a log at the top of a log jam and drops about 12 feet
to a pool if the pot hole is full of water. The pot hole /
pool is about 5 feet in diameter. On the other side of the
pool is a narrow spot to climb up out of which can be difficult
since the walls are smooth. In low water conditions this pool
could be a difficult pothole to get over or across.
After getting up out of the pool below rap 5 will be a short slide
down to large pool in a wide open area. This is where the
first narrows ends (wHeaps-Nrws1Bt) and the canyon makes a sharp
right to start through a long corridor to walk in.
From the bottom of the first narrows continue walking down canyon
for about 0.4 miles to the start of the second narrows. The
walk between the first and second narrows has a couple pools to
skirt around and a very long narrow corridor with a sandy bottom.
As the long corridor ends you should notice you are looking straight
up a ravine / drainage coming down to you. As you get to this
ravine the canyon veers left and starts into the second narrows
(wHeaps-Nrws2Tp).
A short distance into the second narrows is a down climb / awkward
slide of about 8 feet down to a pool long pool to swim thorough with
some log jams to climb over. Rap 4 is from one of the log jams
at the other end of the pool.
Rap 6 (dHeaps-R6) is anchored from logs at the top of a log jam and
drops about 12 feet down to a long pool of about 80 feet to swim.
Rap 7 (dHeaps-R7) is about 80 feet down canyon of rap 6 at the other end
of the pool, is anchored from a log and drops about 15 feet to a
pool.
Below rap 7 are two potholes of about 15 feet long each. In
full water conditions these pools are just one long swim of about 30
or 40 feet. In lower water conditions both of these pools can
be a challenge to climb up out of. After the second pool is a
drop of about 40 feet.
Climb up out of the second pool just above the 40 foot drop then
climb up 8 to 10 feet to a ledge on the RDC side. The anchors
for rap 8 are about 40 feet down canyon on this ledge but you will
find a fracture running down the ledge that you will need to climb
past to get over to the anchors for rap 8. It is a good idea
to have one person cross the fracture and rig the other end of a
safety line from the rap 8 anchors to assist others.
Rap 8 (dHeaps-R8) is about 80 feet down canyon of rap 7, is anchored from
2 bolted hangers and drops about 30 feet down a vertical wall into a
narrow corridor.
The corridor down canyon of rap 8 is over 100 feet long and may be
walk or a wade / swim depending on sand levels.
Rap 9 (dHeaps-R9-10) is about 140 feet down canyon of rap 8, is anchored from
log jam debris and drops about 15 feet down to a pool with a short
swim to rap 9.
Rap 10 is also anchored from logs and drops about 15 feet down to a long
pool to swim in a narrow corridor.
Down canyon of rap 10 is a long swim in a corridor with a slide down
some rock of about 8 feet part way through the swim. The
second narrows ends about 300 feet down canyon of rap 10 where it
opens up to a wide area. As the second narrows ends
(wHeaps-Nrws2Bt) you are entering the cross roads.
The cross roads offers a easy travel for a while in more wide open
canyon. About 300 feet into the crossroads is a drainage
dropping in from RDC (south) which is the bottom of the drainage to
climb up to get to Isaac Canyon (jIsaac-Canyon). About 100
feet farther down canyon is a drainage dropping in from LDC (north)
which is the bottom of the Gunsight route (yGunSit-Bt) which is
descended as an alternate version of Heaps or as access to go to
Isaac Canyon.
Down canyon of the Gunsight are a few pools to skirt around on the
RDC side. About 200 feet down canyon of the Gunsight is a use
trail going up to a ledge on the RDC (south) side. The use
trail runs along the ledge to avoid a couple potholes and has a
rappel at the end to drop back to the canyon which is rap 11.
Rap 11 (dHeaps-R11) is about 200 feet down canyon the Gunsight drainage
is up on a ledge on the RDC side anchored from tree and drops about
15 feet down a vertical wall. Rap 11 is optional and is used
to bypass a couple pot holes. Optionally one could drop into
the pools and swim and climb in and out of them.
Down canyon of rap 11 is a narrow section of a few hundred
feet and a couple very long swims when the canyon is full of water.
After the long swims in the narrow section and about 450 feet down
canyon of rap 11 the canyon takes a sharp right where another short
drainage drops in from LDC.
When the canyon turns right you are presented with a very long
corridor to walk in which is a scenic treat. Enjoy the easy
travel and prepare yourself for the third technical narrows ahead.
The corridor runs for about 0.3 miles to the start of the third
technical narrows (wHeaps-Nrws3Tp).
At the end of the long corridor there is a drainage dropping down to
the canyon and the main canyon takes a left as this drainage drops
in from straight ahead. At the left turn just past the
drainage is the start of the third technical narrows
(wHeaps-Nrws3Tp).
The third technical narrows starts out deep narrow and has nicely
twisted sculpted walls. The first part of the narrows has a
few pools to swim with a couple short down climbs into them still in
a tight narrow environment. When the canyon is full some of
the swims here can be very long. At the end of the long swims
is a log jamb that is the anchor for rap 12.
Rap 12 (dHeaps-R12-13) is about 650 feet down canyon into the third
technical narrows, is anchored from a log jam drops about 15 feet to
a pool. The pool at the bottom of rap 12 is about 30 feet long
with a log jam on the other end which is where rap 13 is.
Rap 13 is about 30 feet down canyon of rap 12 on the other side of a
pool, is anchored from a log jam and drops about 15 feet to a pool.
Down canyon of rap 13 is a corridor of water or sand depending on
conditions that runs for about 90 feet to where the canyon takes a
right turn. As the canyon turns right you are greeted with the
continuation of more tight, deep, narrow and sculpted canyon.
In this section will be 3 down climbs to pools of 6 to 10 feet each.
Partner assists or pack anchors may be useful on a couple of these
drops. Shortly after the short down climbs will be a log jamb
to climb up to where the top of rap 14 will be.
Rap 14 (dHeaps-R14-15) is about 500 feet down canyon of rap 13, is anchored from
a log jamb and drops about 12 feet to a pool.
Rap 15 is a short distance down canyon of rap 14, is anchored from a log
jam and drops about 10 feet to a pool.
Down canyon of rap 15 are a few logs to climb up and over
mixed in with a few narrow swims. Just before reaching rap 16
is a dark narrow slot that can be a difficult spot to get through if
the log soup is thick. A short distance into the dark slot
will be a tall log jam to climb up about 20 feet. Rap 16 is at
the top of this log jam.
Rap 16 (dHeaps-R16) is about 275 feet down canyon of rap 15, is at the
top of a tall log jam in a dark slot and anchored from a single
bolted hanger RDC. Rap 16 drops about 40 feet down a vertical
wall.
After rap 16 are a few swims and the Iron Room. The Iron Room
is a chamber feeling room with deep rust colored stains running down
the RDC wall.
Rap 17 (dHeaps-R17) is just after the Iron Room and about 70 feet down canyon of
rap 16. Rap 17 is anchored from one piton and one bolted
hanger RDC and drops about 15 feet to a pool to swim in. This
is where the canyon lets in a little more light and you start to see
more green moss and plants on the walls. The green is a
beautiful contrast with the color of the canyon itself. After
rap 17 is more narrows, swims and a down climb of about 8 feet.
Rap 18 (dHeaps-R18) is about 80 feet down canyon of rap 17 and has no
fixed anchor. Rap 18 and drops about 15 feet down a
mostly vertical wall to a pool. A pack anchor works well for
rap 18 which is pulled down over the edge when done.
Shortly down canyon of rap 18 is a down climb of about 8 feet to a
pool to swim about 20 feet over to a log jammed in a narrow spot.
Getting up over the log can be a challenging up climb of about 6
feet. It may speed things up for the group if the first person
up sets up an aider for those following.
Rap 19 (dHeaps-R19) is about 80 feet down canyon of rap 18, is anchored from
log debris and drops about 12 feet to a pool.
Down canyon of rap 19 is a long narrow swim a couple short down
climbs and large boulder choke stone overhead.
About 100 feet down canyon of rap 19 is wide ravine dropping down to
the canyon from the northwest (wHeapsRP-05). This ravine can
be easily up climbed a long way in case of flash flooding.
When meeting this ravine the canyon turns sharp right and goes
through a key hole like opening into a deep dark narrow section.
The narrow section down canyon of the ravine has sections to wade in
and a couple pot holes to get across. If the water levels are
low the pot holes can present pot hole escape issues. If the
canyon is in full water conditions these pot holes can be moderately
difficult due to log jams. On the other end of the second pot
hole is rap 20.
Rap 20 (dHeaps-R20) is about 200 feet down canyon of the ravine, is anchored from
a log at the top of a log jam and drops about 12 feet.
Shortly after rap 20 the canyon widens a little and provides easier
travel. Most of the pools down canyon of here can be avoided
by walking ledges on either side.
Note:
As the canyon opens up a bit more you are in the alcove
(wHeapsAlcove) where you can set up camp on ledges on either side of
the canyon. The slick rock makes good clean camping but
camping here means you have to put your wet, cold wet suite back on
in the morning. Another option if you have a small group is to
camp on a sandy ledge just before the up climb about 800 feet and
two raps farther down canyon. The camp there is sandy and can
be a pain to keep sand off things but from there you can just wade
about 20 feet over to the up climb in the morning and be done with
water for the day.
Rap 21 (dHeaps-R21) is at the other end of the alcove and about 450 feet down canyon of
rap 20. Rap 21 has two possible routes. You can anchor
to a log directly in the water course and rap down 15 feet with an
overhanging start if water flow is low or non existent.
The other option is to walk the LDC ledge about 50 feet over to a
bolted anchor and rap about 40 feet.
Down canyon of rap 21 are a couple easy down climbs.
Rap 22 (dHeaps-R22) is about 150 feet down canyon of rap 21, is anchored from
a piton and a single bolted hanger out on a ledge LDC and drops
about 45 feet down a flat vertical wall into a long corridor.
The ledge is a little sketchy and care should be taken here.
The corridor down canyon of rap 22 is almost 400 feet long. At
the other end of the corridor is sandy bank on the LDC side which
can be used for a small group to camp. Just past this sand
bank is a narrow slot that continues down canyon on the LDC side.
Do not continue down that slot. Instead climb up a sloped
dihedral on the RDC side to exit the main water course and
get to teh final rap sequence.
Note:
The spot to climb up out of the main watercourse is where
the final slot appears to end with a vertical wall at the end.
As you get closer you will see the main water course drops down a
narrow slot on the LDC side of the wall. The climb out is made
by going up a dihedral on the RDC wall. To check that you are
looking at the correct climb up spot you can look for a lot of deep
rope grooves about 30 feet up near the top of the climb caused by
people hauling packs up the climb out.
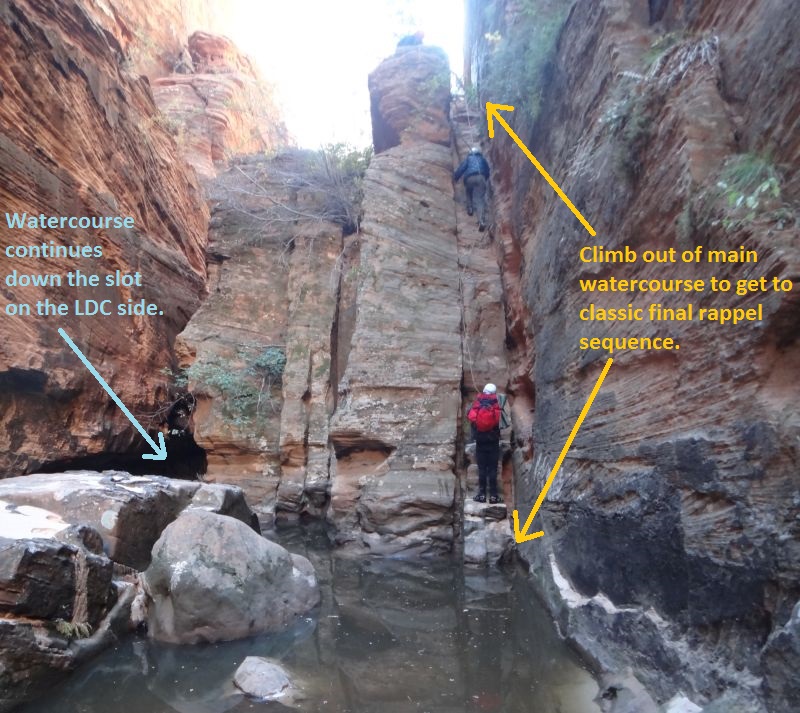 This is where you climb up out of the water course to get to the classic final rappel sequence.
The up climb is about 30 feet and mostly low class 5 with one
awkward spot that some feel may be 5.7 or so. An option to
make this upclimb more safe is to send someone up without a pack who can set up a rope to help the rest of the group
and haul packs up with ropes. To help preserve the sandstone
and reduce rope grooves, try to climb with your pack and use the
rope as a safety.
From the top of the up climb walk 30 or 40 feet over to a narrow
chute and down climb the chute to a small tree at the other end.
The small tree is the anchor for rap 23.
Note:
Raps 23, 24 and 25 are the final three rappels and are one on top of
the other dropping a total of about 500 feet. Rap 23 is
anchored from a small tree and drops about 60 feet down a sloped
wall. Rap 24 is right at the bottom of rap 23, is anchored
from a small pine tree and drops about 150 feet
down a vertical dihedral to a bird perch large enough for only two
people. Rap 25 is right at the bottom of rap 24, is anchored
from 4 bolted hangers and drops from the bird perch about 290 feet with mostly free hang over the
Upper Emerald Pool. Views from the tops of raps 24 and 25 are
incredible. It is way up there and will grab your attention
but don't forget to take a moment to look around and enjoy the
incredible views!
Rap 23 (dHeaps-R23-25) , is anchored from a small pine tree and drops about
60 feet down a steep slope to another pine tree which is the anchor
for rap 24. There is only enough room for 2 people here so
stage people through.
Rap 24 is at the bottom of rap 23, is anchored from pine tree and drops about
150 feet down a vertical wall in a dihedral down to the Bird Perch
for rap 25.
Warning:
Be careful when rappelling down rap 24. It would be possible
to rappel down past the Bird Perch if you are not watching for it.
When setting up rap 24 it is a good idea to tie a knot in the end of
your rope. The Bird Perch is not difficult to see and the fall
line of rap 24 is pretty close to it but if you have a moment of not
paying attention it is possible to pass right on by.
Rap 25 is at the bottom of rap 24, is anchored from 4 bolted hangers and drops about
290 feet which is mostly free hanging down to the Upper Emerald
Pool. The Bird Perch has VERY limited space. Two people
can fit but not comfortably. It will be a challenge to
maneuver two people and their packs while on the Bird Perch.
While on rap 25 remember to look around. If you are lucky
enough to rap this one while there is a little flow in the canyon
you will get to watch the water fall like rain right next to you
while hanging there. The first person down should be sure to
provide a belay for those that follow.
After rap 25 clean up the ropes and put away your gear while
enjoying the Upper Emerald pool and maybe some conversation from
hikers. THis is the final rap and the end of the canyon.
The Exit:
Once down to the Upper Emerald Pool and the exit of Heaps (yHeapsBt),
follow the trails 1.2 miles to the Lodge and catch the shuttle back
to the visitor center. Optionally you can follow the trails
1.3 miles to the Grotto shuttle stop.
Downloadable GPX files
available at
BG-Gear Store
(easier than manual entry and a great way to support
Bluugnome).
Waypoint naming convention and map symbol information can be found on the Glossary page.
Elevations are approximate.
BEFORE
manually entering coordinates set your system to WGS84 datum and Lat/Lon hddd.ddddd° coordinate format.
Inconsistent datum's and coordinate formats will result in location errors.
Click to show / expand the list of waypoints below........
| Heaps (1) - Drive to Upper Trailhead (optional) |
- extKolobRes
Lat/Lon (WGS84): N 37.20374
W -113.18604
Elev: NaN Feet
Turn off for Kolob Reservior Raod.
- tLftFrkNrthCk
Lat/Lon (WGS84): N 37.28480
W -113.09576
Elev: 5,070 Feet
Trailhead for the Left Fork of North Creek trail.
- tWildCatCyn
Lat/Lon (WGS84): N 37.33985
W -113.07587
Elev: 6,970 Feet
Wild Cat Canyon Trailhead.
- extLavaPoint
Lat/Lon (WGS84): N 37.39454
W -113.05287
Elev: 7,898 Feet
Turn off for Lava Point off of the Kolob Reservoir Road.
- tWestRimN
Lat/Lon (WGS84): N 37.38155
W -113.02298
Elev: 7,470 Feet
Northern trailhead for the West Rim Trail (by Lava Point).
|
| Heaps (2) - Approach from Upper Trailhead |
- tWestRimN
Lat/Lon (WGS84): N 37.38155
W -113.02298
Elev: 7,470 Feet
Northern trailhead for the West Rim Trail (by Lava Point).
- jWldCatCny
Lat/Lon (WGS84): N 37.38057
W -113.02244
Elev: 7,450 Feet
Junction where the Wild Cat Canyon Trail ends at the West Rim Trail.
- jSawMillSpg
Lat/Lon (WGS84): N 37.37184
W -113.01502
Elev: 7,290 Feet
Junction to Saw Mill Spring
- jPotatoHollow
Lat/Lon (WGS84): N 37.32098
W -112.98908
Elev: 6,810 Feet
Junction off the West Rim Trail to Potato Hallow.
- jTelphnCynTrl1
Lat/Lon (WGS84): N 37.30388
W -112.98553
Elev: NaN Feet
Junction where the Telephone Canyon trail meets the West Rim Trail
- jWestRimCamp4
Lat/Lon (WGS84): N 37.28539
W -112.98403
Elev: 7,340 Feet
Junction to Camp 4 on the West Rim Trail.
- yHeapsPvTp
Lat/Lon (WGS84): N 37.28230
W -112.98625
Elev: 7,120 Feet
Top of Heaps Canyoneering route via Phantom Valley route. This is the start of a ridge dropping down from teh rim to the south and into Phantom Valley.
|
| Heaps (3) - Approach from Lower Trailhead |
- wBusStpGrotto
Lat/Lon (WGS84): N 37.25908
W -112.95121
Elev: 4,280 Feet
The Grotto shuttle stop on the Zion - Floor of the Valley road.
- tAngleLnd
Lat/Lon (WGS84): N 37.25998
W -112.95152
Elev: 4,300 Feet
Angel's Landing Trailhead.
- sWaltrsWiglsTp
Lat/Lon (WGS84): N 37.27534
W -112.95128
Elev: NaN Feet
Top of Walter's Wiggles. 21 short steep switchbacks cut into the rock for the trail.
- jWestRimS
Lat/Lon (WGS84): N 37.27492
W -112.95085
Elev: 5,330 Feet
Junction off the Angel's Landing trail for the Southern West Rim Trailhead. This is known as Scouts Lookout.
- cWstRmBridge
Lat/Lon (WGS84): N 37.28598
W -112.95582
Elev: 5,590 Feet
A bridge allowing the trail to cross a stream.
- jTelphnCynTrl2
Lat/Lon (WGS84): N 37.28674
W -112.96846
Elev: 6,740 Feet
Junction where the Telephone Canyon trail and the Cabin Springs trail both meet the West Rim Trail.
- sCabinSpng
Lat/Lon (WGS84): N 37.28756
W -112.96841
Elev: 6,706 Feet
Cabin Spring. Seasonal Water filtering source.
- jWestRimCamp4
Lat/Lon (WGS84): N 37.28539
W -112.98403
Elev: 7,340 Feet
Junction to Camp 4 on the West Rim Trail.
- yHeapsPvTp
Lat/Lon (WGS84): N 37.28230
W -112.98625
Elev: 7,120 Feet
Top of Heaps Canyoneering route via Phantom Valley route. This is the start of a ridge dropping down from teh rim to the south and into Phantom Valley.
|
| Heaps (4) - The Canyon, |
- yHeapsPvTp
Lat/Lon (WGS84): N 37.28230
W -112.98625
Elev: 7,120 Feet
Top of Heaps Canyoneering route via Phantom Valley route. This is the start of a ridge dropping down from teh rim to the south and into Phantom Valley.
- dHeaps-R1
Lat/Lon (WGS84): N 37.28188
W -112.98617
Elev: NaN Feet
Rap 1 - Heaps Canyon. Located on the ridge leading down into Phantom Valley. Anchored from a small tree on the crest of the ridge and drops about 60 feet a lot of loose rock on the wall.
- wHeapsRP-01
Lat/Lon (WGS84): N 37.28138
W -112.98598
Elev: NaN Feet
Down climb of about 8 feet.
- dHeaps-R2
Lat/Lon (WGS84): N 37.28070
W -112.98597
Elev: 6,765 Feet
Rap 2 - Heaps Canyon. Located on the ridge leading down into Phantom Valley. Anchored from an obvious large tree near the crest of the ridge and drops off the west side of the ridge about 200 feet down a mostly vertical wall.
- wHeapsRP-02
Lat/Lon (WGS84): N 37.28020
W -112.98685
Elev: NaN Feet
Bottom of the use trail after rap 2 where it dumps off onto a wide open slick rock ridge.
- wHeapsRP-03
Lat/Lon (WGS84): N 37.27015
W -112.98534
Elev: NaN Feet
One of a few confluences in the Heaps Drainage. The Route down the slick roack ridge meets the Heaps draiange approximately here in Phantom Valley.
- wHeapsRP-04
Lat/Lon (WGS84): N 37.26844
W -112.98563
Elev: NaN Feet
Drop in the water course that is bypassed on a ledge LDC.
- wHeaps-Nrws1Tp
Lat/Lon (WGS84): N 37.26577
W -112.98511
Elev: 5,621 Feet
Start of the fisrt narrows with a down climb of about 12 feet down into a narrow corridor about 80 feet long.
- dHeaps-R3
Lat/Lon (WGS84): N 37.26566
W -112.98495
Elev: NaN Feet
Rap 3 - Heaps Canyon. This is the first rap in the first narrows of Heaps via Phantom Valley. Anchored from a single bolted hanger LDC about head high and drops about 50 feet over two stages of 40 then 8 feet with a pool between stages.
- dHeaps-R4-5
Lat/Lon (WGS84): N 37.26572
W -112.98466
Elev: NaN Feet
Raps 4 and 5 - Heaps Canyon.
Rap 4 anchored from two bolted hangers RDC about head high and drops aobut 25 feet to a pool.
Rap 5 on the other sidce of the pool below rap 4 at the top of a log jam. Rap 4 anchored from a log and drops about 12 feet to a pool that may be a keeper in low water conditions.
- wHeaps-Nrws1Bt
Lat/Lon (WGS84): N 37.26585
W -112.98450
Elev: NaN Feet
End of the first Narrows in Heaps. The narrows dumps out to a large pool where the canyon makes a sharp right and starts into a long corridor section to walk.
- wHeaps-Nrws2Tp
Lat/Lon (WGS84): N 37.26139
W -112.98129
Elev: 5,580 Feet
Start of the second narrows after the long corridor below the first narrows.
- dHeaps-R6
Lat/Lon (WGS84): N 37.26134
W -112.98109
Elev: NaN Feet
Rap 6 - Heaps Canyon. This is the first rap in the second narrows. Anchored from logs at the top of a log jam and drops about 12 feet to a long pool of about 80 feet to swim to rap 7.
- dHeaps-R7
Lat/Lon (WGS84): N 37.26129
W -112.98080
Elev: NaN Feet
Rap 7 - Heaps Canyon. Anchored from a log and drops about 15 feet to a pool.
- dHeaps-R8
Lat/Lon (WGS84): N 37.26128
W -112.98054
Elev: NaN Feet
Rap 8 - Heaps Canyon. Anchored from two bolted hangers RDC along a ledge after climbing up from pot holes and drops about 30 feet to a long corridor swim / wade.
- dHeaps-R9-10
Lat/Lon (WGS84): N 37.26128
W -112.98005
Elev: NaN Feet
Raps 9 and 10 - Heaps Canyon.
Rap 9 anchored from log debris and drops about 15 feet to a pool.
Rap 10 shortly after rap 9 anchored from log debris and also drops about 15 feet to a pool.
- wHeaps-Nrws2Bt
Lat/Lon (WGS84): N 37.26131
W -112.97910
Elev: 5,540 Feet
End of the second narrows about 300 feet down canyon of rap 8 and about 300 feet up canyon of drainages crossing Heaps at the cross roads.
- jIsaac-Canyon
Lat/Lon (WGS84): N 37.26120
W -112.97805
Elev: 5,465 Feet
This is the bottom of the drainage to climb up out of Heaps to get up to Isaac Canyon.
- wHeapsCrossRds
Lat/Lon (WGS84): N 37.26122
W -112.97780
Elev: NaN Feet
A point called the Cross Roads on the Heaps Canyoneering Route. This point is between two drainages dropping in from opposite sides.
- dHeaps-R11
Lat/Lon (WGS84): N 37.26109
W -112.97710
Elev: NaN Feet
Rap 11 - Heaps Canyon. Anchored from a tree high up on a ledge RDC and drops about 15 feet. Rap 11 is used to bypass a couple pot holes and is optional.
- wHeaps-Nrws3Tp
Lat/Lon (WGS84): N 37.25879
W -112.97302
Elev: 5,460 Feet
Start of the third technical narrows. This is where the canyon turns left as a drainage drops in just before.
- dHeaps-R12-13
Lat/Lon (WGS84): N 37.26009
W -112.97154
Elev: NaN Feet
Raps 12 and 13 - Heaps Canyon.
Rap 12 anchored from log debris and drops about 15 feet to a pool.
Rap 13 is abouth 30 feet down canyon, is anchored from log debris and drops about 15 feet to a pool.
- dHeaps-R14-15
Lat/Lon (WGS84): N 37.26014
W -112.97022
Elev: NaN Feet
Raps 14 and 15 - Heaps Canyon.
Rap 14 is anchored from a log jam and drops about 12 feet.
Rap 15 is shortly down canyon, is anchored from a log jam and drops about 10 feet.
- dHeaps-R16
Lat/Lon (WGS84): N 37.25987
W -112.96937
Elev: NaN Feet
Rap 16 - Heaps Canyon. Located at the top of a tall log jam in a dark slot, anchored from a single bolted hanger RDC and drops about 40 feet down a vertical wall.
- dHeaps-R17
Lat/Lon (WGS84): N 37.25999
W -112.96917
Elev: NaN Feet
Rap 17 - Heaps Canyon. This is the rap just after the Iron Room. Anchored RDC from one bolted hanger and one piton and drops about 15 feet to a short swimmer
- dHeaps-R18
Lat/Lon (WGS84): N 37.26008
W -112.96890
Elev: NaN Feet
Rap 18 - Heaps Canyon. No fixed anchor and drops about 15 feet to a pool. Use a pack anchor here and pull it down to you when done.
- dHeaps-R19
Lat/Lon (WGS84): N 37.26027
W -112.96884
Elev: NaN Feet
Rap 19 - Heaps Canyon. Anhored from log debris and drops about 12 feet.
- wHeapsRP-05
Lat/Lon (WGS84): N 37.26051
W -112.96881
Elev: NaN Feet
Spot where the canyon meets a ravine dropping in from the northwest. As the canyon meets this ravine it takes a sharp right and drops into a more narrow section. The ravine can easily be up climbed a long way in case of flash flooding.
- dHeaps-R20
Lat/Lon (WGS84): N 37.26032
W -112.96816
Elev: NaN Feet
Rap 20 - Heaps Canyon. Anchored from a log and drops about 12 feet to a pool.
- wHeapsAlcove
Lat/Lon (WGS84): N 37.25972
W -112.96761
Elev: NaN Feet
The alcove is a place you can set up camp on sand stone ledges up out of the water course.
- dHeaps-R21
Lat/Lon (WGS84): N 37.25920
W -112.96763
Elev: NaN Feet
Rap 21 - Heaps Canyon. Two options. You can anchor to a log directly in the water course and rap down 15 feet with an overhanging start if water flow is low or non existent. The other option is to walk the LDC ledge about 50 feet over to a bolted anchor and rap about 40 feet.
- dHeaps-R22
Lat/Lon (WGS84): N 37.25884
W -112.96751
Elev: NaN Feet
Rap 22 - Heaps Canyon. Anchored from a piton and a single bolted hanger LDC on a ledge and drops about 45 feet. The ledge is a little sketchy so be careful.
- dHeaps-R23-25
Lat/Lon (WGS84): N 37.25773
W -112.96691
Elev: NaN Feet
Raps 23 thru 25 - Heaps Canyon.
Rap 23 anchored from a pine tree and drops 60 feet down a steep slope to rap 24.
Rap 24 anchored from a pine tree and drops 150 feet down a vertical wall in a dihedral to rap 25.
Rap 25 anchored from 4 bolted hangers and drops about 290 feet mostly free hanging to the Upper Emerald Pool.
- yHeapsBt
Lat/Lon (WGS84): N 37.25760
W -112.96661
Elev: 4,800 Feet
Bottom of Heaps Canyoneering route. Ends at the Upper Emerald pool with a 290 foot rappel.
|
| Heaps (5) - Exit |
- yHeapsBt
Lat/Lon (WGS84): N 37.25760
W -112.96661
Elev: 4,800 Feet
Bottom of Heaps Canyoneering route. Ends at the Upper Emerald pool with a 290 foot rappel.
- sUprEmrld
Lat/Lon (WGS84): N 37.25736
W -112.96623
Elev: NaN Feet
Upper Emerald Pool
- jKayentaEmrld
Lat/Lon (WGS84): N 37.25745
W -112.96058
Elev: 4,440 Feet
Junction of the Kayenta trail and the Emerald Pools Trails
- tEmrldPls
Lat/Lon (WGS84): N 37.25113
W -112.95935
Elev: 4,287 Feet
Trailhead for Emerald Pools
- tLodgeBt
Lat/Lon (WGS84): N 37.25020
W -112.95733
Elev: 4,270 Feet
A drive way leading from the main lodge lawn area to the lodge rooms.
|