Canyoneering Route Description
Trachyotomy Canyon - 3B II R
AKA - Witch's Cauldron or Trachyte Slot
Trachyte Creek area, Utah.
11-13-11, 3 people, 1 Day (Travel time in route 3.75 hours)

03-08-14, 4 people, 1 day (Travel time in route 5.5 hours)
Time Required - 3.5 to 5 hours
Distance - 5 miles Total, 0.7 miles Technical
Rappels - 1 Rappels, Longest Rappel 35 feet.
Need more rope for a 50 foot drop since anchor is set back.
Elevation Range - 5200 - 4500 Feet
Shuttle Required -No Vehicle - High Clearance
- possibly 4WD depending on road conditions
Permit Required - No
Rappelling and anchor gear, Ropes and or pull cords for rappels up
to 50 feet and 30 feet of 1 inch webbing for sling placement. Wet
suits are recommended since there is a possible keeper pot hole and
a couple other spots with possible water. A wet suit may be
optional on hot days but keep in mind you may be in the water a
while if you run into issues with the keeper. Also bring potshot bags or other pothole escape tools.
Travel down Trachyotomy Canyon involves sections of
high stemming. In some places you will be stemming close to 30
feet above the deck. If you are unfamiliar with tight canyons you
should try an easy narrow canyon first to see if you are comfortable with it.
The Middle Fork of Leprechaun Canyon is a good test to see how you like
skinny canyons and is short to give you a taste with minimal commitment.
The R rating for Trachyotomy is due to a pot hole that
can be in keeper mode depending on water conditions and for the stemming
about 30 feet above the deck in places.
To get to the Trailhead
From the junction of highways 276 and 95, travel south on
highway 276 for 3.6 miles to a dirt road turn off on the left
(east) side of the road (extLandOZ-Hogs).
Turn left (east)
onto the dirt road and drive about 2.1 miles to the crest of a
small hill (pkHogsUpper). This spot is also where
the road starts to veer from east to south east and where you
could park to start the route into the Hogs from the top.
Continue southeast for about 1.5 miles to where the road winds
left and and begins going east again. As the road winds
continue for another 0.5 miles to shortly after the road winds
to the right and begins traveling southeast again. As you
round the corner look left (southwest) for a drill hole pipe
sticking up out of the dirt about 170 feet from the road
(wDrillHoleHog1).
Continue about 0.35 miles farther southeast after passing the
drill hole and find a convenient place to park (pkTrachyotomy).
Note:
Optionally you can continue to drive about 0.6 miles farther on
the road to where the top of Trachyotomy meets the road (tTrachyot).
To leave the Exit Vehicle / Escape Pod
No exit vehicle required. The Hogs are done as loop
routes.
GPS coordinate information listed at the bottom. For information about waypoint naming and map symbols, refer to the
Glossary page.

Click the links for maps of the route.
Map of the drive into the route.
Map of the entire route.
Map of the technical section.
The Approach:
From
the parking spot (pkTrachyotomy)
continue walking
southeast along the
road. The head of
Trachyotomy is about 0.6
miles from the parking
spot. A convenient
spot to leave the road (tTrachyot)
and drop down into
Trachyotomy is about 250
feet before reaching the
actual head.
When you are about 250
feet before reaching the
head of Trachyotomy (tTrachyot),
turn right (south) and
route find your way down
into Trachyotomy.
While route finding your
way down in it is
easiest to stay a a bit
high on the RDC (west)
side of the canyon and
travers down along the
slick rock.
About 0.2 miles after
leaving the road you
should be down on the
floor of the drainage
(wTrachyotRP-01).
Continuing south down
Trachyotomy the wash is
wide and a mix of sand
and slick rock.
Note:
The first mile or so
down Trachyotomy can
seem like a convoluted
mix of sand, slick rock,
a few drops and a lot of
little side drainages.
Since this section is
wide and a mix of a lot
of things each party
will likely take
different paths through
here. The
description in this
first part of the
drainage may be a little
different from your
experience depending on
your path.
About 600 feet farther
down the wash are some
drops that are easily
bypassed by going up and
over on slick rock LDC.
About another 600 feet
down canyon is the start
of a narrow slot
(wTrachyotRP-02).
This narrow slot is
about 400 feet long and
can hold water at times.
This slot can be easily
bypassed by going up and
over the slick rock LDC
then dropping back down
to the floor after.
Note:
So far I have only
bypassed the slot and
have no details of what
is in it.
After getting to the
other end of the narrow
slot continue down
canyon in a sandy wash
for about 150 feet and
to where another narrow
section begins
(wTrachyotRP-03).
This next narrow section
(wTrachyotRP-03) is not
as narrow but is much
longer and looks to have
more water holding
capacity. This
narrows section can be
bypassed by scrambling
about 15 to 20 feet up
the steep slick rock on
the RDC side then route
finding your way along
the slick rock.
Route find your way for
about 850 feet until you
get to a point
(wTrachyotRP-04) where
you have a good view
down to the wash below
that is down canyon of
the narrow section.
To get down to the wash
look west for the head
(wTrachyotRP-05) of a
side chute about 250
feet away. Find
your way over to the
head of the chute then
scramble and down climb
in the chute to get back
down to the wash below.
Note:
So far I have only
bypassed the slot and
have no details of what
is in it.
After getting into the
wash after the second
narrow section
(wTrachyotRP-06) travel
down the wash is easy
walking on sand and a
few short sections of
slick rock. About
0.7 miles down canyon
the walls will get
higher and closer
together just be fore
reaching a very narrow
slot (yTrachyotomyTp).
This is where the fun
begins and is the first
mandatory slot.
The Canyoneering / Technical Section:
From the start of
the first mandatory slot
(yTrachyotomyTp), down
climb about 15 feet down
into the slot and start
working your way down
canyon between the
narrow walls.
Small people may be able
to fit on the bottom all
the way through this
section but larger
people will be forced up
high often. When
stemming up over the
narrow portions of this
slot you may find
yourself stemming about
30 feet above the deck.
This first technical
slot is about 0.2 miles
long and full of scenic
candy.
After getting out of the
first technical narrows
(wTrachyotRP-07), the
canyon widens out
briefly where another
small drainage drops in
from LDC. This
wider section is a
little more than 100
feet long and looks like
it may be an easy spot
to escape if you decide
to abort.
Continuing down canyon
is a mix of walking in
the sand, scrambling
through short easy
narrow spots and
stemming over or around
small pools. One
of the pools can be up
to waist deep.
About 0.25 miles down
canyon after the first
technical narrows is rap
1.
Rap 1 (dTrachyotomyR1) is about
0.25miles down canyon of
the first technical
narrows, is anchored from
a dead man anchor about
10 feet back from the drop and drops about
35 feet down a mostly
vertical wall in a slot.
Be sure to extend the
anchor webbing all the
way over the drop to
help with rope pull and
avoid rope pull grooves.
Starting out on Rap 1
climb out and into the
crack at the top then
down through the crack.
Leaving the anchor
webbing long helps make
the start of rap 1 a
little less awkward
since you will have
enough slack to allow an
easy climb out into the
crack.
After rap 1 walk and
light scramble down
canyon between V shaped
walls.
About 350 feet down
canyon of rap 1 is the
start of the second
technical narrows
(wTrachyotRP-08).
As this narrows starts
you will begin to need
to stem up over some
narrows sections.
About 40 feet into the
second technical narrows
is a small pot hole that
can be stemmed over very
easily. Just after
this pot hole is a
second pothole that only
tall people can stem
over. This second
pothole is what I think
was named the Witch's
Cauldron.
If you are lucky enough
to have a tall person
that can stem over the
Witch's Cauldron they
can go over then assist
others up out of the pot
hole. Most people
will need to go down
into then through the
pot hole. Slide
down a steeply sloped
slot down into the
Witch's Cauldron.
If the pot hole is full
the slide down will be
15 to 20 feet or longer
if the pot hole is low
on water. If full
simply swim about 10
feet across the water
and climb up into the
slot on the other side.
If the water is low you
may need to use pot hole
escape methods to get
out the other side.
Note / Warning:
The Witch's Cauldron and
be a keeper pot hole.
Be prepared to use
pothole escape
techniques if needed.
So far I have only seen
the Witch's Cauldron
full so there are no
details of how deep it
can get.
After climbing up into
the slot on the other
side of the Witch's
Cauldron continue under
a log jam just overhead.
The canyon continues
down a very narrow
section which can get
kind of dark in spots.
Just past the Witch's
Cauldron is drop of
about 25 feet which is
easily down climbed by
slithering down a
steeply sloped V shaped
slot to a pool below.
The pool below his down
climb can be a swimmer
for a few feet if full.
After getting across the
pool continue down
canyon between narrow
walls which will soon
become too narrow for
travel down low.
When it gets too narrow
stem up high to
continue.
Next is a drop of about
15 feet where the walls
open up into a chamber
like area. This
drop is easily down
climbed but can be
anchored from a choke
stone at the top of the
drop if a hand line is
desired.
On the other side of the
chamber is the top of
the last drop in the
canyon (wTrachyotRP-09).
The last drop is about
25 feet down a steep
slot. The top of
the slot has very
featured walls and is
shaped in a way that
will force a down
climber out of the slot
which feels exposed and
awkward. However
the down climb is not as
difficult as it looks.
Climb out over the very
tight section near the
top then just before
being forced out of the
crack slide straight
down into the crack
again. After
getting past the first
skinny obstacle the rest
of the down climb is
pretty simple and
straight forward.
There is a pool at the
bottom of the last drop
that may be a waist to
chest deep if sand
washes out but will
likely be only thigh
deep. After
crossing the pool you
are roughly 250 feet
down canyon of the
Witch's Cauldron.
After the last drop it
is a walk down a huge
wide corridor all the
way to the exit climb
out with the exception
of one pool to stem over
along the way. The
walk down canyon is in a
huge wide corridor that
sweeps to the right for
about 0.25 miles down to
the exit climb out.
During the walk in the
corridor keep your eyes
open for an arch high up along
the RDC wall.
A few hundred feet down
canyon of the arch the
RDC wall will drop down
as the corridor opens up
significantly. As
the wall drops look for
the first opportunity to
scramble up out of the
canyon on the RDC
(north) side of the
canyon. The climb
out starts up a steep
slick rock nose about 40
feet high.
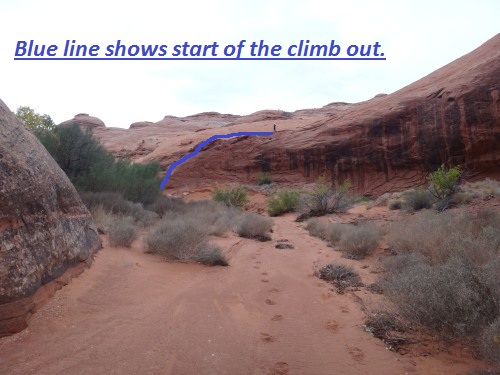
The climb up out of the canyon can be seen ahead on the RDC side. Look close and you can see John standing on the ridge part way up the climb out.
The picture below shows a view looking up from the base of the exit climb
out (yTrachyotomyBt).
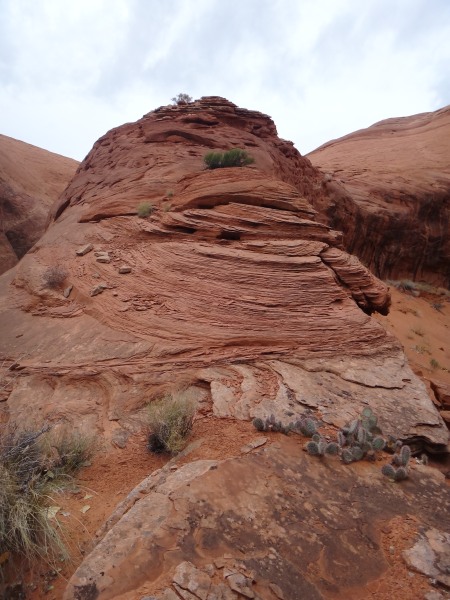
A look up the start of the climb up out of the canyon.
The Exit:
From the
base of the exit climb
out (yTrachyotomyBt)
climb up the slick rock
nose about 30 or 40 feet
up out of Trachyotomy.
After getting up the
slick rock nose continue
northeast up the slick
rock. About 300
feet after exiting the
main drainage of
Trachyotomy the route
will level off a briefly
(wTrachyotRP-10) and you
will have a view of more
slick rock to route find
your way up to the
northeast.
As the route gets to the
brief level area look
north west for a wide
saddle a little over 300
feet away. Route find
your way up to the
saddle (wTrachyotRP-11).
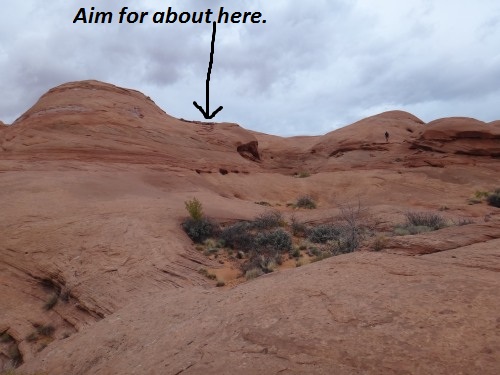
Route find over to the saddle center image to continue the exit out of Trachyotomy Canyon.
When you get to the
saddle (wTrachyotRP-11)
look north up the mix of
slick rock and dirt.
About 0.4 miles away you
should be able to see a
flat topped peak on the
horizon. Aim for
the base of that flat
topped peak and route
find your way there.
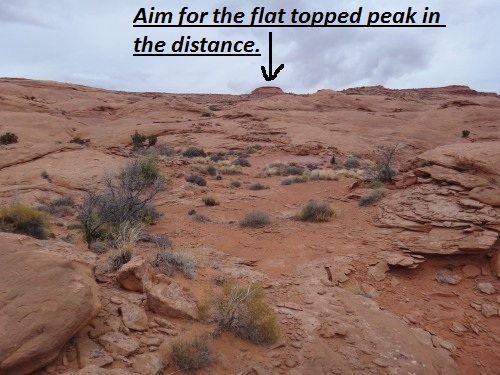
When this comes into
view aim for the flat
topped peak in the
distance.
When you get to the base
of the flat topped peak
(wTrachyotRP-12) walk
around the right (east)
side of it. As you
get around the east side
of it you will be able
to see a cliff band
about 500 feet away.
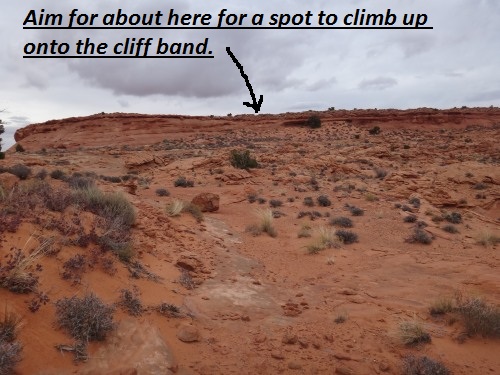
Aim for a spot about
center image for a route
up to the top of the
cliff band.
Walk north east about
500 feet to the cliff
band. As you walk
over to the cliff band
note the prominent point
on the left and aim for
a spot a couple hundred
feet right of the point.
This is where you will
find a route to climb up
to the top of the cliff
band.
The climb up to the top
of the cliff band is an
over all easy scramble /
up climb with the
exception of one spot.
One portion of the up
climb will be a little
difficult for weak up
climbers where mantling
makes it easier.
When you get to the top
of the cliff band
(wTrachyotRP-13), you
are greeted with wide
open rolling desert to
walk in and enjoy the
solitude and easy
travel.
If you parked at the
parking spot near the
drill hole (pkTrachyotomy),
your vehicle is a little
east of north on a
bearing of 27 degrees
about 1.2 miles away.
A compass is helpful to
keep your wandering feet
on the straight and
narrow but is not
needed. If you get
off track you will run
into the road at a
different spot and need
to walk the road to find
your car. The
route will roughly
follow a canyon rim on
the left (west).
Note:
If you drove in past the
parking spot and drove
to the head of
Trachyotomy Canyon, your
vehicle will be about
1.4 miles away on a
bearing of 48 degrees.
To get to the head of
the canyon you will
roughly follow the rim
of Trachyotomy on the
right (east).
Enjoy the walk across
the desert to the car by
the drill hole (pkTrachyotomy)
or by the head of the
canyon (tTrachyot) to
complete the route.
Downloadable GPX files
available at
BG-Gear Store
(easier than manual entry and a great way to support
Bluugnome).
Waypoint naming convention and map symbol information can be found on the Glossary page.
Elevations are approximate.
BEFORE
manually entering coordinates set your system to WGS84 datum and Lat/Lon hddd.ddddd° coordinate format.
Inconsistent datum's and coordinate formats will result in location errors.
Click to show / expand the list of waypoints below........
| Trachyotomy (1) - Drive in to Trailhead |
- extLandOZ-Hogs
Lat/Lon (WGS84): N 37.97361
W -110.56810
Elev: 4,770 Feet
Exit off highway 276 for the Land of OZ canyons and access to the top entry for the Hogs. This is between mile markers 3 and 4. Dirt road needs high clearance and 4WD is recommended as the road condition varies greatly.
- pkHogsUpper
Lat/Lon (WGS84): N 37.97219
W -110.53028
Elev: 5,175 Feet
Park here for access to the Hogs from the top. This is at the crest of a hill andjust as the road begins to veer from east to south east. The Hogs can be done as a loop route from here.
- wDrillHoleHog1
Lat/Lon (WGS84): N 37.95545
W -110.51005
Elev: 5,088 Feet
Drill hole with a pipe sticking up out of the ground. Stuff has been welded on it including it being described as in Hog Canyon and called Hog 1. Lots of room to park and camp here.
- pkTrachyotomy
Lat/Lon (WGS84): N 37.95161
W -110.50769
Elev: 5,100 Feet
Park here to start the route for Trachyotomy or optionally drive aonther 0.6 miles south east to where Trachyotomy meets the road.
|
| Trachyotomy (2) - Approach |
- pkTrachyotomy
Lat/Lon (WGS84): N 37.95161
W -110.50769
Elev: 5,100 Feet
Park here to start the route for Trachyotomy or optionally drive aonther 0.6 miles south east to where Trachyotomy meets the road.
- tTrachyot
Lat/Lon (WGS84): N 37.94982
W -110.49867
Elev: 5,205 Feet
Leave the road here to start down into Trachyotomy. This is about 250 feet from where the actual head of the canyon meets the road a little fartehr east.
- wTrachyotRP-01
Lat/Lon (WGS84): N 37.94764
W -110.49950
Elev: NaN Feet
After route finding your way down the RDC slick rock you should be down in the drainge approximately here.
- wTrachyotRP-02
Lat/Lon (WGS84): N 37.94418
W -110.50144
Elev: NaN Feet
Start of a narrow slot in the wash that is about 400 feet long. Bypass this slopt by going up and over on slick rock LDC.
- wTrachyotRP-03
Lat/Lon (WGS84): N 37.94259
W -110.50168
Elev: NaN Feet
Another narrow section begins. Not as narrow but longer and can hold more water. There are a couple drops at the end of the narrows. Bypass this narrows by going up and over to the right (west) and looking for a gully to scrable down to teh canyon floor. The
- wTrachyotRP-04
Lat/Lon (WGS84): N 37.94148
W -110.50391
Elev: NaN Feet
A spot on the slick rock above the wash wiht a good view down to the wash below. To get down into the wash travel west about 200 feet to the head of a side chute to scramble down.
- wTrachyotRP-05
Lat/Lon (WGS84): N 37.94183
W -110.50437
Elev: NaN Feet
Head of a side chute that is used to scramble back down to the wash after bypassing a long narrow section.
- wTrachyotRP-06
Lat/Lon (WGS84): N 37.94070
W -110.50411
Elev: NaN Feet
Back in the wash after the second narrow section.
- yTrachyotomyTp
Lat/Lon (WGS84): N 37.93459
W -110.51220
Elev: 4,725 Feet
Start of the Trachyotomy slot. This is the first mandatory slot and is where the fun begins. There are a couple other short slots that are optional in the wash up canyon.
|
| Trachyotomy (3) - The Canyon, |
- yTrachyotomyTp
Lat/Lon (WGS84): N 37.93459
W -110.51220
Elev: 4,725 Feet
Start of the Trachyotomy slot. This is the first mandatory slot and is where the fun begins. There are a couple other short slots that are optional in the wash up canyon.
- wTrachyotRP-07
Lat/Lon (WGS84): N 37.93255
W -110.51358
Elev: NaN Feet
End of the first technical narrows.
- dTrachyotomyR1
Lat/Lon (WGS84): N 37.93104
W -110.51635
Elev: 4,650 Feet
Rap 1 - Thrachyotomy Canyon. Anchored from a dead man anchor about 10 feet back from the drop and drops about 35 feet down a slot and mostly vertical wall.
- wTrachyotRP-08
Lat/Lon (WGS84): N 37.92999
W -110.51635
Elev: NaN Feet
Start of the second technical narrows. The second pothole in this section is nick named the Witch's Cauldron.
- wTrachyotRP-09
Lat/Lon (WGS84): N 37.92948
W -110.51588
Elev: NaN Feet
A down climb of about 25 feet drops into a pool as the canyon opens up into a huge corridor.
- yTrachyotomyBt
Lat/Lon (WGS84): N 37.92818
W -110.51858
Elev: 4,500 Feet
This is the end of the technical portion of Trachyotomy where the exit climb out starts up from the base of a slick rock nose on the RDC (north) side of the canyon.
|
| Trachyotomy (4) - Exit |
- yTrachyotomyBt
Lat/Lon (WGS84): N 37.92818
W -110.51858
Elev: 4,500 Feet
This is the end of the technical portion of Trachyotomy where the exit climb out starts up from the base of a slick rock nose on the RDC (north) side of the canyon.
- wTrachyotRP-10
Lat/Lon (WGS84): N 37.92894
W -110.51808
Elev: NaN Feet
Exit route briefly levels off with a view of more slick rock to route find up to the north east.
- wTrachyotRP-11
Lat/Lon (WGS84): N 37.92975
W -110.51758
Elev: 4,685 Feet
On a saddle about 650 feet after leaving the main Trachyotomy drainage.
- wTrachyotRP-12
Lat/Lon (WGS84): N 37.93530
W -110.51792
Elev: 5,000 Feet
At the base of the flat topped peak you were aiming for.
- wTrachyotRP-13
Lat/Lon (WGS84): N 37.93663
W -110.51730
Elev: 5,040 Feet
Top out of the climb up onto the cliff band.
- pkTrachyotomy
Lat/Lon (WGS84): N 37.95161
W -110.50769
Elev: 5,100 Feet
Park here to start the route for Trachyotomy or optionally drive aonther 0.6 miles south east to where Trachyotomy meets the road.
|