Canyoneering Route Description
Montezuma (aka East of Eden) Canyon - 4B II (III)
Ticaboo Mesa, Utah.
03-01-13 and 03-03-13, 3 people, (Travel time in route 5.5 hours)

First time through we did Lower Montezuma and Euphrates in a day.
Then another day we threw in Upper Montezuma after doing Good Day Jim.
Time in route above compiled from these two segments.
05-05-13, 5 people (Travel time in route 6.5 hours)
11-11-14, 4 people (Travel time in route 6.7 hours)
09-13-21, 8 people
(Travel time in route 8.5 hours) - super muddy and new people learning.
Time Required - 5 to 8 hours
Distance - 3.2 miles Total, 1 miles Technical
Rappels - 4 Rappels, Longest Rappel 260 feet.
A 75 foot rope and pull cord works well for in canyon.
Elevation Range - 4900 - 3640 Feet
Shuttle Required - No Miles Vehicle - High Clearance
(4WD if roads are bad)
Permit Required - No
This route description provides minimal detail in the canyon section.
Rappelling and anchor gear, Ropes and or pull cords for rappels up
to 260 feet and 30 feet of 1 inch webbing for sling placement.
You will also need a Sandtrap or other anchoring tools for using
sand. A 75 foot rope and pull cord works well in canyon.
On our first trip through we had mostly dry conditions
but have been told this is not normally the case. With the Lower half
of Montezuma usually
holding water, always plan on a wet suit and a little extra time dealing
with a wet canyon.
The lower half has a couple spots that are very skinny
but for only a short distance. A large pack can be forced through with
some effort. Large chested people may have a little difficulty but
only for a very short distance but should be ok. Rap 1 is particularly
awkward due to the skinny start but is way worth it when you consider the
gorgeous soot you find yourself in.
Montezuma has stemming / galumphing to 15 feet off the
deck in a few short spots, multiple potholes that will be swimmers if full,
one pothole that could be a keeper if you fell in while trying to avoid it
and uses a Sandtrap for anchoring.
Note:
The standard
exit from Montezuma involves
scrambling up a steep
rock filled chute /
ravine to
climb up out of the exit
drainage and away from
the lake. The rock
filled chute / ravine has portions that may become impassable if rocks shift
or fall. It should be noted that a secondary exit can be used if the
standard exit chute is found impassable. A quick description of the
secondary exit is given at the start of the exit instructions below.
To get to the Trailhead
Note:
There is a maze of roads on Ticaboo Mesa making it a good idea
to study the map ahead of time and keep a close eye on the map
as you drive.
From Hanksville, UT., drive south on highway 95 for 26 miles to
the junction of highways 95 and 276.
From the junction, drive south on HWY-276 for 25.6 miles then
turn left (east) onto BLM dirt-road 13400 between mile markers
25 and 26 (extTicaboo1).
About 1.5 miles from the highway is a junction (TicabooDP-01)
of BLM roads, 13400 continues east and 13410 branches off to the
south. Continue east on BLM road 13400. Note: If you were headed
to the Smith Fork area you would turn south onto BLM road 13410.
About 2 miles farther is another junction
(TicabooDP-02) of BLM roads, 13400 continues east and 13420
branches off to the south. Continue east on BLM road 13400.
Note: BLM road 13420 to the south goes out to Cane Spring Well
about 1.25 miles south.
About 0.2 miles farther is short side road (TicabooDP-03) on the
left (north) that goes to a camp area.
Stay right to
continue on BLM road 13400. Beyond this point the roads
will have intermittent rough sections.
About 0.37
miles past here is a fork in the road where the two roads rejoin
a short distance later. The low road is typically the
smoothest.
About 1.7 miles farther is another junction (TicabooDP-04) of
BLM roads (13400 continues north-ish and 13430 branches off to
the south).
Continue north on BLM road 13400.
Note: If you were going to the roads between Warm Springs Creek
and Sevenmile Creek, you would turn south onto BLM road 13430.
About 0.3 miles farther is another junction (TicabooDP-05) of
BLM roads (13400 continues northeast and 13440 branches off to
the north).
Continue straight northeast on BLM road 13400.
Note: BLM road 13440 to the south goes out to Colt Spring Well
about 0.4 miles north.
About 0.5 miles farther is a junction (TicabooDP-06) of BLM
roads (13400 continues northeast and 13450 branches off to the
north).
Continue straight northeast on BLM road 13400.
About 0.9 miles farther is a junction (TicabooDP-07) of BLM
roads (13400 continues northeast and 13430 branches off to the
south).
Turn south onto BLM road 13430.
Note: If you were
going to Tough, SF Ticaboo or Sleepytime Trio Canyons you would
continue northeast on BLM road 13400.
About 700 feet farther is a fork in the road (extWarmSpring).
At this fork stay left to continue toward the East Branch of
Seven Mile Creek.
About 0.4 miles farther is another fork in the road
(ext7MileCkEB). Veer right (more south) to continue toward
the East Branch of 7 Mile Creek.
About 1.0 mile farther is a junction (7MileCkEBDP-01) where a
side road joins in from the left. Continue straight
(south) past the side road.
About 0.5 miles farther is a jog in the road (7MileCkEBDP-02)
near an old stock pond. Veer left to continue south.
About 1.1 miles farther will be a wide pull out on the left side
of the road (pkHardDayHarvy). Continue past this turnout
as the road winds and begins to travel more east.
About 0.8 miles past the turnout is road junction (pkEuphrates).
Park near this junction where you can get off the road.
Note:
Continuing left (north) at this junction goes over toward
FiddleStix and to the right is a short spur road to a wide area
to park.
To leave the Exit Vehicle / Escape Pod
No exit vehicle is needed. This is done as a loop route.
GPS coordinate information listed at the bottom. For information about waypoint naming and map symbols, refer to the
Glossary page.

Click the links for maps of the route.
Map of the drive into the route.
Map of the entire route.
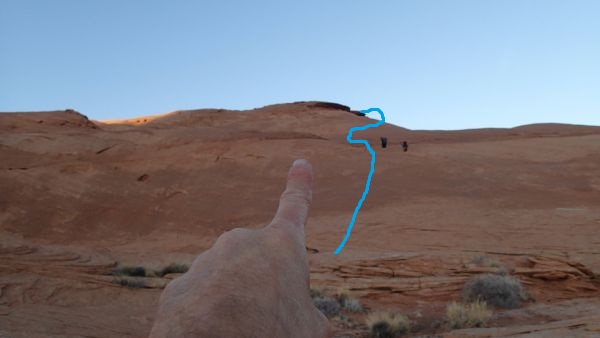
The Approach:
From the parking spot (pkEuphrates)
walk the road about west
about 0.3 miles to where
the head of a wide
shallow drainage drops
down to the southwest
away from the road
(wMontezuRP-01).
This is the Montezuma
water course.
Leave the road and
follow southwest down
the drainage for about
0.2 miles to a drop of
about 50 feet (yMontezumaTp).
Just before reaching the
drop will be an
interesting arch in the
water course.
The Canyoneering / Technical Section:
From the drop at
the head of the canyon (yMontezumaTp)
rimwalk the RDC
(northwest) rim about
200 feet and look for a
spot to downclimb into
the canyon
(wMontezuRP-02).
The spot to downclimb is
about 30 or 40 feet and
very steep with loose
sandy like spots on it.
Lowering packs is a good
idea and if people are
uncomfortable with this
all but the last person
can be provided a meat
anchor.
Once down in the canyon
follow the watercourse
follow down canyon with
downclimbs to 15 feet,
easy stemming and
galumphing.
About 0.3 miles down
canyon after dropping in
from the rim is a
boulder debris section
in the canyon
(wMontezuRP-03).
Downclimb through the
boulders to a sandy
floor below.
The next 0.25 miles of
canyon has easy down
climbs and stemming /
galumphing to about 10
feet off the deck before
reaching the mid point
of Montezuma (yMontezumaMd).
The midpoint of
Montezuma is where the
meat of Montezuma Canyon
begins. This spot is at
a cross joint where you
can get into or out of
on either side. The
cross joint on the RDC
(west) side goes all the
way up to the rim where
there is a rubble pile
allowing access up to
the top of the rim on
the Hard Day Harvey
approach
(wMontezuRP-99).
From the Midpoint of
Montezuma (yMontezumaMd)
Start down into the slot
down canyon that is
deeper and more narrow
than what was above.
The lower section of
Montezuma has a lot more
twisting and winding
walls with a couple
narrow spots.
Rap 1 is about 450 feet
down canyon of the
midpoint for Montezuma.
This section has easy
stemming / galumphing
and a couple spots that
can be swimmers if full
of water. There is
one down climb just
before reaching rap 1
that is about 6 feet but
is very awkward.
The down climb is in a
small V channel and is
overhung as you try to
lower yourself to a
ledge about 6 feet down.
It is difficult to get
onto the ledge and would
be easy to fall another
6 feet past the ledge.
Partner assists will be
very helpful here.
Rap 1 (dMontezumaR1) is
anchored from a choke
stone and drops about 35
feet. Getting onto
rap 1 is very awkward
with your pack since it
is very skinny. At
the bottom of rap 1 is a
pothole that would be a
swimmer for about 10
feet if full. When
dry it is an easy
pothole to get out of.
Looking up while on at
at the bottom of rap 1
is an extremely
beautiful scene with the
twisted walls and arch.
Just after the pothole
at the bottom of rap 1
is a short skinny
section where a large
pack or a barrel chested
person would have a
little difficulty for a
short distance. Then
another pothole that
could be chest deep if
full before a short
patio section.
Shortly down canyon is a
15 foot sloped downclimb
over a hanging garden
like area to the top of
a pothole that can be
avoided with a little
tricky traverse on the
RDC ledge. The
pothole was water filled
when I was there first
so I am not sure how
deep it is but looked
like it could be a
keeper? Just after
the pothole is easy
walking in a short patio
to the beginning of a
slot. Shortly into
the slot is rap 2.
Rap 2 (dMontezumaR2-3)
is anchored from a choke
stone about 20 feet back
from the drop.
From the anchor Rap 2 is
about 60 feet to where
you can get off on a
ledge that is the lip of
a 15 foot deep pothole
that you walk around. On
the other side of the
pothole the canyon
continues to drop
steeply and looks like
it may be a rap but is
an easy downclimb for
another 30 feet.
At the bottom of the
downclimb carefully step
over a small pothole as
you go around a sharp
corner to the left where
you get a great view out
toward lake Powell.
On the other side of the
pothole downclimb into
another pothole to get
to the top of rap 3.
Rap 3 is anchored using
a Sandtrap and drops
about 55 feet to a sandy
pool that would be a
swimmer for 20 or 30
feet if full but an easy
walk out on the other
side. There is a
little odd geometry in
the pothole at the top
of rap 3 where you
should be careful how
you set the Sandtrap so
it pulls well. A
little over 100 feet
down canyon is the top
of rap 4 out on a large
ledge.
Rap 4 (dMontezumaR4) is
anchored from a large
cairn anchor at the top
of the drop and drops
260 feet down a vertical
wall where most of the
rappel is free hanging.
Rap 4 is at the top of a
hue ledge whit awesome
views toward Lake Powell
and the cove below.
Note:
From the top of rap 4
you have a good view of
the beginning of your
exit route. Look
out toward an obvious
point to the left
(southeast). Note
a chute running up to
the top near the end of
the point. That
chute is where you begin
your exit climb.
After rap 4 route find
your way down canyon
boulder hoping and
walking about 0.2 miles
down to the Water of
Lake Powel at the
confluence of Montezuma
and Tripoli Canyons (yMontezuTripBt).
The Exit:
Note - secondary
exit option:
The standard
exit involves
scrambling up a steep
rock filled chute /
ravine to
climb up out of the exit
drainage and away from
the lake. The rock
filled chute / ravine
has portions that may
become impassable if
rocks shift or fall.
It should be noted that
a secondary exit can be
used if the standard
exit chute is found
impassable.
The GPS waypoints for
the secondary exit are
not included in the
waypoint list here in
this description.
Basically the exit is to
walk a bench around to
the east where you can
join with the exit for
Euphrates Canyon.
This secondary exit is
pretty easy to find but
will add an additional
1.1 miles to the route
if used. Below is
a quick description of
the exit route.
If you find the exit
ravine impassable,
scramble back down
toward the lake where
the Tripoli and
Montezuma canyons meet (yMontezuTripBt).
Next scramble over to
the large bench on the
east side of the inlet
you are in. Route
find your way south
along the shelf / bench.
The first few hundred
feet of this will be
steeply sloped toward
the lake and you will
pass a seep along the
way. A short
distance past the seep,
the bench will level off
and become very wide and
easy to travel on.
Continue along the bench
as it turns and starts
heading east. As
the bench starts east it
becomes very wide and
travel is quick and easy
with great views of the
lake. Continue
east for about 0.75
miles ridge that travels
up to the left (north).
On the other side (east
side) of the ridge is
another drainage winding
down to the lake and is
the Euphrates drainage.
The ridge running up to
the north is part of the
standard Euphrates exit.
Route find your way
north up the ridge and
follow the Euphrates
exit to get back to the
mesa top. More
information on this
ridge exit can be found
on the Euphrates page.
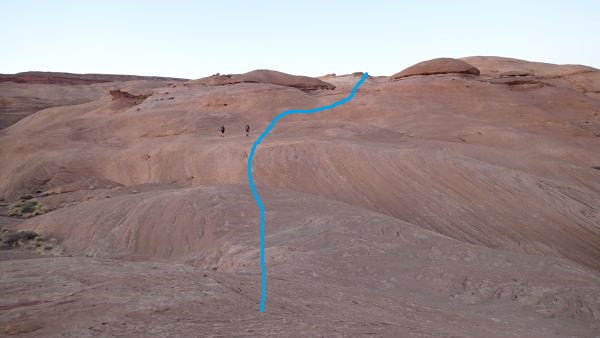
Standard Exit
From the
end of Montezuma (yMontezuTripBt)
look east toward an
point about 700 feet
away and note a chute
dropping down from the
left side of it.
That chute is what you
will climb up to begin
your exit climb.
Scramble up the hill
side about 450 feet to
the bottom of the chute
(wMontezuRP-04).
After reaching the the
top of the chute
(wMontezuRP-05) turn
left and scramble up the
steep slickrock slope to
the north. About
150 feet up the slope
the grade will level off
a bit (wMontezuRP-06)
where it is easy to walk
but you will still be
gaining elevation.
Note:
If you find the slope
too steep and wish a
more gentle route up,
continue east after
getting to the top of
the chute and walk down
the other side about 150
feet. Here you
will find a more gentle
slope up.
Route find your way
northeast up the slick
rock and keep your eye
out for the top of a
dome with a slickrock
cliff face at the top of
it (the others will just
be rolling tops) about
600 feet away. Go
up and around the cliff
face on its south side
then over to its north
side as shown below.
Route find your way
northeast up the slick
rock and keep your eye
out for the top of a
dome with a slickrock
cliff face at the top of
it (the others will just
be rolling tops) about
600 feet away.
As you get near the base
of that dome you will
cross over a small
drainage
(wMontezuRP-07).
Going straight up the
slick rock to the dome
is very steep. Instead
traverse the slope
staying relatively low
for about 250 feet to
where it is easier to
turn left and go up to
the slope at a more
gentle grade
(wMontezuRP-08).
Travel north up the
slope to a point on the
north side of the cliff
face you were using as a
land mark
(wMontezuRP-09).
Continue north for about
750 feet and aim for a
set of sandstone loaf
tops that are kind of
mushroom shaped.
Make your way to those
and cross between them
(wMontezuRP-10).
Make your way to the
mushroom shaped tops and cross between them.
Continue north for about
500 feet to what feel
like a top out
(wMontezuRP-11).
From here you begin to
see more of the rim to
the north.
Continue following the
top of the sandstone
north toward the rim.
The drainage on the left
(west) is Tripoli
Canyon.
About 0.3 miles is where
this route joins into
the exit for Euphrates
Canyon (wEuphrateRP-14).
This point may go
un-noticed when
traveling from this
direction.
Continue north along the
top of the sandstone
another 0.2 miles to
where the route gets to
the base of the cliff
band at the bottom of a
point (wEuphrateRP-15).
After reaching the point
(wEuphrateRP-15) turn right and walk more
east and contour around
the bottom of the cliff
band for about 0.2 miles
back to the bottom of
the rubble pile used to
get down off the rim on
the approach
(wEuphrateRP-02).
Scramble up the rubble
pile to the top of the
rim then route find your
way about 0.2 miles
northeast to your
vehicles (pkEuphrates).
Downloadable GPX files
available at
BG-Gear Store
(easier than manual entry and a great way to support
Bluugnome).
Waypoint naming convention and map symbol information can be found on the Glossary page.
Elevations are approximate.
BEFORE
manually entering coordinates set your system to WGS84 datum and Lat/Lon hddd.ddddd° coordinate format.
Inconsistent datum's and coordinate formats will result in location errors.
Click to show / expand the list of waypoints below........
| Montezuma (1) - Drive in to trailhead |
- extTicaboo1
Lat/Lon (WGS84): N 37.69720
W -110.67138
Elev: 4,520 Feet
Exit off of highway 276 to get to the Ticaboo Mesa area. Turn east and leave the highway on a dirt road. Near Mile post 25.
- TicabooDP-01
Lat/Lon (WGS84): N 37.68607
W -110.65188
Elev: NaN Feet
Continue straight for the main area of Ticaboo Mesa. Or Turn right (south) here for an alternate route over toward the Smith Fork Canyons.
- TicabooDP-02
Lat/Lon (WGS84): N 37.67981
W -110.62886
Elev: NaN Feet
Road junction with faint road running to the south. Continue straight (east).
Road to the south is about 1.25 miles long and goes down toward Cane Spring Well.
- TicabooDP-03
Lat/Lon (WGS84): N 37.68038
W -110.62628
Elev: 4,565 Feet
Exit to a spot to camp if the roads ahead are too rough.
- TicabooDP-04
Lat/Lon (WGS84): N 37.67963
W -110.60429
Elev: NaN Feet
Junction for a road going south. Continue straiaght (north east) to continue toward Ticaboo Measa. This road junction is near Wild Horse Springs.
- TicabooDP-05
Lat/Lon (WGS84): N 37.68389
W -110.60153
Elev: NaN Feet
Junction for a side road on the left going north. Continue north east toward Ticaboo Mesa.
The road going north is BLM Road 13440 aobut 0.4 miles long and goes over toward Colt Spring.
- TicabooDP-06
Lat/Lon (WGS84): N 37.68667
W -110.59547
Elev: NaN Feet
Junction for a side road going north.
The Road north is BLM Road 13540 and goes out toward Upper South Fork Ticaboo.
- TicabooDP-07
Lat/Lon (WGS84): N 37.69529
W -110.58385
Elev: NaN Feet
Turn off for a side road on the right. Turn right onto the side road and drive southwest.
- extWarmSpring
Lat/Lon (WGS84): N 37.69362
W -110.58484
Elev: NaN Feet
Stay right to go toward the main drainage of Seven Mile Creek and Warm Springs Canyon. Or Stay left to go toward the East Branch of Seven Mile Creek and Ticaboo Mesa.
- ext7MileCkEB
Lat/Lon (WGS84): N 37.69147
W -110.58014
Elev: NaN Feet
Turn right (more south) to continue toward the East Branch of Seven Mile Creek. Or veer left to continue toward Ticaboo Mesa.
- 7MileCkEBDP-01
Lat/Lon (WGS84): N 37.68044
W -110.56997
Elev: NaN Feet
Continuestraight (south) past a side road joining from the left. This road is not shown on all maps.
- 7MileCkEBDP-02
Lat/Lon (WGS84): N 37.67443
W -110.56735
Elev: NaN Feet
Jog in the road near a stock pond. Veer right and continue south. Turning left leads to a berm with a survey marker on it.
- pkHardDayHarvy
Lat/Lon (WGS84): N 37.66329
W -110.55625
Elev: 4,855 Feet
Park here for Hard Day Harvey. Hard Day Harvey is the East Fork of the East Branch of Seven Mile Creek.
- pkEuphrates
Lat/Lon (WGS84): N 37.66296
W -110.54411
Elev: 4,900 Feet
Park hear at a tee in the road to begin the route over to Euphrates.
|
| Montezuma (2) - Approach and Canyon |
- pkEuphrates
Lat/Lon (WGS84): N 37.66296
W -110.54411
Elev: 4,900 Feet
Park hear at a tee in the road to begin the route over to Euphrates.
- wMontezuRP-01
Lat/Lon (WGS84): N 37.66328
W -110.54872
Elev: 4,900 Feet
Leave the road here to head to the top of Montezuma. Follow the draiange dropping down to the southwest.
- yMontezumaTp
Lat/Lon (WGS84): N 37.66088
W -110.55139
Elev: 4,800 Feet
Top Montezuma Canyon (aka of East Of Eden). This is at the top of a drop of about 50 feet to drop into the canyon. You can bypass the drop by scrambling down a steep slope about 200 feet down canyon on the RDC side.
- wMontezuRP-02
Lat/Lon (WGS84): N 37.66049
W -110.55193
Elev: NaN Feet
Top of a spot on the RDC rim where you can scramble down into the top of Montezuma. This drop is about 30 or 40 feet and can be downclimbed. It is recomended to lower packs and climb slowly since it is steep and has loose sandy spots.
- wMontezuRP-03
Lat/Lon (WGS84): N 37.65659
W -110.55568
Elev: NaN Feet
Boulder debris section. Downclimb through the boulders to a sandy floor below.
- yMontezumaMd
Lat/Lon (WGS84): N 37.65365
W -110.55752
Elev: 4,420 Feet
This is where the meat of Montezuma Canyon begins. This spot is at a cross joint where you can get into or out of on either side. The cross joint on the RDC (west) side goes all the way up to the rim where there is a rubble pile allowing access up to the top of the rim on the Hard Day Harvey approach. Very steep on the LDC side over toward Tripoli.
- wMontezuRP-99
Lat/Lon (WGS84): N 37.65572
W -110.55980
Elev: 4,735 Feet
A break in the rim that you can use a boulder fall area to get up to or down from the rim. This spot is at the top of a cross joint that runs down into Montezuma just before the meat of the canyon in the lower section. The cross joint is easily scrambled up or down.
- dMontezumaR1
Lat/Lon (WGS84): N 37.65239
W -110.55757
Elev: NaN Feet
Rap 1 - Montezuma Canyon. Anchored from a chokestone and drops about 35 feet in an extremely cool twisted section that looks incredible as you look up.
- dMontezumaR2-3
Lat/Lon (WGS84): N 37.65166
W -110.55778
Elev: NaN Feet
Raps 2 and 3 - Montezuma Canyon.
Rap 2 anchored from a chokestone about 20 feet back and uses about 60 feet of rope to get to the lip of a pothole that can be avoided. After rap 2 the canyon drops and appears to be more rappel but is a downclimb.
Rap 3 is after the downclimb and around the corner.
Rap 3 is anchored using a sandtrap in a pothole if it is dry. If it is wet you may need to use a pack or get creative.
- dMontezumaR4
Lat/Lon (WGS84): N 37.65125
W -110.55765
Elev: NaN Feet
Rap 4 - Montezuma Canyon. Anchored from a large cairn pile and drops 260 feet down a vertical wall where most of the rap is freehanging. The views out to Lake Powell from here are awesome.
- yMontezuTripBt
Lat/Lon (WGS84): N 37.64862
W -110.55564
Elev: 3,640 Feet
Confluence of Montezuma Canyon (aka East of Eden) and Tripoli Canyons.
|
| Montezuma (3) - Exit |
- yMontezuTripBt
Lat/Lon (WGS84): N 37.64862
W -110.55564
Elev: 3,640 Feet
Confluence of Montezuma Canyon (aka East of Eden) and Tripoli Canyons.
- wMontezuRP-04
Lat/Lon (WGS84): N 37.64797
W -110.55407
Elev: NaN Feet
Bottom of the chute to climb up to start the exit from Montezuma (aka East of Eden) and Tripoli Canyons.
- wMontezuRP-05
Lat/Lon (WGS84): N 37.64770
W -110.55361
Elev: NaN Feet
Top of the climb up the chute for the exit from Tripoli and Montezum (aka East of Eden). From here scramble north up the steep slickrock. If you find it too steep you can go east about 150 feet down to the bottom of a nose that will provide a more gentle slope up.
- wMontezuRP-06
Lat/Lon (WGS84): N 37.64809
W -110.55339
Elev: NaN Feet
After getting to the top of the climb out chute scramble up steep slick rock to here where it begins to level off a little.
- wMontezuRP-07
Lat/Lon (WGS84): N 37.64923
W -110.55186
Elev: NaN Feet
Small drainage to cross over near the base of a dome with a cliff face above. Going straight up the slick rock to the dome is very steep. Instead traverse the slope staying relatively low for about 250 feet to where it is easier to turn left and go up to the slope at a more gentle grade.
- wMontezuRP-08
Lat/Lon (WGS84): N 37.64909
W -110.55103
Elev: NaN Feet
Traverse staying reletively low over to this point where it the slope is more gentle and you can get up to the dome to the north more easily.
- wMontezuRP-09
Lat/Lon (WGS84): N 37.64956
W -110.55133
Elev: 4,360 Feet
Up on the slick rock dome just north of the cliff face that was being used as a visual land mark.
- wMontezuRP-10
Lat/Lon (WGS84): N 37.65140
W -110.55096
Elev: NaN Feet
Route goes between a couple of mushroom shaped caps on a couple of sandstone loafs.
- wMontezuRP-11
Lat/Lon (WGS84): N 37.65293
W -110.55093
Elev: 4,530 Feet
A spot that feel like a top out. From here you can see more of the rim. Contnue north along the top of the sandstone.
- wEuphrateRP-14
Lat/Lon (WGS84): N 37.65657
W -110.54973
Elev: 4,660 Feet
Top out on a prominent sandstone ridge on the exit from Euphrates. If you travel west you can drop down to a point where it is easy to cross Tripoli Canyon about 500 feet away. To continue the exit of Euphrates follow the sandstone ridge up and to the northeast.
- wEuphrateRP-15
Lat/Lon (WGS84): N 37.65895
W -110.54836
Elev: 4,770 Feet
The exit from Euphrates comes next to a point on the rim and is just east of the Tripoli drainage. To follow the exit from Tripoli, Montezuma or Euphrates Canyons, follow along the base of the cliff band about 800 feet east toward the rubble pile where you can climb up to the top of the rim.
On the approach into Tripoli Canyon follow the slickrock along the bottom of the cliff band out to the end of this point. To continue to Tripoli Canyon continue west contouring along the slickrock about 150 feet over to the Tripoli Drainage.
Of note there is a chute on the west side of this point that can be downclimbed as an alternate access route to this area below the rim.
- wEuphrateRP-02
Lat/Lon (WGS84): N 37.66066
W -110.54656
Elev: 4,840 Feet
Top of a rubble pile allowing a way up or down from the rim here.
- wEuphrateRP-01
Lat/Lon (WGS84): N 37.66247
W -110.54494
Elev: NaN Feet
Point to start droping down from the level you poarked on to start the Euphrates route.
- pkEuphrates
Lat/Lon (WGS84): N 37.66296
W -110.54411
Elev: 4,900 Feet
Park hear at a tee in the road to begin the route over to Euphrates.
|