Canyoneering Route Description
Double Deuce Canyon - 4B III (IV)
Ticaboo Measa, Utah.
03-17-13, 5 people, 1 Day (Travel time in route 8.25 hours)
 Double Deuce Left Fork using Seven Mile Exit
11-01-14, 6 people, 1 Day (Travel time in route 7.9 hours)
_ Double Deuce
Right Fork using the Preferred Exit
Time Required - 7 to 10 hours
Distance Left Fork - 3.1 miles Total, 0.6 miles Technical
(using Preferred Exit)
Distance Right Fork - 3.2 miles Total, 0.8
miles Technical (using Preferred Exit)
Rappels - 7 Rappels Left Fork or 8 Rappels
Right Fork, Longest Rappel 125 feet.
Optionally can combine final 2 raps using retrievable anchor
like Smooth Operator and 200 foot rope.
Elevation Range - 4680 - 3730 Feet
Shuttle Required - No Vehicle - High Clearance
(4wd if bad road conditions)
Permit Required - No
Rappelling and anchor gear, Ropes and or pull cords for
rappels up to 125 feet and 40 feet of 1 inch webbing for sling
placement. An additional rope of about 100 feet is required to set an exit
rope for the Preferred Exit Option. Also needed are a couple potshots and a Sandtrap. Ascenders
will also be needed for the exit route since a rope is placed to
make a portion of it easier. Wet
suits are a good idea for Double Deuce Canyon but may not be needed
in warm weather.
Note:
If you bring a 200 foot rope and pull line, the final two raps can
be combined into a single rappel avoiding the use of an awkward
chockstone anchor for the last rap. If you plan to bring a 200
foot rope and pull line PLEASE use a retrievable anchor like the
Smooth Operator or Fiddlestick. This will reduce or possibly
eliminate the rope grooving at the final drop. If combining
the final 2 drops the rope pull path will be around corners and
create rope grooves if anchored as a traditional anchor.
Note:
Both Right and Left Forks need a sandtrap for one rappel in each
fork. Both of these drops can be bypassed making the sandtrap
optional. I do suggest bringing the sandtrap since the section
in the Left Fork just below rap 1 is worth checking out and I
encourage people to take the time to enjoy it.
If you decide to take on the exit route up Seven Mile Canyon, wet
suits are recommended even in warm weather since the pools can be
very cold.
Thanks to Matt Williams for finding this slot and
inviting us on the scouting and exploration of it.
The right and left forks of DoublDouble Deuce Canyon turned out to be a very nice
surprise. Everyone on the first trip through the Left Fork of Double
Deuce thought it was right up there with the quality of some of the Dante
Canyons. Double Deuce is a fun, scenic route that I feel most people will
enjoy.
The right and left forks of Double Deuce are short and
offer only a little technical fun while the portion of the canyon below the
confluence of the forks is committing, fun, challenging and scenic.
Since the upper forks are short I feel it best to include both in this one
route description rather than divided them up separately.
All the potholes on the route had sand bottoms on our
trip through in March 2013 and were not deep enough to cause problems
escaping them. The down canyon sides of some of the potholes were
vertical. If flooding washes sand out, some of these potholes could get
deeper and create keeper potholes. It is a good idea to have a couple
potshots on hand just in case conditions change the character of the canyon.
Route Option to See All the Good Stuff
in Both Fork:
The Upper sections of both the Right and the Left Fork do not offer much fun
or scenery. The lower portions closer to the confluence do offer fun
and scenery. If you want to see all the good stuff in one route I
suggest the following.......
Follow the approach down to the Left Fork. Descend the Left Fork to the confluence. Exit the
confluence by scrambling up the right (southeast) side of the Right Fork.
Go set the exit rope. Return to the Right Fork and go over to the top
of rap 2 in the Right Fork. Descend the Right Fork to the Confluence.
Descend the remainder of the canyon. Follow the Preferred Exit Route.
Return to the parking area to complete the route.
Note:
If you bring a 200 foot rope and pull line, the final two raps can
be combined into a single rappel avoiding the use of an awkward
chokestone anchor for the last rap. If you plan to bring a 200
foot rope and pull line PLEASE use a retrievable anchor like the
Smooth Operator or Fiddlestick. This will reduce or possibly
eliminate the rope grooving at the final drop. If combining
the final 2 drops the rope pull path will be around corners and
create rope grooves if anchored as a traditional anchor.
Exit Options:
There are 3 exit options to exit from Double Deuce. The
Preferred Exit, Exit Up Seven Mile Creek and Exit Down Seven Mile Creek.
Preferred Exit Route -
The Preferred Exit Route involves setting an exit rope to assist with a
section of steep upclimbing of about 15 feet. Setting the rope
involves a side trip of about 30 minutes before starting into the main
technical section of Double Deuce. After setting the exit rope, return
to Double Deuce and descend the canyon down to Seven Mile Creek. Once
in Seven Mile Creek turn left and walk north Up Seven Mile Creek for about
500 feet to a weakness in the LUC (northwest) side. Scramble up the
weakness to the exit rope, get up the short vertical section then continue
up back to Double Deuce to above the technical section then reverse the
approach route back to the car. This makes exiting the canyon short
and easy.
Exit Up Seven Mile Creek -
The exit Up Seven Mile can be physically challenging. If you choose to
Exit up Seven Mile Creek add an R to the canyon rating since a few of the
upclimbs will have some risk of injury involved. Do Not
use the Exit up Seven Mile Creek if you are unsure about your teams
upclimbing ability. You will depend on the team to partner up some of
the upclimbs. The
Most physically difficult section is about 650 feet long between points
w7MileRP-82 and w7MileRP-81 on the map with this description. The Exit
Up Seven Mile Creek has pools of cold water and a few very difficult
upclimbs made worse by clay like mud.
Exit Down Seven Mile Creek -
Ram has posted an exit route where one can exit by going down stream in
Seven Mile Creek. I am not sure where this information was posted so I
do not yet have a link to share. The scenery down Seven Mile is
reported to be very good. Somewhere down close to Lake Powel you can
get up to the mesa top and onto the Warm Springs road by going up a rubble
pile and then a chimney and slab upclimb section. If the level of Lake
Powel is above 3600 feet this exit option may not go.
To get to the Trailhead
Note:
There is a maze of roads on Ticaboo Mesa making it a good idea
to study the map ahead of time and keep a close eye on the map
as you drive.
From Hanksville, UT., drive south on highway 95 for 26 miles to
the junction of highways 95 and 276.
From the junction, drive south on HWY-276 for 25.6 miles then
turn left (east) onto BLM dirt-road 13400 between mile markers
25 and 26 (extTicaboo1).
About 1.5 miles from the highway is a junction (TicabooDP-01)
of BLM roads, 13400 continues east and 13410 branches off to the
south. Continue east on BLM road 13400. Note: If you were headed
to the Smith Fork area you would turn south onto BLM road 13410.
About 2 miles farther is another junction
(TicabooDP-02) of BLM roads, 13400 continues east and 13420
branches off to the south. Continue east on BLM road 13400.
Note: BLM road 13420 to the south goes out to Cane Spring Well
about 1.25 miles south.
About 0.2 miles farther is short side road (TicabooDP-03) on the
left (north) that goes to a camp area.
Stay right to
continue on BLM road 13400. Beyond this point the roads
will have intermittent rough sections.
About 0.37
miles past here is a fork in the road where the two roads rejoin
a short distance later. The low road is typically the
smoothest.
About 1.7 miles farther is another junction (TicabooDP-04) of
BLM roads (13400 continues north-ish and 13430 branches off to
the south).
Continue north on BLM road 13400.
Note: If you were going to the roads between Warm Springs Creek
and Sevenmile Creek, you would turn south onto BLM road 13430.
About 0.3 miles farther is another junction (TicabooDP-05) of
BLM roads (13400 continues northeast and 13440 branches off to
the north).
Continue straight northeast on BLM road 13400.
Note: BLM road 13440 to the south goes out to Colt Spring Well
about 0.4 miles north.
About 0.5 miles farther is a junction (TicabooDP-06) of BLM
roads (13400 continues northeast and 13450 branches off to the
north).
Continue straight northeast on BLM road 13400.
About 0.9 miles farther is a junction (TicabooDP-07) of BLM
roads (13400 continues northeast and 13430 branches off to the
south).
Turn south onto BLM road 13430.
Note: If you were
going to Tough, SF Ticaboo or Sleepytime Trio Canyons you would
continue northeast on BLM road 13400.
About 700 feet farther is a fork in the road (extWarmSpring).
At this fork veer right and and travel south toward the Warm
Springs area.
Drive the road south for about 3.6 miles to a junction with
another road (WarmSpngDP-01). This is where the alternate drive
in route joins back with this standard drive in route. Turn
left at this junction and continue to the parking spot you need
to go to.
About 0.3 miles farther south on the road you will come to where
the road makes a sharp bend to the right. On the left side
of the road at this bend is a large clearing where a few
vehicles can be parked (t2Deuce). This is where you park
for the Double Deuce route down into the Seven Mile drainage.
To leave the Exit Vehicle / Escape Pod
No exit vehicle is needed. This is done as a loop route.
GPS coordinate information listed at the bottom. For information about waypoint naming and map symbols, refer to the
Glossary page.

Click the links for maps of the route.
Map of the drive into the route.
Map of the entire route.
Map zoomed in on upper forks.
Map zoomed in on lower canyon and preferred exit.
Left Fork Approach
and Canyon down to
Confluence:
From the trailhead /
parking area (t2Deuce)
walk about 300 feet
southeast over to the
rim (w2DeuceRP-01).
From here you have a
good view over most of
the Double Deuce area.
This is also where the
left fork of the Double
Deuce drainage drops down
off the rim and starts
down into the sandstone
layers.
Walk south along the RDC
rim for about 450 feet
to a point that is easy
to drop down to the next
lower dirt shelf
(w2DeuceRP-02).
After dropping down to
the next lower dirt
shelf continue south
along the rim for
another 500 feet to the
top of a break in the
rim (w2DeuceRP-03).
As you hit this break
start dropping down the
slickrock and traversing
in the up canyon
direction to a spot to
scramble down to the
open slickrock below.
Walk east about 300 feet down the slickrock below to the left fork of the
Double Deuce drainage
(w2DeuceRP-04).
Up canyon of this point
are a few minor potholes
and a rubble filled drop
where the head of the
left fork drops off the
rim.
Once down in the
left fork of Double
Deuce
(w2DeuceRP-04) travel
south down canyon.
Down canyon of here are
multiple potholes which
can be bypassed easily.
When bypassing potholes
there are multiple
places you can drop into
the canyon so feel free
to enjoy the sections
that don't look like
more work than they are
worth considering you
can walk along the rim
right next to them.
Setting the Exit
Rope for the Preferred
Exit:
Keep in mind you
need to set the exit
rope for your exit
BEFORE you start down
the technical section of
Double Deuce. As
you follow down the Left
Fork likely bypassing
the few potholes keep an
eye out to the east to
locate the route over to
set the exit rope.
Look for wide open
rolling slick rock that
you can easily walk to
the east and cross over
the Right Fork of Double
Deuce and continue to
the top of a cross joint
that will lead down to
the spot to set the exit
rope. Walk East
about 0.29 miles over to
the top of the cross
joint (w2DeuceRP-05)
crossing over the Right
Fork and route finding
your way over the
rolling slickrock.
Use the image below to
help identify where you
are trying to go.
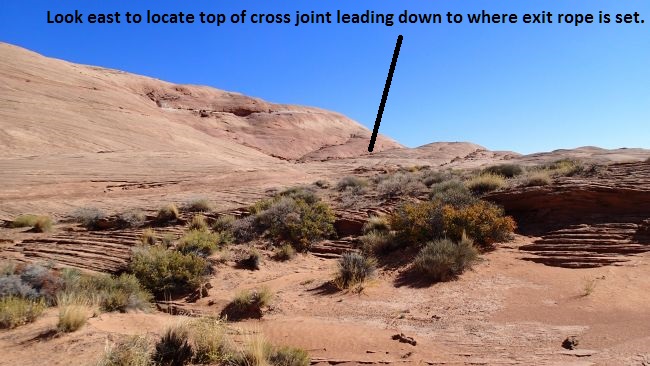 Look east to locate the top of a cross joint that will lead down to
where you go set the exit rope.
Look east to locate the top of a cross joint that will lead down to
where you go set the exit rope.
From the top of the
cross joint walk
southeast through the
cross joint on mostly
level terrain for about
600 feet to the top of a
steep sloping section
(w2DeuceRP-06).
When you get to the of
the steep sloping
section stay to the
right (southwest) to
find a place to scramble
down along the wall to
the next lower level.
The scramble does have
some exposure but the
moves are easy.
Stay left (southwest)
and walk down about 150
feet to the top of a
ravine (w2DeuceRP-07)
leading down to Seven
Mile Creek.
Setting an exit rope
here at the top of the
ravine anchored on a
large rock will assist
with exiting up this
ravine from Seven Mile
Creek. A section
of about 15 feet is
vertical and is a
difficult and sketchy
upclimb due to loose
rock. A rope of about
100 feet is needed to
set the anchor since a
good anchor point is
well above the vertical
upclimb. Anchor
the rope to a large
boulder at the top of
the ravine and take it
down to the bottom of
the vertical section.
Depending on where you
anchor from a shorter
exit rope may be able to
be used.
After setting the exit
rope, reverse your route
to go back to the Left
Fork of Double Deuce
Canyon above rap 1.
After getting back into
the the Left Fork of
Double Deuce from
setting the exit rope, travel a
few hundred feet down
canyon to the top of rap
1.
Rap 1
in the Left Fork (d2DeuceLF_R1-2) is anchored using
a Sandtrap about 25 feet
back from the drop and
the drop is about 40
feet. Rap 1 drops
down a a mostly sloped
slot to a pool below
about waist deep with a
large choke stone on the
down canyon side.
Rap 2
in the Left Fork is anchored from
the choke stone after
rap 1. Rap 2 drops
a total of about 35
feet. Arguably rap
2 can be considered a
downclimb. The
first part of rap 2 is
an easy downclimb to the
steeper second half.
The bottom portion of
rap 2 can be downclimbed
by canyoneers skilled at
wide and flaring stems
and surrenders well to
partner assists.
At the bottom of rap 2
is a pothole about waist
deep. If this
pothole gets deep from
sand washing out it will
likely be a keeper.
After rap 2 the canyon
remains narrow for about
300 feet before opening
wide as you get to the
confluence of the left
and right forks of
Double Deuce (j2DeuceConf).
Right Fork Approach
and Canyon down to
Confluence:
From the trailhead /
parking area (t2Deuce)
walk east about 450 feet
down into the wash
leading down to the top
of the Left Fork of
Double Deuce
(w2DeuceRP-20).
Cross over the wash and
continue east across the
mesa top over to the
Right Fork of Double
Deuce. Route find
your way about 0.27
miles east to drop down
into the wash leading
down to the Right Fork
of Double Deuce Canyon (y2DeuceRF-Tp).
Turn right and walk
south down the wash
about 350 feet to the
top of rap 1 for the
Right Fork.
Rap 1 in the Right Fork
(d2DeuceRF_R1) is
anchored from boulders
in the wash and drops
about 45 feet.
After rap 1 you are down
off the mesa top and
down to the next lower
shelf. It is still
pretty wide open on the
shelf and is not yet
canyon like.
A little over 200 feet
after rap 1 is the start
of a short section
(w2DeuceRP-21) where
you will need to galumph
along in a shallow Vee
Slot. This section
is very short then opens
up to more wide open
wash and slickrock.
About 400 feet farther
is the start of another
section with some easy
galumphing. This
section of galumphing
goes for about 90 feet
before reaching the top
of rap 2.
Rap 2 in the Right Fork
(d2DeuceRF_R2) drops
about 35 feet and can be
downclimbed but is a
spicy downclimb.
All but the last person
can be given a meat
anchor and only the last
person needs to
downclimb. The
downclimb is in a crack
/ chute with sections of
flaring that will
require thought to
downclimb. If you
are uncomfortable
downclimbing this drop
and anchor can be made
from rocks at the top of
the drop or you can
simply walk around the
drop on the LDC side.
After rap 2 is a section
about 650 feet long that
has a mix of galumphing,
walking a couple easy
downclimbs and some
potholes. None of
the potholes in this
section would be a major
problem and most can be
stemmed over with a
little effort. A
couple of the potholes
could be chest deep or
so if full of water but
are likely dry most of
the time. Only one
of the potholes has an
overhung down canyon lip
indicating that if the
pothole scoured out and
was deep it may take a
little effort to get up
out of. As this
section ends
(w2DeuceRP-22) things
widen out to easy
walking in wide open
spaces. Walk down
canyon in wide open
spaces about 300 feet to
the top of rap 3.
Note - go set
the exit rope:
Just before starting
down rap 3 it is a good
time to take the side
trip to go set the rope
for the exit route.
Refer to the section
above labeled Setting
the Exit Rope for the
Preferred Exit.
Setting the exit rope
must be done
before
continuing down canyon
of the confluence.
Rap 3 in the Right Fork
(d2DeuceRF_R3) is
anchored from a sandtrap
and drops about 45 feet
down to a pool that
would be a swimmer if
full followed by a
section only a few feet
long of skinny slot and
one pool to stem over.
Rap 3 and the skinny
part after can easily be
bypassed on the RDC side
by going up around then
scrambling down the
slickrock down to the
confluence.
Walk a few more feet
down to the confluence (j2DeuceConf).
Canyon /
Technical Section down
canyon from the
confluence:
Traveling down from the
confluence the walls
narrow up again.
In a few hundred feet
you come to a set of
stem style downclimbs
one right after the
other (w2DeuceRP-08).
The first down climb is
about 30 feet and the
second is about 20 feet.
Each of the downclimbs
has a long pool to swim
if water filled.
Next a little walking in
a corridor for a couple
hundred feet.
Next are a few short
easy downclimbs and a
couple shallow pools to
cross before reaching
the top of a V shaped
slot that drops about 25
feet down a steep slope.
A few more short downclimbs
and pothole features to
cross.
Shortly before reaching
rap 3 is a downclimb of
about 15 feet down a
steep slope that looks
more difficult than it
is.
Rap 3 (d2DeuceMF_R3) is
anchored about 8 feet
back from the top of the
drop from a deadman
anchor and drops about
25 feet to sand filled
pothole about waist
deep. The pothole
at the bottom of rap 3
is a double pothole with
a divider in the center
(whatch your feet if
walking in murky water).
After rap 3 is a short
corridor to walk.
Shortly after the
corridor is an downclimb
of about 6 feet.
Just after the down
climb is rap 4.
Rap 4 (d2DeuceMF_R4-5) is
anchored from a deadman
anchor on the up canyon
side of a pothole at the
top of rap 4. The
pothole at the top of
rap 4 is narrow and easy
to step over but is
deep. Rap 4 drops
about 20 feet down a
mostly vertical wall.
About 40 feet down
canyon of rap 4 is a
huge boulder wedged
overhead in the canyon.
Rap 5 drops under the
overhead boulder after
rap 4. Rap 5 is
anchored from a pinch
point between the
boulder and the canyon
wall and drops about 35
feet down a sloped wall.
At the bottom of rap 5
is a pothole to be
careful not to slip down
into.
Down canyon of rap 5 is
some galumphing and a
chimney downclimb of
about 15 feet before
reaching the top of rap
6.
Rap 6 (d2DeuceMF_R6-7) is
anchored from a deadman
at the top of the drop.
There is also a good
spot for a choke stone
anchor about 8 feet
back. From the top
of rap 6 you can see the
last part of the canyon
and down to the open
canyon below and down to
the confluence with
lower Seven Mile Creek.
Rap 6 drops about 45
feet down a vertical
wall to ledge type area
where 3 or 4 people can
fit. From this
ledge is a downclimb of about
15 feet in a V shaped
slot down to a 40 foot
long pool.
Rap 7 is the final drop
and is on the other side
of the 40 foot long pool. Rap 7 is
anchored from a chokestone down in the V
shaped downclimb at the
bottom of rap 6.
Setting the anchor for
rap 7 is a little
awkward and must be set
carefully. After
the anchor is set swim
the pool then climb out
where you are greeted
with the final drop of
about 85 feet.
From the anchor of rap
7, across the pool then
down to the bottom of
the rap uses about 125
feet of rope travel.
The pool at the top of
rap 7 was full when we
went through in March
2013 and was a swimmer
for part of it then
became only waist deep
and easy to exit the
other side. If
sand were to wash out of
this pool and the pool
was dry it might be a
little more of a
challenge to get out of.
Note:
A 200 foot rope can be
used do combine raps 6
and 7 and thus avoid
using the awkward choke
stone anchor at the top
of rap 7 above the pool.
However the rope pull
path is around corners
and will create rope
grooves. If you
intend to combine raps 6
and 7 use a retrievable
anchor like the Smooth
Operator of Fiddlestick.
This will reduce and
possibly eliminate rope
grooving here. If
you do not have a
releasable anchor to
reduce the rope grooving
please do not combine
raps 6 and 7, this will
reduce rope grooves
scaring the canyon
walls.
After rap 7 boulder hop
and walk your way about
600 feet down canyon to
the end of Double Deuce
Canyon to where it joins
into lower Seven Mile
Creek (y2DeuceBt).
The Exit:
There are 3
options for exiting
Double Deuce. The
first option, described
here, is the Preferred Exit.
The Exit Down Seven Mile
is not Described here
since I have never done
it. The Exit Up
Seven Mile is the first
way we had exited Double
Deuce and was a
difficult exit. I
have included the
description for it
simply because some
people might be curious
to hear about it.
I do not recommend the
Exit Up Seven Mile.
The Preferred Exit -
To follow this exit you
need to set an exit rope
before
you drop down into
Double Deuce Canyon.
See the approach portion
of the route description
for details on setting
the exit rope.
From the bottom of
Double Deuce Canyon (y2DeuceBt)
turn left and walk
northeast up Seven Mile
Creek. About 400
feet up Seven Mile Creek
look for a ravine on the
LUC (west) side of Seven
Mile Creek.
From the bottom of the
ravine (j2DeuceExt)
leave Seven Mile Creek
and start up into the
ravine to go northwest
up out of Seven Mile
Creek. The ravine
does not extend all the
way down into Seven Mile
Creek and you will need
to go up a dirt slope
area to get to the
bottom of the ravine and
start up it.
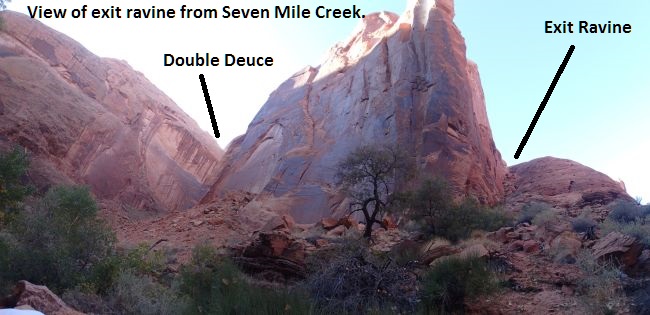 The exit ravine and the
bottom of Double Deuce are
visible at the same time.
The exit ravine and the
bottom of Double Deuce are
visible at the same time.
About 400 feet up the
ravine is an upclimb of
about 15 feet that can
be upclimbed but is
difficult due to
exposure and loose rock.
It is best to set an
exit rope as described
in the approach section.
When you get to the
upclimb use the rope as
a hand line or put
ascenders on if that
works better for you.
After the upclimb
continue up the ravine
to its top out.
From the top of the
ravine (w2DeuceRP-07)
stay left (west) along
the wall to a section
allowing you to scramble
up to the next higher
level. The
scramble up is not
difficult but does
involve some exposure.
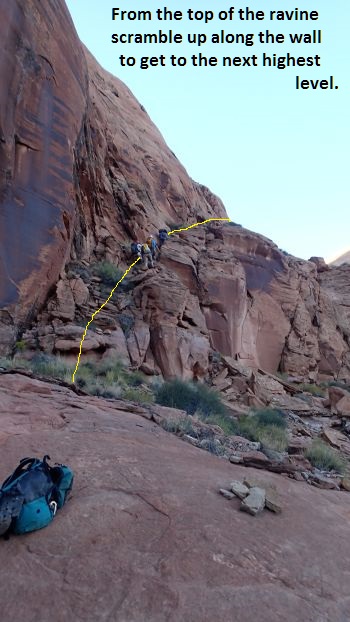 After getting up the exit
ravine upclimb along this
path to get to the next
highest level.
After getting up the exit
ravine upclimb along this
path to get to the next
highest level.
After you get up to the
next higher level you
will be at one end of a
cross joint
(w2DeuceRP-06).
Follow up the cross
joint on mostly level
ground for about 600
feet to the other end
(w2DeuceRP-05).
When you exit the upper
end of the cross joint
look left (west) to see
the upper area over the
Left and Right Forks of
Double Deuce.
Cross over the right and
left forks of Double
Deuce. Then route find
your way up to the mesa
top to the west.
There are a few spots
you can get to the mesa
top to the west.
Feel free to route find
your own way or follow
the reverse of the
approach route for the
Left Fork of Double
Deuce.
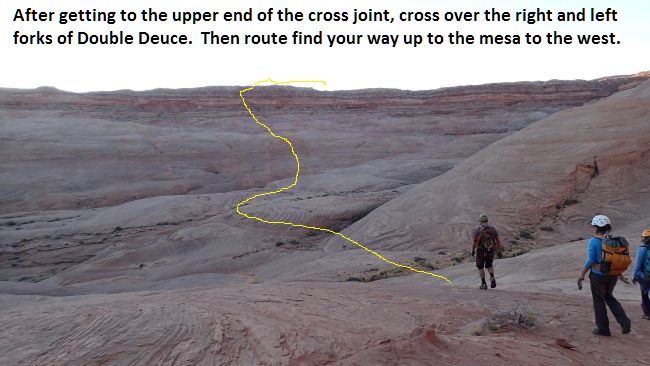 After getting to the upper
end of the cross joint,
cross over the right and
left forks of Double Deuce.
Then route find your way up
to the mesa top to the west.
After getting to the upper
end of the cross joint,
cross over the right and
left forks of Double Deuce.
Then route find your way up
to the mesa top to the west.
After getting to the
mesa top
(w2DeuceRP-02) walk
northwest a few hundred
feet to get back to the
parking spot (t2Deuce).
Exit Up Seven
Mile Creek - NOT
Recomended -
I do not recommend this
exit option as it is
longer and much more
difficult. I leave
the description here for
completeness and to
satisfy the curiosity of
those who may wonder
what is in Lower
Sevenmile Canyon.
From the
bottom of Double Deuce
Canyon (y2DeuceBt)
turn left and walk north
up the Seven Mile Creek
drainage. Travel
here is easy walking
with huge scenic walls
on both sides.
There will be a few
sections of boulders to
scramble your way
through.
About 0.5 miles up Seven
Mile from the bottom of
Double Deuce is a dry
fall of about 15 feet
(w7MileRP-83).
Scramble around the
ledges on the sides to
bypass the dry fall.
About 600 feet farther
up canyon is pile of
huge boulders blocking
the drainage
(w7MileRP-82).
This marks the start of
the difficult section of
the exit up the Seven
Mile Creek Drainage.
The next xx feet or
miles up Seven Mile
Creek is the physically
difficult portion of the
exit route.
Note:
The cross joint on the
Left (west) side of the
canyon running down to
the huge boulder pile
looks like it might go
as an optional exit from
Seven Mile Creek.
However this has not
been confirmed.
Climbing up through this
boulder pile
(w7MileRP-82) is not
a simple scramble.
You will need to route
find your way up through
these boulders and
likely need to assist
one another with packs
up a couple spots.
Climbing around the RUC
side of the lower
portion of the boulders
then up through the
boulders to the LUC side
seemed to work for us.
After getting to the top
of the boulders scramble
back down to the canyon
floor and walk a short
distance of to the
bottom of an upclimb of
about 12 feet. If
the canyon is full of
water there will be a
pool at the bottom of
this upclimb that will
be a swimmer. The
upclimb is about 12 feet
and is very difficult
even with a good climb
and doing a partner
assist. The
upclimb is overhung at
the bottom with little
to no way to get a good
start. There are
rocks at the top of the
drop that would catch a
potshot with a rope tied
to it then a rope can be
used to ascend up but
this will still be a
difficult task.
The mud in the area
makes things worse since
it is very slick.
Even with an etrier
rigged on this upclimb
it is very difficult.
This upclimb is short
but technically the most
difficult on the route.
A couple hundred feet up
canyon is another
boulder to upclimb
around. Going
around RDC then climbing
about 12 feet up a
chimney style upclimb.
A short distance later
is a long pool that if
full of water will be a
swimmer for about 60
feet. Mid way
across there is a large
choke stone overhead.
Most people will need to
swim this pool since
stemming over is
difficult and only
possible if not wearing
their pack. On the
other side of the pool
is a chimney style
upclimb of about 25
feet. The upclimb
is not difficult but
hauling a pack up
would be so hauling pack
up with rope would be
helpful.
A short distance up
canyon is another pool
that will be a swimmer
if full of water.
On the other side of the
pool is a chimney style
upclimb of about 15 feet
which is also not
difficult but pack
hauling will be helpful.
After a couple more
short pools and easy
scrambles the canyon
begins to widen out a
little and travel
becomes easier
(w7MileRP-81). As
the canyon begins to
widen out a little
travel becomes much
easier as you cross a
few small pools (if full
of water) and enjoy
several easy upclimbs /
scrambles.
Continue up canyon about
0.3 miles to a major
fork in the canyon which
is the confluence of the
Big East Fork and the
Main Seven Mile canyon
(y7MileBEF-Bt).
When you reach the
confluence of the Main
Seven Mile Canyon and
the Big East Fork of
Seven Mile
(y7MileBEF-Bt) the Big
East Fork is to the
right (east) and is
visually the larger of
the two drainages.
The fork to the left is
the Main Seven Mile
drainage.
From the confluence look
up the Main Seven Mile
drainage and note a
chute running up out of
the drainage about 140
feet from the
confluence. That
chute runs up the west
side and is where you
will start your exit up
out of Seven Mile
Canyon. Walk north
up the Main Seven Mile
drainage a to the bottom
of the chute
(j7MilEx2RP-01).
The chute looks like it
will be a difficult
climb out but actually
goes pretty easily.
The first couple hundred
feet the chute is steep
and has a lot of loose
rock so be careful about
what you trust. At
the top of the chute you
will find yourself on
slick rock that is a lot
more solid.
From the top of the
chute continue northwest
following a fault line
in the slick rock.
Following up this fault
involves walking up a
steep slope and a couple
short spots of easy
scrambling. About
0.22 miles up the
slickrock will top out
just after scrambling up
another very short chute
(j7MilEx2RP-02).
After topping out on the
slickrock
(j7MilEx2RP-02) you will
be on a large dirt ledge
/ shelf just below the
rim. Right at the
top out is also the
bottom of a rubble pile
to the northwest
creating a break in the
rim. Route find
your way about 350 feet
up the rubble pile to
the top of the rim
(j7MilEx2RP-03).
After getting to the top
of the rim
(j7MilEx2RP-03) begin
walking southwest and
skirting around the
south side of a small
nearby hill. About
0.4 miles into your walk
small drainages will
begin to form a larger
one (w2DeuceRP-30).
Route find your way
through the desert
roughly following this
drainage about 0.4 miles
farther to where the
vehicles were parked to
start the route (t2Deuce).
Downloadable GPX files
available at
BG-Gear Store
(easier than manual entry and a great way to support
Bluugnome).
Waypoint naming convention and map symbol information can be found on the Glossary page.
Elevations are approximate.
BEFORE
manually entering coordinates set your system to WGS84 datum and Lat/Lon hddd.ddddd° coordinate format.
Inconsistent datum's and coordinate formats will result in location errors.
Click to show / expand the list of waypoints below........
| Double Deuce (1) - Drive in to Trailhead |
- extTicaboo1
Lat/Lon (WGS84): N 37.69720
W -110.67138
Elev: 4,520 Feet
Exit off of highway 276 to get to the Ticaboo Mesa area. Turn east and leave the highway on a dirt road. Near Mile post 25.
- TicabooDP-01
Lat/Lon (WGS84): N 37.68607
W -110.65188
Elev: NaN Feet
Continue straight for the main area of Ticaboo Mesa. Or Turn right (south) here for an alternate route over toward the Smith Fork Canyons.
- TicabooDP-02
Lat/Lon (WGS84): N 37.67981
W -110.62886
Elev: NaN Feet
Road junction with faint road running to the south. Continue straight (east).
- TicabooDP-03
Lat/Lon (WGS84): N 37.68038
W -110.62628
Elev: 4,565 Feet
Exit to a spot to camp if the roads ahead are too rough.
- TicabooDP-04
Lat/Lon (WGS84): N 37.67963
W -110.60429
Elev: NaN Feet
Junction for a road going south. Continue straiaght (north east) to continue toward Ticaboo Measa. This road junction is near Wild Horse Springs.
- TicabooDP-05
Lat/Lon (WGS84): N 37.68389
W -110.60153
Elev: NaN Feet
Junction for a side road on the left going north. Continue north east toward Ticaboo Mesa.
- TicabooDP-06
Lat/Lon (WGS84): N 37.68667
W -110.59547
Elev: NaN Feet
Junction for a side road going north.
- TicabooDP-07
Lat/Lon (WGS84): N 37.69529
W -110.58385
Elev: NaN Feet
Turn off for a side road on the right. Turn right onto the side road and drive southwest.
- extWarmSpring
Lat/Lon (WGS84): N 37.69362
W -110.58484
Elev: NaN Feet
Stay right to go toward the main drainage of Seven Mile Creek and Warm Springs Canyon. Or Stay left to go toward the East Branch of Seven Mile Creek and Ticaboo Mesa.
- WarmSpngDP-01
Lat/Lon (WGS84): N 37.65055
W -110.60412
Elev: NaN Feet
Alternate drive in route and standard drive in route for the Warm Springs area join here.
- t2Deuce
Lat/Lon (WGS84): N 37.64746
W -110.60106
Elev: 4,560 Feet
Trailhead for Double Deuce canyon. This is a large clering for a few vehicles to park where the road makes a sharp bend.
|
| Double Deuce (2) - Left Fork Approach and Canyon to Confluence |
- t2Deuce
Lat/Lon (WGS84): N 37.64746
W -110.60106
Elev: 4,560 Feet
Trailhead for Double Deuce canyon. This is a large clering for a few vehicles to park where the road makes a sharp bend.
- w2DeuceRP-01
Lat/Lon (WGS84): N 37.64709
W -110.60012
Elev: NaN Feet
Walk southeast from the parking spot to this spot on the rim where the Left Fork of Double Deuce dives down into the sandstone layers.
- w2DeuceRP-02
Lat/Lon (WGS84): N 37.64593
W -110.60018
Elev: NaN Feet
While walking the RDC rim from the head of the left fork of Double Deuce this is a spot where it is easy to drop down to the next lower dirt shelf.
- w2DeuceRP-03
Lat/Lon (WGS84): N 37.64453
W -110.60038
Elev: NaN Feet
Break in the rim that allows you to climb down to the slick rock below. After dropping down here traverse and work your way down the slickrock and in the up canyon direction to a spot to scramble down to the pen slickrock below.
- w2DeuceRP-04
Lat/Lon (WGS84): N 37.64502
W -110.59904
Elev: 4,320 Feet
Down in Double Deuce Canyon in a series of potholes that can be bypassed if desired.
- d2DeuceLF_R1-2
Lat/Lon (WGS84): N 37.64292
W -110.59810
Elev: NaN Feet
Raps 1 and 2 in the left fork of Double Deuce Canyon.
Rap 1 anchored from a sandtrap about 25 feet back and drops about 40 feet to a waist deep pool.
Rap 2 anchored from the large chokestone at the pool below rap 1 and drops a total of about 35 feet. Rap 2 can be downclimbed and may need partner assists.
- j2DeuceConf
Lat/Lon (WGS84): N 37.64234
W -110.59752
Elev: 4,170 Feet
Confluence of the left and right forks of Duoble Deuce Canyon. You can enter or exit the canyon here on the LDC side just below the confluence.
|
| Double Deuce (3) - Right Fork Approach and Canyon to Confluence |
- t2Deuce
Lat/Lon (WGS84): N 37.64746
W -110.60106
Elev: 4,560 Feet
Trailhead for Double Deuce canyon. This is a large clering for a few vehicles to park where the road makes a sharp bend.
- w2DeuceRP-20
Lat/Lon (WGS84): N 37.64756
W -110.59957
Elev: 4,530 Feet
Cross over the wash leading down toward the West Fork here. Continue east along the mesa top to go to the Right Fork.
- y2DeuceRF-Tp
Lat/Lon (WGS84): N 37.64742
W -110.59472
Elev: 4,550 Feet
Top drop in for the Right Fork of Double Deuce Canyon. This is a shallow wash like area at this point.
- d2DeuceRF_R1
Lat/Lon (WGS84): N 37.64660
W -110.59540
Elev: NaN Feet
Rap 1 - Double Deuce Canyon - Right Fork.
Anchored from boulders and drops about 45 feet.
- w2DeuceRP-21
Lat/Lon (WGS84): N 37.64601
W -110.59570
Elev: 4,445 Feet
Short section of Vee Slot to galumph through before the route opens up to wide wash and slickrock again.
- d2DeuceRF_R2
Lat/Lon (WGS84): N 37.64492
W -110.59664
Elev: NaN Feet
Rap 2 - Double Deuce Canyon - Right Fork. Just before reaching this drop is a section about 90 feet long where you will galumph through it down to the rap. This rap drops about 35 feet and can be downclimbed but is spicy. All but the last person can have a meat anchor and the last person down can climb down the skinny crack / chute. If you are not comfortable with this drop you can anchor from rocks above or simply go around this drop.
- w2DeuceRP-22
Lat/Lon (WGS84): N 37.64330
W -110.59685
Elev: 4,176 Feet
End of the pothole and galumph section after rap 2.
- d2DeuceRF_R3
Lat/Lon (WGS84): N 37.64256
W -110.59723
Elev: NaN Feet
Rap 3 - Doulbe Deuce - Right Fork. Anchored suing a sandtrap and drops about 45 feet to a pool that would be a swimmer if full. After this rap is a skinny section only a few feet long to galumph before getting to the confluence. This drop and the skinny part below it can be easily bypassed RDC by walking around and scrambling down the sloped slickrock to the confluence.
- j2DeuceConf
Lat/Lon (WGS84): N 37.64234
W -110.59752
Elev: 4,170 Feet
Confluence of the left and right forks of Duoble Deuce Canyon. You can enter or exit the canyon here on the LDC side just below the confluence.
|
| Double Deuce (4) - Main Fork Below Confluence |
- j2DeuceConf
Lat/Lon (WGS84): N 37.64234
W -110.59752
Elev: 4,170 Feet
Confluence of the left and right forks of Duoble Deuce Canyon. You can enter or exit the canyon here on the LDC side just below the confluence.
- w2DeuceRP-08
Lat/Lon (WGS84): N 37.64167
W -110.59736
Elev: NaN Feet
A pair of stem style down climbs each with a long pool to swim after it. The first down climb is about 30 feet and the second is about 20 feet.
- d2DeuceMF_R3
Lat/Lon (WGS84): N 37.64026
W -110.59619
Elev: NaN Feet
Rap 3 - Double Deuce Canyon. This is the first rap after the confluence. Anchored from a deadman anchor and drops about 25 feet to a wasit deep doble pothole with a divider between them.
- d2DeuceMF_R4-5
Lat/Lon (WGS84): N 37.63972
W -110.59537
Elev: NaN Feet
Raps 4 and 5 - Double Deuce Canyon.
Rap 4 anchored from a deadman just up canyon of a small but deep pothole and drops about 20 feet.
Rap 5 about 40 feet down canyon of rap 4 and drops under a huge boulder wedged overhead. Rap 5 is anchored from a pinch point between the boulder and the RDC canyon wall.
- d2DeuceMF_R6-7
Lat/Lon (WGS84): N 37.63917
W -110.59480
Elev: NaN Feet
Raps 6 and 7 - Double Deuce Canyon.
Rap 6 is anchored from a deadman (or optionally a choke stone about 8 feet back), and drops about 45 feet to a large ledge like area.
Rap 7 anchored in V slot at the bottom of rap 6 before a long pool to swim then drops about 85 feet. Rap 7 from anchor to bottom uses about 125 feet of rope travel.
Raps 6 and 7 can be combined using a single 200 foot rope to avoid using the awkward chokestone anchor for rap 7. The rope pull path will then be around corners and will create rope grooves when pulled. If you combine raps 6 and 7 into one rap PLEASE use a retrievable anchor like the Smooth Operator or Fiddlestick. Using a Smooth Operator will reduce or almost eliminate rope grooving.
- y2DeuceBt
Lat/Lon (WGS84): N 37.63856
W -110.59318
Elev: 3,730 Feet
Bottom of Double Deuce Canyon where it meets the main Seven mile Drainage.
|
| Double Deuce (5) - Preferred Exit |
- y2DeuceBt
Lat/Lon (WGS84): N 37.63856
W -110.59318
Elev: 3,730 Feet
Bottom of Double Deuce Canyon where it meets the main Seven mile Drainage.
- j2DeuceExt
Lat/Lon (WGS84): N 37.63930
W -110.59203
Elev: 3,780 Feet
Near the bottom of a ravine going up out of Seven Mile Creek on the LUC (northwest) side. You will need to go up a dirt slope section to get to the bottom of the ravine. Travel up this ravine to exit Seven Mile Creek. An exit rope needs to be set prior to using this exit to aid in a difficult upclimb of about 15 feet.
- w2DeuceRP-07
Lat/Lon (WGS84): N 37.64028
W -110.59275
Elev: NaN Feet
Top of a ravine leading down to Seven Mile Creek. Setting an exit rope here anchored on a large rock will assist with exiting up this ravine from Seven Mile Creek. A section of about 15 feet is vertical and is a difficult and sketchy upclimb due to loose rock. A rope of about 100 feet is needed to set the anchor since a good anchor point is well above the vertical upclimb. Depending on where you anchor from a shorter rope may be able to be used.
- w2DeuceRP-06
Lat/Lon (WGS84): N 37.64070
W -110.59290
Elev: NaN Feet
Top of a steep section. On the way dow to set the exit rope up out of Seven Mile Creek stay to the right (southwest) to scramble down to the next lower level. This scramble does have some exposure but the moves are easy. On the way up out of Seven Mile Creek stay left (southwest) and scramble up to the next higher level then walk north west up through the cross joint on mostly level terrain.
- w2DeuceRP-05
Lat/Lon (WGS84): N 37.64227
W -110.59405
Elev: 4,260 Feet
Top of a cross joint that will lead over and down to the spot to set the exit rope. To set the exit rope walk southeast along the cross joint on mostly level terrain for about 600 feet then scramble down southeast down toward Seven Mile Creek to get to the exit rope set spot.
- w2DeuceRP-04
Lat/Lon (WGS84): N 37.64502
W -110.59904
Elev: 4,320 Feet
Down in Double Deuce Canyon in a series of potholes that can be bypassed if desired.
- w2DeuceRP-03
Lat/Lon (WGS84): N 37.64453
W -110.60038
Elev: NaN Feet
Break in the rim that allows you to climb down to the slick rock below. After dropping down here traverse and work your way down the slickrock and in the up canyon direction to a spot to scramble down to the pen slickrock below.
- w2DeuceRP-02
Lat/Lon (WGS84): N 37.64593
W -110.60018
Elev: NaN Feet
While walking the RDC rim from the head of the left fork of Double Deuce this is a spot where it is easy to drop down to the next lower dirt shelf.
- w2DeuceRP-01
Lat/Lon (WGS84): N 37.64709
W -110.60012
Elev: NaN Feet
Walk southeast from the parking spot to this spot on the rim where the Left Fork of Double Deuce dives down into the sandstone layers.
- t2Deuce
Lat/Lon (WGS84): N 37.64746
W -110.60106
Elev: 4,560 Feet
Trailhead for Double Deuce canyon. This is a large clering for a few vehicles to park where the road makes a sharp bend.
|
| Double Deuce (6) - Exit Up Seven Mile Creek (not good) |
- y2DeuceBt
Lat/Lon (WGS84): N 37.63856
W -110.59318
Elev: 3,730 Feet
Bottom of Double Deuce Canyon where it meets the main Seven mile Drainage.
- j2DeuceExt
Lat/Lon (WGS84): N 37.63930
W -110.59203
Elev: 3,780 Feet
Near the bottom of a ravine going up out of Seven Mile Creek on the LUC (northwest) side. You will need to go up a dirt slope section to get to the bottom of the ravine. Travel up this ravine to exit Seven Mile Creek. An exit rope needs to be set prior to using this exit to aid in a difficult upclimb of about 15 feet.
- w7MileRP-83
Lat/Lon (WGS84): N 37.64483
W -110.59054
Elev: NaN Feet
Just up canyon of some large boulders to scramble up is this dry fall of about 15 feet. Scramble along the ledge to the side to bypass the dryfall.
- w7MileRP-82
Lat/Lon (WGS84): N 37.64652
W -110.58996
Elev: 3,940 Feet
A set of huge boulders to scramble up. This is not a simple scramble up and over. You will need to route find your way through the boulders and assist one another with packs. A short distance up canyon of these boulders is the 12 foot upclimb that is the most difficult on the route. The 650 foot stretch of canyon up canyon of this point is the most physically challenging part of the exit up Seven Mile Creek.
- w7MileRP-81
Lat/Lon (WGS84): N 37.64810
W -110.58909
Elev: NaN Feet
On the way up Seven Mile creek the canyon starts to open up a little here and you are up canyon of the physically difficult section. Continue up Seven Mile Creek enjoying a few small pools and several easy upclimbs before reaching the confluence with the Big East Fork.
- y7MileBEF-Bt
Lat/Lon (WGS84): N 37.65268
W -110.58832
Elev: 4,080 Feet
Bottom of the Big East Fork of Seven Mile Canyon where it drops into the main fork. If traveling up from below the confluence the Big East Fork is to the right (east) and is visually the larger looking of the two. About 140 feet up the Main Seven Mile Canyon is a chute to start an exit up ut of the system.
- j7MilEx2RP-01
Lat/Lon (WGS84): N 37.65299
W -110.58861
Elev: NaN Feet
Bottom of a chute to start the beginning of Exit Two from the Seven Mile Canyon system.
- j7MilEx2RP-02
Lat/Lon (WGS84): N 37.65599
W -110.58996
Elev: 4,510 Feet
Exit route out of Seven Mile gets to the top of sandstone and is on a large shelf just below the rim. To exit continue northwest up a rubble pile creating a break in the rim.
- j7MilEx2RP-03
Lat/Lon (WGS84): N 37.65654
W -110.59088
Elev: 4,650 Feet
Top of a rubble pile that was climbed to gain access to the rim.
- w2DeuceRP-30
Lat/Lon (WGS84): N 37.65200
W -110.59579
Elev: NaN Feet
Arbitrary point where a larger drainage begins to form. Follow down that draiange to the Southwest to the parking area for Double Deuce Canyon.
- t2Deuce
Lat/Lon (WGS84): N 37.64746
W -110.60106
Elev: 4,560 Feet
Trailhead for Double Deuce canyon. This is a large clering for a few vehicles to park where the road makes a sharp bend.
|