Canyoneering Route Description
Not Mindbender Canyon - 3A(B) III
Robbers Roost, Utah.
03-24-12, 8 people, 1 Day (Travel time in route 9 hours - includes
time to hike in and leave an exit rope)

Time Required - 6 to 8 hours (add 45 min if
hiking in to leave an exit rope at the climb out).
Distance - 7.3 miles Total, 2.6 miles Technical
Rappels - 3 Rappels, Longest Rappel 80 feet.
Elevation Range - 5280 - 4450 Feet
Shuttle Required -Optional 2 Miles Vehicle - High Clearance
(4wd only if road conditions are bad)
Permit Required - No
Rappelling and anchor gear, Ropes and or pull cords for rappels up
to 80 feet and 50 feet of 1 inch webbing for sling placement.
Rap 1 has no anchor so be prepared to use a pack or potshots as an
anchor. Wet
suits should not be needed unless there have been recent rains.
Even with water in the canyon the water exposure will be in only a
couple very short spots.
The drive into Not Mindbender has about 38 miles of dirt
roads from the highway out to the start of the route. The dirt roads are
well maintained and usually passable with a passenger vehicle. Keep in
mind that road conditions can change on these dirt roads from weather or
ranching activity. The last couple miles of the drive in have a couple of
spots where high clearance will likely be needed.
Portions of Not Mindbender are skinny. Larger people
will need to stem up a few feet more often than smaller people but ultimately
everyone will need to stem along the canyon. With that said people up to
200 pounds fit through here but need to work a little more. Those over 200
pounds will likely be fine as well but may not like the required effort.
Also of note rap 1 has no anchor or anchor material.
Rap 1 drops about 15 feet down a sloped wall. A backpack, potshot or
other dynamic anchor can be used. Optionally the last person can slide
down and partners can catch them at the bottom. This would be a fast
slide and need an aggressive capture from friends if this option is used.
Be prepared for this challenge if you enter the canyon.
On my first visit to Not Mindbender we found a single
bat hanging on the wall near the top of rap 1. If you encounter this,
please be respectful and leave the bat alone.
A pothole just before the last rap could be a keeper if
traveling solo. The pothole is shallow enough that a partner assist
should easily get you out the other side.
Navigation Warning:
The approach into Not Mindbender starts from a dirt road and meanders across
rolling dessert and a convoluted mix of minor drainages. It would be very
easy to accidentally drop into the wrong drainage by mistake. Dropping
into the wrong canyon could be life threatening if you are not prepared for
the challenges in it. Verbal or written directions alone are not
sufficient. Bring your route finding skills, a map and compass with
you. A GPS may be useful for this approach as well.
Also of note the Mindbender system has 4 well
known canyon routes, Mindbender, Almost Mindbender, Maybe Mindbender and Not
Mindbender. This approach route cuts across the upper drainages for
each of these routes with Not Mindbender being the farthest out.
Keeping this in mind when reading the description for the approach route may
help reduce confusion since the names are similar.
This route can be done as a loop with no shuttle.
If doing this add 2 miles of road walking to your route to cover the shuttle
section.
The exit route has a vertical climb section typically
rated at 5.5 for about 30 feet. Be prepared to have someone climb
hauling a rope up with them to belay the rest of the group. Or you can
hike in before your route and leave a rope tied off at the top.
Warning (light
rant):
The exit from the
mindbender system is well known
and commonly used for
all 4 Mindbender routes,
a few forks of Robbers
Roost Canyon and other
routes in the area.
The climb portion is not
in a casual hiking area
and will rarely if ever
be seen by anyone other
than your fellow
canyoneers. A
fellow canyoneer should
know the rope was placed
as a safety for others
exiting one of the many
canyon routes in the
area. However some
fellow canyoneers have
taken it upon themselves
to remove ropes from
this climb out if left
un-attended for a few
hours (not days, hours).
While it is my opinion a
note should not be
needed, since this climb
out is commonly used for
multiple routes, it is a
good idea to leave a
note on the rope.
The note should have the
date it was left and a
date when you intend to
retrieve the rope along
with a comment about not
removing it. This
note should be enough to
inform others of the
obvious fact that the
rope was obviously placed for
safety reasons.
To get to the Trailhead
From the junction of Highways 24 and 95 in Hanksville Utah,
drive north on Highway 24 about 16.2 miles to a turn off for a
dirt road on the right (east) side of the road (ExtRobRoost).
This turn off is just across the highway from the Little Gilson
Butte.
Drive east on the un-named dirt road continuing past a small
building with a water tank about 0.5 miles from the highway.
This small building and tank is close to what some maps label as
Gilson Butte Well (wGilsonButeWel).
About 2.0 miles from the highway will be an intersection with a
major dirt road (extFlintTrail1). Some maps have this road
labeled as the Flint Trail and other have it labeled as the
Lower San Rafael Road. Turn right (south) on to this large
dirt road.
After turning onto the Lower San Rafael Road, drive 4.1 miles to where the
road turns left (east) and passes by a large corral (wJefferyWell).
This turn in the road is next to what is labeled as Jeffery Well
on some maps.
After passing Jeffery Well drive east about 2.8 miles and pass
through a gate which is on the south side of the Little Flat Top
(wLittleFltTpGt). This gate is also at the top out of the road.
Continue beyond the gate following the road east then slowly
turning toward the south and passing along the south side of The
Big Flat Tops. About 6.0 miles after the gate will be a turn
off to a road on the right (extFlintTrail2). Stay left and
continue east on the Lower San Rafael Road.
Continuing east, stay on the very obvious main road ignoring
small occasional un-signed side roads for about 9.4 miles to a
major junction (extHansFlat). At this junction are signs
for Hans Flat to the right (south). This is where you will
leave the Lower San Rafael Road by turning right (south) onto
the Hans Flat Road towards Hans Flat Ranger station.
Drive south on the Hans Flat Road for 7.1 miles to another large
junction with signage at it (extBurrEkker). This is a
junction of 3 roads (Hans Flat Road continuing south, Burr Pass
Road going west and Ekker Ranch Road going southwest).
Leave the Hans Flat road by turning right (west) onto the Burr
Pass Road traveling west.
Note:
Up to this point the roads appear to be well maintained and
should be easily traveled by passenger cars unless recent rains
have messed stuff up. The Burr Pass Road continuing west
from here is over all the same way but does have some rough
sections that are not recommended for passenger cars.
Unless conditions are bad 4wd should not be needed but high
clearance is recommended for portions of the Burr Pass Road.
Follow the Burr Pass Road as it winds across the mostly flat
wide open desert with views down into lower areas along the way.
About 7.7 miles into the Burr Pass Road will be a section of
road where the land on both sides of the road obviously drops
down. Up until this point any noticeable drops have been
primarily to one side or the other. Find a spot near here
to park and get off the road to start the route (pkMindBendrTp).
There is no large obvious parking spot just find what looks like
a good spot to park out of the way of other traffic.
Note:
The area is wide open with a lack of obvious landmarks. If
using a GPS the trailhead is easy to find. Checking your
odometer when you get onto the Burr Pass Road and driving 7.7
miles and looking for this spot where the road drops down on
both sides will get you to the correct location. Something
to keep in mind is that about 1 mile farther down the Burr Pass
is another spot where the land on both sides drops off.
The second spot about a mile farther than the start trailhead is
a lot more obvious than the trailhead spot. If you are not
watching the odometer and just winging it pay attention and be
aware that the second one is more obvious and may be mistaken as
the trailhead.
To leave the Exit Vehicle / Escape Pod
Follow the directions to get to the trailhead (pkMindBendrTp).
From the trailhead, continue west on the Burr Pass Road for
about 2 miles to the end of the road (pkMindBendrBt).
This is where the exit vehicle is parked.
GPS coordinate information listed at the bottom. For information about waypoint naming and map symbols, refer to the
Glossary page.

Click the links for maps of the route.
Map of the drive into the route.
Map of the entire route.
Map of the technical section.
Map of the exit.
Leaving an exit
climb out rope
(Optional):
The exit has a spot
where moderate climbing
is required and
generally accepted as a
5.5 climb for about 30
feet. Option 1
is to have one person
make the climb
un-protected then drop a
rope down to belay the
rest of the group.
Option 2 is to
hike in from the exit
vehicle parking spot to
the top of the climb,
leave a rope tied off
then hike back out to
the exit vehicle.
Then go enjoy the route
knowing you have a rope
left hanging at the
climb out. If you
leave a rope hanging for
the exit climb be sure
to leave a note.
There have been times
when fellow canyoneers
have removed a needed
rope if left un-attended
for a few hours.
If you decide to leave a
rope hanging for the
climb out, allow about
45 minutes to hike in,
anchor the rope and hike
back out with a round
trip distance of about
1.8 miles.
From the exit vehicle
parking spot (pkMindBendrBt)
walk 200 feet due south
to the top of a gully
(RP-MBendExt5)
dropping down to the
right (west).
About 150 feet down the
gully will widen and
drop you out onto a
steep slick rock slope.
When the gully widens
out and drops you onto
the slick rock slope,
take a moment to look
ahead of you. Note
the dirt, semi flat
terrain below. To
the right (north) of
this wide open dirt area
are steep sandstone
slopes / walls running
west. About 0.3
miles to the west, the
sandstone walls drop
down exposing a saddle
you can easily walk up
to. From this
vantage point it is
obvious the saddle is
just around a corner but
is not quite visible.
The saddle is what you
will be aiming for next.
Route find your way down
the slick rock slope to
the dirt floor below
then route find your way
about 0.3 miles west,
roughly following the
sandstone walls on your
right (north) until you
come to the bottom
(RP-MBendExt4) of a
slick rock slope running
up to the saddle.
Walk about 300 feet
northwest up to the top
of the saddle
(RP-MBendExt3).
From top of the saddle
note, a peak to the west
with an obvious dark
brown top layer about
0.4 miles away which
makes for a good visual
landmark. Route
find your way west
aiming just to the right
(north of the peak with
the brown top layer.
About 0.3 miles from the
saddle you should find a
small drainage running
west and over the rim
with series of small pot
holes running along it.
Work your way down the
right (north) side of
the potholes as the
slope gets steeper and
find your way onto a
ledge (RP-MBendExt2).
After dropping down to
the ledge turn left and
contour around the ledge
south then sweeping
around north then
turning west again to
the larger ledge system
running west. A
couple hundred feet into
the part of the ledge
running west is where
you can anchor the rope
for the climb out.
As you walk along the
ledge look for a small
natural bridge in the
rock under a small ledge
about waist high.
This small natural arch
feels like an obvious
and convenient place to
anchor your rope but
this does not drop the
rope in the most
convenient place for the
exit climb.
However this small
natural bridge / arch
makes for a good visual
land mark. For the
most convenient rope
placement, walk about 50
feet west of this small
arch and anchor the rope
from a large rock(s).
There may be a large
cairn here if it has not
been dismantled
(RP-MBendExt1).
A rope of about 80 feet
will do the trick.
The Approach:
Written or verbal
directions are not
sufficient to guide you
to the correct canyon.
Bring your route finding
skills, a map and
compass with you.
A GPS may be useful for
this approach as well.
From trailhead parking
spot (pkMindBendrTp),
leave the road and start
walking slightly east of
north (bearing of about
28 degrees) crossing
over a rolling slick
rock area about 400 feet
from the road
(RP-MBendApr1).
Route find your way
through the rolling
desert and aim for a
confluence of minor
drainages
(RP-MBendApr2) shown on topo maps about 0.5
miles from where you
left the road.
This confluence of minor
drainages are part of
the Mindbender drainage
well up canyon of the
technical portion.
From the confluence of
minor drainages in the
Mindbender drainage
(RP-MBendApr2), look
northeast and note a
steep slick rock hill
about 600 feet away.
The next step is to get
up on top of that slope
to the wide open rolling
desert above. An
easy route up is to
travel east up the left
fork from this drainage
for about 0.25 miles and
look for a spot where
slope is gentle enough
(RP-MBendApr3) to allow
travel up to the top.
Leave the drainage and
route find your way
about 0.2 miles north up
the slope to the rolling
desert above.
Once out of the
Mindbender drainage and
in the rolling desert
(RP-MBendApr4) travel
northeast along the flat
wide open dirt for about
0.2 miles where you will
pass by the
(RP-MBendApr5) head of
a small drainage that
drops down to the west.
This small drainage is
the top of the Maybe
Mindbender drainage
where the minor drainage
begins to form.
After crossing over the
tippy top of Maybe
Mindbender continue
northeast across the
wide open dirt for about
0.25 miles to where the
route crosses over
another minor drainage
(RP-MBendApr6).
This minor drainage
quickly becomes steep as
it drops off toward a
bowl like area to the
left (west). This
is a side drainage to
Not Mindbender but is
not the main canyon you
are looking for.
Continue northeast about
600 feet until you get
close to the rim of Not
Mindbender
(RP-MBendApr7).
The rim here is too
steep to safely drop
down. Veer right
and walk north east up
along the rim to a safer
spot to drop into Not
Mindbender.
About 600 feet along the
rim will be a spot you
can easily walk down off
the dirt down onto a
wide slick rock area.
Continue along the rim
now on the slick rock.
Another 200 feet along
the slick rock is the
top of a short ravine
(RP-MBendApr8) that can
be easily scrambled down
to drop into the Not
Mindbender drainage.
Farther up canyon the
rim quickly becomes less
steep so if you pass
this ravine there will
be lots of opportunity
to find your way down
into Not Mindbender (yMdBndNotTp).
The Canyoneering / Technical Section:
Once down in the
Not Mindbender drainage
(yMdBndNotTp), you can
take a moment to put
your body armor on for a
couple down climbs
coming up soon.
But the upper section
has only a couple spots
where body armor may be
desired then a lot of
walking down canyon
after. Something
to consider if its hot
and you are not enthused
about putting on the
armor yet.
Continue down canyon as
it quickly goes narrow
with a mix of walking,
stemming and galumphing
for travel.
About 400 feet down
canyon is the first down
climb and is about 15
feet starting over a
choke stone. The
down climb is an easy
stem.
About 100 feet farther
down canyon is another
downclimb over a larger
choke stone and is also
about 15 feet and and
easy stem style
downclimb. Smaller
people may enjoy a
squeeze under this choke
stone rather than going
up and over it.
About 80 feet down
canyon is a easy down
climb of about 8 feet.
About 250 farther the
canyon widens out into
wide easy to walk in
wash (RP-Mind-Not-01)
where you will need to
downclimb about 10 or 12
feet over a ledge to get
to the canyon floor.
The wide easy wash walk
about 0.2 miles long to
where the walls close in
and the canyon begins to
slot up again
(RP-Mind-Not-02).
Travel in this narrow
section walking and a
little side stepping
here and there for about
600 feet to a boulder
pile with a stem style
down climb of about 10
feet.
About 80 feet after the
boulder debris is
another fork joining in
from the right
(RP-Mind-Not-03).
Just after this
confluence is tight spot
about 40 feet long where
larger people may want
to stem up about 10 or
15 feet to galumph where
it is wider.
Right after the tight
spot the canyon turns
sharp left and is wide
enough for easy walking
but offers a very closed
in hallway feel with the
walls slanting to the
left. After about
400 feet the walls open
up giving a large
corridor feel.
This corridor like area
sweeps right for about
0.2 miles and is all
easy wash walking except
for a very short shallow
slot to galumph through.
At the end of the long
sweeping right the
canyon turns sharp left
again (RP-Mind-Not-04)
where another side
drainage joins in from
LDC.
From this sharp left the
canyon stays wide and
offers easy walking in
sand as the canyon winds
its way west for the
next 0.6 miles.
Note:
If you are watching the
map to visually find
keep track of where you
are points
RP-Mind-Not-05 is a side
drainage joining from
LDC, RP-Mind-Not-06 is a
side drainage joining
from RDC in a horseshoe
bend and RP-Mind-Not-07
is a side drainage
joining from LDC.
After the long wash walk
the canyon begins to
narrow again
(RP-Mind-Not-08).
As the canyon narrows it
starts with a V shaped
slot with a mix of some
easy galumphing and
walking. This
narrow slot is where the
meat of the route starts
and is a good time to
armor up if you haven't
already done so.
The first 800 feet of
this narrow section is
skinny with multiple
spots where it becomes
necessary to stem up a
few feet to get over
tight spots.
Larger people will need
to do more of this
obviously. In
general your body size
will determine how high
you need to stem but you
should never need to go
more than 10 or 12 feet
up. Just pick a
comfortable height and
go.
In that 800 foot skinny
section are a couple
easy stem style down
climbs of about 15 feet
and a couple spots where
waist or chest deep
water are possible if
recent rains have filled
it. But this
section should drain
water fairly rapidly.
Next the skinny section
opens up to a large room
/ chamber. The
chamber is a scenic
treat but just emerging
from a skinny section
into the chamber adds to
the experience.
On the other side of the
chamber is a stem style
down climb of about 15
feet to a ledge and a
small pool. The
top of this ledge is
where the the first rap
is for Not Mindbender.
Rap 1 (dMind-NotR1) has
no anchor or anchor
material. Use a
back pack, potshot or
other dynamic anchor for
this rappel.
Optionally the last
person can slide down
and partners can catch
them at the bottom.
This would be a fast
slide and need an
aggressive capture from
friends if this option
is used.
After rap 1 the canyon
turns left and enters a
very beautiful chamber /
subway like area.
Worth the time for some
spur of the moment
photos!
Walk a short distance in
this chamber then start
into more skinny narrows
down to rap 2.
Just before reaching rap
2 the walls make a sharp
right turn and open up a
little.
Rap 2 (dMind-notR2) is
about 150 feet down
canyon of rap 1.
Rap 2 is anchored from a
chokestone and drops
about 35 feet down a
mostly vertical wall.
If recent rains filled
the canyon you may have
waist deep water just
before reaching rap 2.
At the bottom of rap 2
the canyon makes a sharp
left into a beautiful
long narrow section.
Continuing down canyon
quickly becomes easy
walking between narrow
walls.
About 0.35 miles down
canyon of rap 2 the
corridor starts to widen
out and become very wide
giving way to easy wash
walking where a side
drainage also joins in
from LDC
(RP-Mind-Not-09).
From here the canyon has
tall walls but is very
wide with a sandy floor
providing easy wash
walking for a long way.
For a scenic treat keep
your eyes open for a
large pendant like rock
that looks like it is
teetering high on the
LDC wall ready to topple
down any time.
About 0.4 miles down
canyon is a side slot
joining in from RDC
followed by a large
drainage joining in from
LDC. The large
drainage joining in from
LDC is the bottom of
Maybe Mindbender (yMdBndMbyBt).
About 0.2 miles farther
down the wide sandy walk
is another drainage
joining in from LDC
which is Almost
Mindbender (yMdBndAlmBt).
About 500 feet farther
down canyon is the start
of the last narrow
section before reaching
the last rap in Mind
Bender Canyon
(RP-Mind-Not-10).
The narrow section down
to the final rap is
about 200 feet long and
has two potholes to
cross. The first
pothole has a down climb
of about 8 feet to get
down into it and would
be about waist deep if
full of water. The
second has a down climb
of about 5 feet to get
into it and if full of
water could be a
possible keeper.
The exit is shallow
enough that a partner
assist should easily get
you out the other side
but the exit is still a
little awkward as it
exits in a tight V slot.
Just after the potholes
is rap 3 for Not
Minbender Canyon.
Rap 3 (dMind-NotR3) can
be anchored in multiple
ways and drops about 80
feet free hanging and an
awkward start.
There are options for
choke stones in the side
walls or sand and debris
for a deadman. As
of 2012 there is a bolt
in the RDC wall and
close to it a very ugly
patch job on the wall
where another bolt had
been removed. What
you find will depend on
who went before you and
re-rigged the rappel.
On my first visit
through rap 3 was
anchored from 3 points,
a choke stone and a
climbing nut placed in
the wall on the LDC side
as well as from the
single bolt on the RDC
wall. Whatever
option you use try to
extend the webbing as
far as possible to avoid
adding rope grooves to
the rock from pulling
the rope.
After rap 3 the canyon
is again wide open and
easy sand walking.
This is the last of the
technical portion except
for the short climb on
the exit route.
About 250 feet down
canyon is a sharp bend
to the left which is an
arbitrary point I chose
to mark the end of Not
Mindbender (yMdBndNotBt).
The Exit:
From the
sharp left bend after
the last rap in Not
Mindbender (yMdBndNotBt)
the canyon becomes
extremely wide. with a
lot of vegetation and
tall scenic walls.
About 0.6 miles down
canyon after the last
rap of Not Mindbender is
a large drainage joining
in from LDC which is the
bottom of Mindbender
Canyon (yMdBndBt).
About 0.9 miles farther
down canyon is a very
wide drainage joining in
from RDC which, is the
end of the Mindbender
system where it joins
into North Fork of
Robbers Roost Canyon (yRRNFcyn-Bt).
After passing the bottom
of the North Fork of
Robbers Roost Canyon (yRRNFcyn-Bt),
continue southwest down
stream for about 0.5
miles looking for a
large bowl like area on
the LDC (south) side
(jMndBndrExt). As
you get closer to the
bowl area you are
looking for, keep an eye
along the horizon
slightly left of canyon
and look for an obvious
sandstone peak with a
crusty brown layer on
top. The bowl area
you want is just below
this peak.
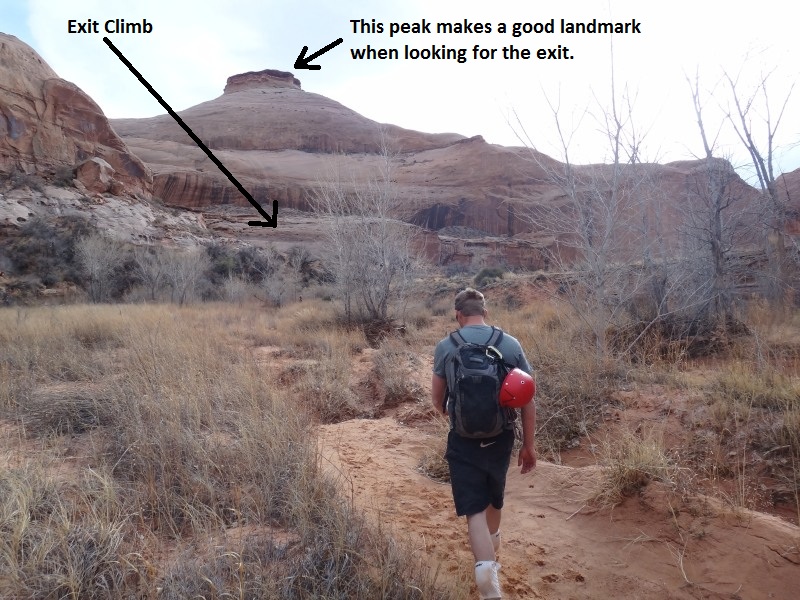 After passing the bottom of the North Fork of Robbers Roost Canyon, keep an eye down canyon on the left for this peak. Just below this peak is the climb out part of the exit in a bowl like area.
When you get to the bowl
area (jMndBndrExt) leave
the main drainage route
find your way through
the sand and vegetation
aiming for the peak you
have been using as a
visual aid. Look
for an obvious sloped
light colored sandstone
wall about 500 feet from
the main drainage on the
southwest side of the
bowl.
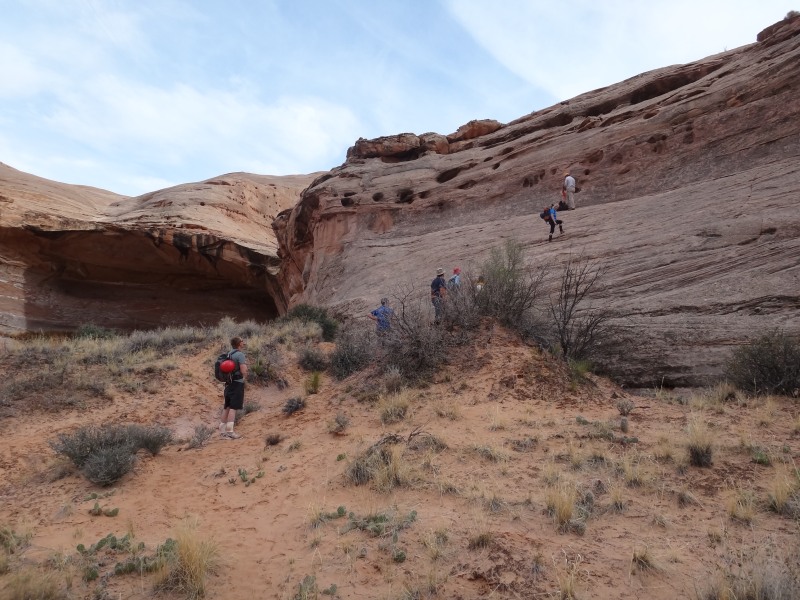 The first part of the climb out is an easy scramble up a slope followed by a 30 foot section of 5.5 climbing then a steep scramble to the top.
The bottom of the wall
(RP-MBendExt1) is sloped
allowing an easy
scramble before reaching
a near vertical wall.
The vertical section of
the wall is about 30
feet and has a lot of
hand and foot holds and
is generally rated about
a 5.5 climb. Then
the wall starts to slope
a bit making the rest of
the climb more of a
scramble. If you
have left a rope hanging
for the exit and no one
has taken it, use that
to ascend up the
vertical section.
If you have not left a
rope send your better
climber up with a rope.
They can then anchor the
rope and belay others
for a safer option.
For anchors there are
just large rocks you
might be able to fashion
into a cairn anchor.
But finding a good
stance to sit and
provide a meat anchor
will be faster.
After getting everyone
to the top of the wall
(RP-MBendExt1) follow
the ledge left (east)
toward a large alcove
about 200 feet away.
You will need to contour
around along the ledge
to get to the alcove.
When you get to the
alcove you might want to
take a moment to walk
over to the walls to
look at some fun stuff
there.
From the alcove continue
along the ledge north
as it becomes much smaller
and leads over the top
of an overhang below.
Just as you get over the
overhang there will be
the start of a small
drainage in the slick
rock (RP-MBendExt2).
Scramble east up the
slick rock next to this
drainage. As you
continue up the slope
levels off a lot
dropping you into a wide
open rolling slick rock
area.
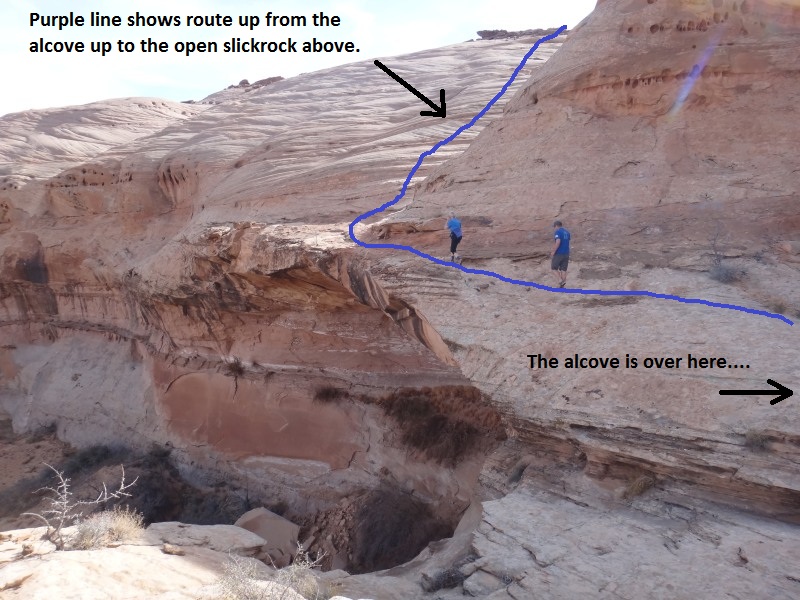 From the alcove traverse left along the ledge as it gets smaller to a small drainage in the slickrock above an overhang. The purple line shows the route up to the slickrock after the alcove.
Once up in the rolling
slick rock area, look
east for a large
sandstone peak with an
obvious brown crusty top
layer about 0.35 miles
to the east. Route
find your way to the
right (south) side of
this peak to a small
saddle at the base of
the wall running down
from the peak
(RP-MBendExt3).
From the saddle
(RP-MBendExt3) travel
southeast about 250 feet
down the slope on the
other side to the bottom
and into the dirt below
(RP-MBendExt4).
Next route find your way
through the desert
northeast roughly
following the sandstone
slope / wall on your
left (north).
About 0.3 miles along
this wall make your way
up the steep hill side
to a short chute
allowing access up to
the rim (RP-MBendExt5).
Once at the top of the
chute turn left (north)
and walk about 200 feet
to where the exit
vehicle is parked (pkMindBendrBt).
Downloadable GPX files
available at
BG-Gear Store
(easier than manual entry and a great way to support
Bluugnome).
Waypoint naming convention and map symbol information can be found on the Glossary page.
Elevations are approximate.
BEFORE
manually entering coordinates set your system to WGS84 datum and Lat/Lon hddd.ddddd° coordinate format.
Inconsistent datum's and coordinate formats will result in location errors.
Click to show / expand the list of waypoints below........
| Not Mindbender (1) Drive to Trailhead and Exit Parking |
- ExtRobRoost
Lat/Lon (WGS84): N 38.58715
W -110.59263
Elev: 5,120 Feet
Exit for an un-named road used to access the Robbers Roost area.
- wGilsonButeWel
Lat/Lon (WGS84): N 38.58688
W -110.58377
Elev: NaN Feet
Building and small water tank near what is labeled on some maps as Gilso Butte Well.
- extFlintTrail
Lat/Lon (WGS84): N 38.58822
W -110.55632
Elev: NaN Feet
Turn off from an un-named dirt road onto the Lower San Rafeal Road.
- wJefferyWell
Lat/Lon (WGS84): N 38.53010
W -110.54118
Elev: 5,280 Feet
Road turns left here on the drive into Robbers Roost. There are corrals along side the road here.
- wLittleFltTpGt
Lat/Lon (WGS84): N 38.53837
W -110.49108
Elev: 5,520 Feet
A gate the road passes by on the south side of The Little Flat Top.
- extFlintTrail2
Lat/Lon (WGS84): N 38.49947
W -110.41446
Elev: NaN Feet
This is where you can turn left (south) to leave the Flint Trail and drive in towards Chambers.
Or continue straight (east) to continue farther east into the Roost area for other canyons.
- extHansFlat
Lat/Lon (WGS84): N 38.47252
W -110.28042
Elev: 5,521 Feet
Exit off the Lower San Rafeal Road to the Hans Flat Road.
- extBurrEkker
Lat/Lon (WGS84): N 38.37664
W -110.30570
Elev: 5,840 Feet
Junction where a few roads come together. A couple of the main roads are Burr Pass road going west from here, Ekker Ranch Road going south west from here and the Hans Flat Road continuing south from here.
- extRRcynSF-Tp
Lat/Lon (WGS84): N 38.36241
W -110.37234
Elev: NaN Feet
Exit off of the Burr Pass Road to a short road laeading to parking for the top entry to the South Fork of Robbers Roost Canyon.
- pkMindBendrTp
Lat/Lon (WGS84): N 38.36655
W -110.40313
Elev: 5,280 Feet
Park here to start the route into the Mindbender system.
- pkMindBendrBt
Lat/Lon (WGS84): N 38.36700
W -110.43653
Elev: 5,170 Feet
Park an exit vehicle here for the exit of the Mindbender Systemn and others using the same exit.
|
| Not Mindbender (2) Approach |
- pkMindBendrTp
Lat/Lon (WGS84): N 38.36655
W -110.40313
Elev: 5,280 Feet
Park here to start the route into the Mindbender system.
- RP-MBendApr1
Lat/Lon (WGS84): N 38.36755
W -110.40214
Elev: 5,220 Feet
Slick rock area about 400 feet from the road.
- RP-MBendApr2
Lat/Lon (WGS84): N 38.37299
W -110.39872
Elev: 5,140 Feet
Confluence of minor drainages in upp Mindbender.
- RP-MBendApr3
Lat/Lon (WGS84): N 38.37332
W -110.39534
Elev: 5,190 Feet
Arbitrary point about 0.25 miles up the left fork from a confluence of minor drainages in the Mindbender drainage. Leave the draiange here and route find your way north up onto the mesa top.
- RP-MBendApr4
Lat/Lon (WGS84): N 38.37543
W -110.39374
Elev: 5,310 Feet
Once up out of the Mindbender draiange and up here on the rolling desert above, continue north east through the wide open flat dirt.
- RP-MBendApr5
Lat/Lon (WGS84): N 38.37812
W -110.39144
Elev: 5,290 Feet
Pass by the head of a draiange. This is the very top of Maybe Mind Bender where the tiny draiange begins to form.
- RP-MBendApr6
Lat/Lon (WGS84): N 38.38108
W -110.39003
Elev: 5,270 Feet
A minor draiange to cross that quickly becomes steeper as it drops into a bowl like area to the left (west).
- RP-MBendApr7
Lat/Lon (WGS84): N 38.38214
W -110.38883
Elev: 5,260 Feet
The route to Not Mindbender gets to the rim here. The rim is too steep here to safely drop in so you need to rim walk up canyon to a safer place to drop in.
- RP-MBendApr8
Lat/Lon (WGS84): N 38.38386
W -110.38670
Elev: 5,230 Feet
Top of a short ravine allowing access down into the main Not Mindbender drainage.
- yMdBndNotTp
Lat/Lon (WGS84): N 38.38410
W -110.38703
Elev: 5,200 Feet
Top of Not Mindbender.
|
| Not Mindbender (3) The Canyon, |
- yMdBndNotTp
Lat/Lon (WGS84): N 38.38410
W -110.38703
Elev: 5,200 Feet
Top of Not Mindbender.
- RP-Mind-Not-01
Lat/Lon (WGS84): N 38.38344
W -110.38993
Elev: 5,120 Feet
After a couple 15 foot easy stem down climbs the canyon widens out here for some easy wash walking. As the canyon widens there is a ledge of 10 to 12 feet to easily down climb on the LDC side to the canyon floor.
- RP-Mind-Not-02
Lat/Lon (WGS84): N 38.38517
W -110.39154
Elev: 5,090 Feet
Canyon begins to slot up again.
- RP-Mind-Not-03
Lat/Lon (WGS84): N 38.38608
W -110.39305
Elev: 5,080 Feet
Another fork joins in fro RDC. Just after this confluence the canyon turns sharp left going from traveling northwestish to traveling southwestish.
- RP-Mind-Not-04
Lat/Lon (WGS84): N 38.38597
W -110.39647
Elev: 5,025 Feet
After a long sweeping right the canyon turns sharp left here where a side draiange joins in from LDC.
- RP-Mind-Not-05
Lat/Lon (WGS84): N 38.38455
W -110.39913
Elev: 5,000 Feet
Large draiange joins in from LDC and appears like two seperate drainages while walking in the canyon.
- RP-Mind-Not-06
Lat/Lon (WGS84): N 38.38549
W -110.40021
Elev: 5,000 Feet
Large side draiange joins in from RDC.
- RP-Mind-Not-07
Lat/Lon (WGS84): N 38.38475
W -110.40080
Elev: 4,990 Feet
Side drainage drops in from LDC.
- RP-Mind-Not-08
Lat/Lon (WGS84): N 38.38499
W -110.40375
Elev: 4,980 Feet
The canyon starts to get narrow again.
- dMind-NotR1
Lat/Lon (WGS84): N 38.38517
W -110.40552
Elev: 4,950 Feet
Rap 1 - Not Mindbender. No anchor for this rap. Use a pack, pot shot or any other dynamic anchor. This rap drops about 15 feet down a slickrock slope. Optionally a fast slide and an aggressive partner capture can be used.
- dMind-NotR2
Lat/Lon (WGS84): N 38.38486
W -110.40600
Elev: 4,940 Feet
Rap 2 - Not Mindbender Canyon. Anchored from a chokestone and drops about 35 feet down a mostly vertical wall.
- RP-Mind-Not-09
Lat/Lon (WGS84): N 38.38199
W -110.41008
Elev: 4,790 Feet
Narrow corridor after rap 2 widens out into a very wide sandy bottomed area where a side draiange joins in from LDC.
- yMdBndMbyBt
Lat/Lon (WGS84): N 38.38168
W -110.41595
Elev: 4,750 Feet
Bottom of Maybe Mindbender where it drops into Not Mindbender.
- yMdBndAlmBt
Lat/Lon (WGS84): N 38.37952
W -110.41885
Elev: 4,740 Feet
Bottom exit of Almost Mindbender where it exits into Not Mindbender.
- RP-Mind-Not-10
Lat/Lon (WGS84): N 38.37964
W -110.42063
Elev: NaN Feet
Start of the last narrow section just before the last rap in Not Mindbender.
- dMind-NotR3
Lat/Lon (WGS84): N 38.38092
W -110.42278
Elev: 4,660 Feet
Rap 3 - Not Mindbender Canyon. Multiple anchor options, a bolt RDC, choke stones, deadman or climbing gear placements may be found. Drops about 80 feet free hanging and an awkward start.
- yMdBndNotBt
Lat/Lon (WGS84): N 38.38138
W -110.42351
Elev: 4,640 Feet
Bottom of Not Mindbender. This is a sharp bend in the canyon about 250 feet down canyon of the last rap in Not Mind Bender.
|
| Not Mindbender (4) Exit |
- yMdBndNotBt
Lat/Lon (WGS84): N 38.38138
W -110.42351
Elev: 4,640 Feet
Bottom of Not Mindbender. This is a sharp bend in the canyon about 250 feet down canyon of the last rap in Not Mind Bender.
- yMdBendBt
Lat/Lon (WGS84): N 38.37642
W -110.43055
Elev: 4,590 Feet
Bottom of Mindbender Canyon where it drops into the draiange for Not Mindbender just down canyon of the last rappel in Not Mindbender.
- yRRNFcyn-Bt
Lat/Lon (WGS84): N 38.37185
W -110.44240
Elev: 4,480 Feet
Bottom of the Mindbender system where it joins into the North Fork of Robbers Roost Canyon. With respect to the naming conventions of canyon routes in the area, it makes more sense to think of this point as the bottom of the North Fork of Robbers Roost Canyons. The bottom of the actual North Fork of Robbers Roost Canyon system is way down stream of here.
- jMndBndrExt
Lat/Lon (WGS84): N 38.36935
W -110.44894
Elev: NaN Feet
Leave the main drainage here and hike up into the large bowl like area on the LDC (south) side.
- RP-MBendExt1
Lat/Lon (WGS84): N 38.36787
W -110.44837
Elev: 4,550 Feet
This is the top of the climb portion of the exit where an exit rope can be anchored for the climb out if desired. This is about 50 feet west of a small natural bridge / arch about waist high. Use a large rock(s) to set an anchor point for the rope. When exiting flow the ledge east contouring around where needed. Follow the ledge to a point due east of the top of the climb out where a steep scramble up a small slick rock drainage starts above an overhang allowing escape.
- RP-MBendExt2
Lat/Lon (WGS84): N 38.36784
W -110.44774
Elev: 4,580 Feet
On the exit from the Mindbender system after walking along the ledge after teh climb out portion veer right (southeast) and scramble your way up the slick rock slope here. THis scramble up should roughly follow a small pothole filled drainage on your right.
- RP-MBendExt3
Lat/Lon (WGS84): N 38.36599
W -110.44211
Elev: 4,860 Feet
Top of a slick rock saddle. On the exit from the Mindbender system drop southeast down the slick rock slope to the dirt floor below.
- RP-MBendExt4
Lat/Lon (WGS84): N 38.36544
W -110.44135
Elev: 4,800 Feet
Bottom of slick rock slope below a saddle. On the exit from the Mindbender system veer left (east) and route find your way along the desert floor roughly following the sandstone walls on the left (north).
- RP-MBendExt5
Lat/Lon (WGS84): N 38.36648
W -110.43637
Elev: 5,165 Feet
Top of a gully. When exiting the Mindbender system turn left (north) and walk 200 feet to the parking spot for the exit vehicle.
- pkMindBendrBt
Lat/Lon (WGS84): N 38.36700
W -110.43653
Elev: 5,170 Feet
Park an exit vehicle here for the exit of the Mindbender Systemn and others using the same exit.
|