Canyoneering Route Description
Miss Piggy Canyon (aka Hog 4) - 3A II
North Wash, Utah.
11-12-11, 9 people, 1 Day (Travel time in route 6.9 hours) - Time for both
Miss Piggy (Hog 4) and Hog 3 (Razorback) combined.

Time Required - 3 - 4 hours
Distance - 2.9 miles Total, 0.5 miles Technical
Rappels - 2 Rappels, Longest Rappel 85 feet.
A couple of the down climbs may be arguably rappels adding to the
count.
Elevation Range - 5175 - 4355 Feet
Shuttle Required -No Vehicle - High Clearance
(possibly 4WD depending on road conditions)
Permit Required - No
Rappelling and anchor gear, Ropes and or pull cords for rappels up
to 85 feet and 40 feet of 1 inch webbing for sling placement. Wet
suit bottoms might be nice ONLY if there were recent rains AND it is
cold out. Even in cooler months a wet suit will likely not be
needed since the water is only in small patches and only to waist
deep and mostly avoidable.
The Hogs are a collection of 4 routes along the
northeast rim of Hog Canyon. Hogs 1, 2 and 3 are separate
drainages dropping down into Hog Canyon and are labeled in order from
northwest to northeast. Hog 4 is actually a side drainage of Hog 1
so the numbering can get a little confusing.
Hog 1 is also
referred to as Boss Hawg.
Hog
2 is only known as Hog 2.
Hog
3 is also referred to as Razorback.
Hog 4 (which is a side drainage of
Hog 1) is also referred to as Miss
Piggy.
So far the route
description is for access to the
Hogs from the top. There are
options to access the Hogs from the
bottom which I hope to complete
sometime and add the routes here.
Hog 4 (Miss Piggy) can hold a little water but will
only be waist deep in a couple spots and only knee deep in others.
So if you feel the need for cold water protection just the lower part of
your body needs anything.
To get to the Trailhead
From the junction of highways 276 and 95, travel south on
highway 276 for 3.6 miles to a dirt road turn off on the left
(east) side of the road (extLandOZ-Hogs). Turn left (east)
onto the dirt road and drive about 2.1 miles to the crest of a
small hill (pkHogsUpper). This spot is also where
the road starts to veer from east to south east. Park
along side the road to start the hike over to the Hogs.
To leave the Exit Vehicle / Escape Pod
No exit vehicle required. The Hogs are done as loop
routes.
GPS coordinate information listed at the bottom. For information about waypoint naming and map symbols, refer to the
Glossary page.
*****************DONT FORGET TO ADD MAP LINKS AND DELETE THIS LINE*********

Click the links for maps of the route.
Map of the drive in and the route.
Map of the route overview.
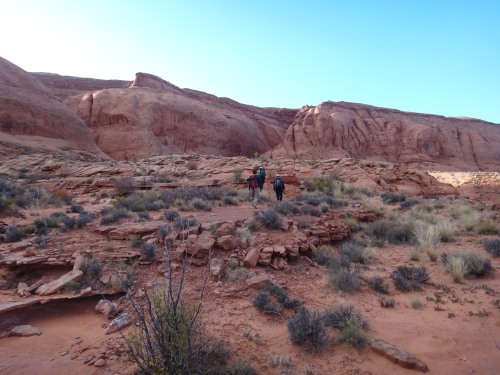
The Approach:
From the parking spot (pkHogsUpper)
walk across the open
desert north west at a
bearing of 30 degrees
for about 0.8 miles over
to the rim of the Hog
Canyon system
(wHogsTopRP-01).
This is also where the
southern end of a short
sandstone cliff band
starts. From
here you have a good
view to the east over
the Hog Canyon routes.
Note:
About 0.4 miles from the
parking spot you will
pass kind of near (jHogStndExTop) the
head of a drainage on
the right (east).
This drainage is used as
one of the exits up out
of the Hogs. You
likely will not notice
it when hiking in on the
approach route but I
thought it worth
mentioning as a helpful
hint if you are
navigating by map and
written route
description only.
When you get to the
sandstone cliff band
along the rim
(wHogsTopRP-01) walk
north along the rim for
about about 0.2 miles to
the top of a wide gently
sloped drainage leading
down southeast from the
rim here. This is
the top of the Hog 4 /
Miss Piggy route
(yHog4-MsPigyTp).
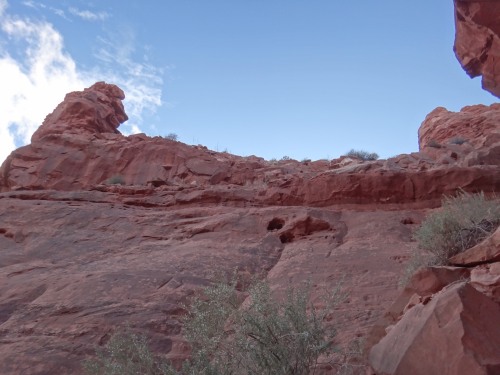
The Canyoneering / Technical Section:
From the head of
Hog 4 / Miss Piggy
(yHog4-MsPigyTp), drop
down from the rim and
follow southeast down
the wide gentle sloped
dirt drainage.
About 300 feet down the
drainage the slick rock
starts at the top of a
ledge (wHogFourRP-01)
looking down over a slot
cutting down into the
slick rock below.
To get down to the slot
below the ledge, find
your way down the sloped
slick rock about 100
feet to the right (south
west).
After getting down to
the head of the slot
continue down canyon in
the slot. You will
need to galumph along as
you move down the
shallow but narrow V
shaped slot.
About 100 feet down into
Miss Piggy is a drop of
about 25 feet
(wHogFourRP-02).
The drop is a steep
exposed slithering
chimney down climb.
All but the last person
can be given a hand line
from above.
Optionally this drop can
be anchored LDC in a
sand filled pothole at
the top of the drop.
At the bottom of the
down climb is a second
down climb of about 15
feet that is much easier
than the first one with
good features to use as
hand holds.
About 100 feet down
canyon is a wide open
area (wHogFourRP-03) in
the slick rock.
The first 300 feet after
the wide open area
starts down into the
next slot galumphing
along in the next wide V
shaped slot. Along
this slot will be a
moderate down climb of
about 10 feet, then a
long pot hole to bridge
across (maybe thigh deep
if full) and then
another down climb of
about 12 feet to kind of
slide down into a
pothole (wHogFourRP-04)
that may be about waist
deep if full of water
(with a bit of skill you
can slowly traverse the
LDC edge around the
pothole).
Continuing down canyon
are a couple short down
climbs and a few small
shallow potholes (knee
deep if full) before
getting to a down climb
of about 12 feet in an
easy slot to chimney
down. At the
bottom of the chimney
down climb is rap 1.
Rap 1 (dHogFour-R1) is about
150 feet down canyon of
the pot hole you slide
down into, is anchored from
choke stones about 5
feet back from the drop and drops
a total of about 60 feet
down a vertical wall
including a ledge of
about 8 feet at the
bottom.
Shortly
after rap 1 is a down
climb of about 12 feet
in a crack that feels
exposed. It is not
as difficult as it looks
and the trick is to
really slither down the
crack using friction
from your whole body.
After
the down climb is a
winding S like turn
before getting a ledge
looking down over a
pothole. Looking
down from the top the
pothole looks like a big
heart stretching from
wall to wall.
Slide down a gently
sloped crack about 6
feet down to the heart
shaped pool and slide on
in. The pool is
about waist deep when
full of water.
On the other side of the
heart shaped pool is
gently sloped pour off
winding down to rap 2.
Rap 2 (dHogFour-R2) is about
200 feet down canyon of
rap 1. The anchor
for Rap 2 is rock debris
in a pool at the top of
the rap that can be
about knee deep when
full. The water
can make rigging and
inspecting the anchor a
little difficult.
Rap 2 drops about 85
feet over two stages
both down sloped walls.
At the bottom of rap 2
scramble along a low
ledge for about 30 feet
over to the floor of the
canyon where the Hog
Four (Miss Piggy the
drainage you were in)
drops into a larger
drainage which is Hog
One. This is the
end of the Hog One (Miss
Piggy) slot
(yHog4-MsPigyBt).
To complete the route
turn right and start
south down the lower
portion of Hog One.
Continue down canyon
over a few small pools
that are easily stemmed
over. About 250
feet from the junction
of Hog 4 and Hog 1 is
the top of an elevator
down climb into a deep
narrow slot
(wHogOneRP-06).
The elevator down climb
into the narrow slot is
about 30 feet and has
walls smooth enough to
allow a fun fast
elevator down. The
bottom of the slot has a
flat sandy floor to walk
on and is narrow enough
that you will likely
need to take your back
pack off to continue
through.
As you continue down
canyon in the slot the
walls are twisted and
scenic and slowly widen
out. A couple of
spots can hold water
about shin deep and can
be easily stemmed over
if you don't want to get
your feet wet.
About 250 feet down
canyon of the elevator
the walls widen out
allowing easy walking in
a wide slot.
Continue down canyon as
the walls continue to
get wider as the canyon
makes a slow long sweep
to the left.
Continue down the now
wider canyon with some
vegetation about 500
feet to the confluence
of the bottoms of both
the Hog 1 and Hog 2
canyons (yHog-1and2-Bt).
The Exit(s):
When you
get to the confluence of
the bottom of the Hog 1
and Hog 2 canyons
(yHog-1and2-Bt), you
have two choices for an
exit route. Option
one is the standard exit
which climbs up a ravine
southwest of Hog 4.
Option two is to climb
up the slick rock
between Hogs 1 and 2.
Exit Option One
- Standard Exit Route:
Option one is the
standard exit and is
about 1.6 miles back to
the parking spot for the
top entry to the Hog
System. This
option climbs up out of
the Hog Canyon area in a
rocky ravine to the flat
desert above. This
exit is shorter but
involves more scrambling
up boulders in the
ravine. This route
also does not involve
the difficult up climb
that the other option
has.
If you entered the Hogs
from the top and are
done for the day this is
the shortest and easiest
route back to the car.
To follow option 1,
continue down the wash
about 0.4 miles to a
canyon joining in from
the left (northeast)
which is the bottom of
Hog 3 (yHog3-Bt).
As you head down the
wash down canyon of Hogs
1 and 2, look for a way
to get up on the ledge
on the RDC (southwest)
side to find a use
trail. The use
trail stays up out of
the wash to avoid wet
and heavy vegetation.
Note:
Walking down canyon all
the way to the bottom of
Hog 3 is optional and is
about 0.5 miles longer
than need be.
However I have not done
the shorter version and
can not give details on
it. If you wish to
route find your own way
for this short cut.....
From the bottom of Hog
1, continue down the
wash about 600 feet then
climb the left (west)
side of the drainage.
After finding your way
to the top continue
southwest and route find
your way about 600 feet
over to way point
wHogStndExRP-3.
When you get to waypoint
wHogStndExRP-3 continue
on the remainder of the
route as described.
From the bottom of Hog 3
(yHog3-Bt) walk west
directly across to the
other side of the
drainage you dumped
into. Route find
your way up the bank on
the west side up onto
the desert above.
The bank is about 40 or
50 feet high and a mick
of dirt and sandstone.
When you get to the top
of the bank
(wHogStndExRP-1), walk
north west traversing up
and along the dirt
covered hillside.
After about 400 feet the
route will begin to
level off a little into
a mix of rolling desert
and slick rock. As
the route levels off you
begin to get good views
toward the exit gully
/ravine to the north
west.
Note / Visual
Navigation Note:
As you get to a point
where you have good
views of the entire area
you will be able to see
Hog 3 to the northeast
and see over toward the
area for Hogs 1 and 2 to
the north. Look
north west for a large
ravine / gully running
north west up to the
rim. This gully /
ravine is the exit
route. To the left
(south or southwest)
will be a larger
drainage with an obvious
huge vertical head wall.
This is walking toward
the standard exit gully. Hogs 1 and 2 are to the right, the exit
gully is center image. Note the bottom of another canyon on the
left which has a huge vertical head wall which can be seen as you
continue the walk to the exit gully.
About 0.25 miles after
getting up out of the
drainage at the bottom
of Hog 3 the route
toward the exit gully
will cross over
(wHogStndExRP-2) a wide
slick rock drainage.
The point marked here
for crossing the
drainage is located at a
fork in the drainage
where the north fork
goes up to the exit
gully and the west fork
goes over to the side
canyon with the huge
head wall.
Cross over the drainage
and start traveling up
the slick rock running
up along the north side
of the drainage.
Following up out of this
drainage avoids
obstacles down in it.
About 450 feet after
crossing the drainage
you will get to what
feels like a top out in
the slick rock
(wHogStndExRP-3) where
you have a good view
over to the exit gully.
From this top out on
slick rock do not climb
any higher.
Instead traverse along
whatever route feels
comfortable to get over
and into the exit gully
a few hundred feet
ahead.
Scramble and hike your
way up the exit gully
for about 0.3 miles.
There is a lot of
scrambling on the way up
this gully but non of it
is overly difficult,
just a lot of it.
As you get near the top
of the gully you will
notice it begins to get
a lot steeper.
Keep an eye on the left
(southwest) wall and
look up high for an
obvious rock pinnacle.
Keep an eye on the left
wall as you get near the
top of the exit gully.
Look for this rock
pinnacle for a clue when
to start climbing the
left side wall along
ledges.
As you get roughly
parallel with the rock
pinnacle look for a
series of ledges to
climb up to get to the
ridge just above the
pinnacle. There
are multiple ways to
climb up the ledges.
Some of the spots to
climb up will feel a
little exposed and make
you think a little to
complete the moves.
There are only a couple
spots that may be
moderately difficult but
over all an easy series
of ledges to get up.
About 80 feet up you
will get to sloped dirt
to walk up.
After getting up onto
the ridge above the
pinnacle
(wHogStndExRP-5) walk up
the sloped dirt ridge
about 250 feet to join
the approach route in
the rolling desert (jHogStndExTop).
After meeting with the
approach route
(jHogStndExTop) veer
left and walk about 0.45
miles southwest on a
bearing of 216 degrees
back to the parking spot
for the top entry to the
Hogs (pkHogsUpper).
Exit Option Two
- Alternate Slick Rock
Exit:
Option two is begins
with a difficult up
climb on steep slick
rock (generally rated as
a 5.7) then becomes an
over all easy route
following up slick rock
to the desert above.
This route is the longer
option back to the cars
at the top entry coming
in at about 2 miles.
This is a good exit to
use if you plan to do
more than one Hog in a
day. Using this
exit gets you to the
desert above the Hog
system between the tops
of Hogs 1 and 2 making
the traverse over to any
of the Hogs easy.
If you are planning to
do a second Hog after
your exit up, this exit
is a good choice as it
will get you to the rim
in a spot to quickly
head over to the head of
any of the other Hogs.
To follow exit option
2.... When you get
to the end of Hog 1 at
the confluence of Hog 2
(yHog-1and2-Bt) turn
left (east) and start
into the bottom of Hog
2. Look for a
smooth steep sloped
section of slick rock
starting up the nose
between Hogs 1 and 2.
The base of the climb is
on a ledge above the
vegetated canyon floor
next to Hog 1.
Note / Warning:
The first 25 to 30 feet
of this exit involves a
steeply sloped almost
smooth section of slick
rock and is generally
rated as a 5.7 up climb.
If you are confident of
your skills for a slab
style up climb for about
30 feet you are good to
go. If you are not
confident in your
ability you should have
someone along on the
route that is if you
intend to use this exit.
The first person up can
tie a rope to them
selves and offer a meat
anchored hand line for
every one else.
The good thing is the
hardest part of this
route is the very first
30 feet. If you
check out the climb up
and decide it is not
what you want to do you
have not committed too
much time to the effort.
If you check it out and
decide you do not want
to make the climb you
can turn around and
follow the standard exit
up out of the Hog
system.
If you make it up this
climb the rest of the
route up is easy and
will get you to the rim
between Hogs 1 and 2
ready to go over to the
head of another Hog.
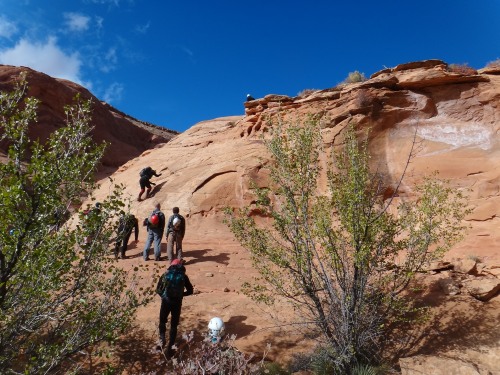
This is is the first 30
foot climb up the slick
rock exit. If you
make it up this the rest
is an easy up hill slog
on slick rock to the
rim.
After getting up to the
top of the 30 foot up
climb (wHogAltExRP-1)
route find your way
north up the wide
wandering slick rock
ridge.
About 0.35 miles up the
ridge you will begin to
see a distinct pointy
slick rock peak about
0.2 miles ahead.
Continue the 0.2 miles
up the slick rock to the
top of the peak
(wHogAltExRP-2).
From the peak the route
levels off and continues
north along the now dirt
covered ridge.
A little over 500 feet
after the peak is the
base (wHogAltExRP-3) of
a sandstone cliff band
about 40 feet high.
To continue the exit up
and back to the cars
parked at the upper
parking area, find a
spot to climb / scramble
up onto the top of the
cliff band then continue
north west about 600
feet to meet up with the
route that travels along
the tops of the Hogs (jHogSlickRkEx).
There is no specific
landmark here.
Note:
From the base of the
cliff band
(wHogAltExRP-3) if you
plan to go over to Hog 2
or Hog 3 do not climb up
the cliff band.
Instead veer right and
follow the ledge system
about eastish about 700
feet over to the head of
Hog 2. Or continue
beyond the head of Hog 2
wrapping around south
east then south down to
the top of Hog 3 about
0.5 miles away.
After meeting up with
the approach route turn
left and head west about
250 feet over to the
head of Hog 1 (yHog1Tp).
From the top of Hog 1
roughly follow the rim
and route find your way
west then wrapping
around southwest through
the rolling desert.
About 0.35 miles from
the top of Hog 1 will be
a wide dirt ravine /
drainage dropping down
from the rim and heading
down southeast.
This is the top of Hog 4
(yHog4-MsPigyTp).
Note:
From the top of Miss
Piggy the top entry
parking area is about 1
mile southwest on a
bearing of 208 degrees.
Continue south along the
rim crossing over the
top of a small sandstone
cliff band
(wHogsTopRP-01) about
700 feet away.
After crossing over the
sandstone cliff band
route find your way
southwest through the
desert back to the road
where you parked your
cars at the top entry
(pkHogsUpper).
Downloadable GPX files
available at
BG-Gear Store
(easier than manual entry and a great way to support
Bluugnome).
Waypoint naming convention and map symbol information can be found on the Glossary page.
Elevations are approximate.
BEFORE
manually entering coordinates set your system to WGS84 datum and Lat/Lon hddd.ddddd° coordinate format.
Inconsistent datum's and coordinate formats will result in location errors.
Click to show / expand the list of waypoints below........
| Hog Four (1) - Drive in to Trailhead |
- extLandOZ-Hogs
Lat/Lon (WGS84): N 37.97361
W -110.56810
Elev: 4,770 Feet
Exit off highway 276 for the Land of OZ canyons and access to the top entry for the Hogs. This is between mile markers 3 and 4. Dirt road needs high clearance and 4WD is recommended as the road condition varies greatly.
- pkHogsUpper
Lat/Lon (WGS84): N 37.97219
W -110.53028
Elev: 5,175 Feet
Park here for access to the Hogs from the top. This is at the crest of a hill andjust as the road begins to veer from east to south east. The Hogs can be done as a loop route from here.
|
| Hog Four (2) - Approach |
- pkHogsUpper
Lat/Lon (WGS84): N 37.97219
W -110.53028
Elev: 5,175 Feet
Park here for access to the Hogs from the top. This is at the crest of a hill andjust as the road begins to veer from east to south east. The Hogs can be done as a loop route from here.
- jHogStndExTop
Lat/Lon (WGS84): N 37.97684
W -110.52602
Elev: 5,135 Feet
Top out of the standard gully exit route where it meets with the approach route from the top.
- wHogsTopRP-01
Lat/Lon (WGS84): N 37.98157
W -110.52342
Elev: 5,000 Feet
Southern end of a sandstone cliff band feature to walk along the top of on the approach into the Hogs from the top.
- yHog4-MsPigyTp
Lat/Lon (WGS84): N 37.98350
W -110.52262
Elev: 5,020 Feet
Top entry of Hog 4 - Miss Piggy. This is the head of a wide gentle sloped draiange leading down south east from the rim here.
|
| Hog Four (3) - The Canyon |
- yHog4-MsPigyTp
Lat/Lon (WGS84): N 37.98350
W -110.52262
Elev: 5,020 Feet
Top entry of Hog 4 - Miss Piggy. This is the head of a wide gentle sloped draiange leading down south east from the rim here.
- wHogFourRP-01
Lat/Lon (WGS84): N 37.98288
W -110.52200
Elev: 4,960 Feet
This is where the dirt ends and slick rock begins. This on the top of a lecdge looking down over a slot cutting down into the slick rock below.
- wHogFourRP-02
Lat/Lon (WGS84): N 37.98246
W -110.52173
Elev: NaN Feet
Drop of about 25 feet that can be a tricky exposed chimney down climb. Optionally this drop can be anchored LDC in a sand filled pothole at the top of the drop.
- wHogFourRP-03
Lat/Lon (WGS84): N 37.98217
W -110.52160
Elev: NaN Feet
Wide open feeling area on the slick rock.
- wHogFourRP-04
Lat/Lon (WGS84): N 37.98137
W -110.52166
Elev: NaN Feet
Drop of about 12 feet to slide down to a pothole which can be about waist deep if full.
- dHogFour-R1
Lat/Lon (WGS84): N 37.98093
W -110.52157
Elev: NaN Feet
Rap 1 - Hog Four (Miss Piggy. Anchored from choke stones about 5 feet back and drops about 60 feet down a vertical wall with an 8 foot ledge at the bottom.
- dHogFour-R2
Lat/Lon (WGS84): N 37.98049
W -110.52125
Elev: NaN Feet
Rap 2 - Hog Four (Miss Piggy. Anchored from rock debris in a shallow pot hole and drops about 85 feet over two stages of sloped walls just before getting into Hog 1.
- yHog4-MsPigyBt
Lat/Lon (WGS84): N 37.98048
W -110.52102
Elev: 4,550 Feet
Bottom Exit of Hog 4 / Miss Piggy where it dumps into Hog 1 - Boss Hawg.
- wHogOneRP-06
Lat/Lon (WGS84): N 37.97980
W -110.52093
Elev: NaN Feet
Top of an elevator style down climb of about 30 feet into a narrow slot below with a sandly floor.
- yHog-1and2-Bt
Lat/Lon (WGS84): N 37.97753
W -110.52006
Elev: 4,480 Feet
Bottom exit of both hogs 1 and 2. This is the confluence of the two routes.
|
| Hog Four (4) - Standard Gully Exit |
- yHog-1and2-Bt
Lat/Lon (WGS84): N 37.97753
W -110.52006
Elev: 4,480 Feet
Bottom exit of both hogs 1 and 2. This is the confluence of the two routes.
- wHogStndExRP-1
Lat/Lon (WGS84): N 37.97335
W -110.51604
Elev: NaN Feet
Top of the bank to climb up for the start of the standard exit after Hog 3.
- wHogStndExRP-2
Lat/Lon (WGS84): N 37.97438
W -110.51938
Elev: 4,510 Feet
Exit route corsses over a wide slick rock drainage on the way to the exit gully. This is also where this drainage forks where the north fork goes up to the exit gully and the west fork goes over to the side canyon with the huge head wall.
- wHogStndExRP-3
Lat/Lon (WGS84): N 37.97488
W -110.52071
Elev: 4,540 Feet
Top of a sandstone section whith good views over to the exit gully.
- wHogStndExRP-4
Lat/Lon (WGS84): N 37.97491
W -110.52176
Elev: NaN Feet
Bottom of the exit gully.
- wHogStndExRP-5
Lat/Lon (WGS84): N 37.97667
W -110.52508
Elev: 5,020 Feet
On the ridge just above the rock pinnacle.
- jHogStndExTop
Lat/Lon (WGS84): N 37.97684
W -110.52602
Elev: 5,135 Feet
Top out of the standard gully exit route where it meets with the approach route from the top.
- pkHogsUpper
Lat/Lon (WGS84): N 37.97219
W -110.53028
Elev: 5,175 Feet
Park here for access to the Hogs from the top. This is at the crest of a hill andjust as the road begins to veer from east to south east. The Hogs can be done as a loop route from here.
|
| Hog Four (5) - Optional Slick Rock Exit |
- yHog-1and2-Bt
Lat/Lon (WGS84): N 37.97753
W -110.52006
Elev: 4,480 Feet
Bottom exit of both hogs 1 and 2. This is the confluence of the two routes.
- wHogAltExRP-1
Lat/Lon (WGS84): N 37.97774
W -110.52005
Elev: 4,481 Feet
Top of the climb at the base of the Slick Rock exit up out of the Hogs.
- wHogAltExRP-2
Lat/Lon (WGS84): N 37.98327
W -110.51826
Elev: 4,965 Feet
A pointy peak along the slick rock ridge.
- wHogAltExRP-3
Lat/Lon (WGS84): N 37.98465
W -110.51747
Elev: 5,010 Feet
Base of a slick rock cliff band about 40 feet high.
- jHogSlickRkEx
Lat/Lon (WGS84): N 37.98622
W -110.51788
Elev: NaN Feet
This is where the slick rock exit up out of the Hogs meets the approch route that travels along the rim around the heads of the Hogs. No specific land mark here.
- jHog1
Lat/Lon (WGS84): N 37.98538
W -110.52020
Elev: 5,050 Feet
From here turn southeast and walk about 100 feet to the rim and look for a spot to scramble down off the rim.
- yHog4-MsPigyTp
Lat/Lon (WGS84): N 37.98350
W -110.52262
Elev: 5,020 Feet
Top entry of Hog 4 - Miss Piggy. This is the head of a wide gentle sloped draiange leading down south east from the rim here.
- wHogsTopRP-01
Lat/Lon (WGS84): N 37.98157
W -110.52342
Elev: 5,000 Feet
Southern end of a sandstone cliff band feature to walk along the top of on the approach into the Hogs from the top.
- jHogStndExTop
Lat/Lon (WGS84): N 37.97684
W -110.52602
Elev: 5,135 Feet
Top out of the standard gully exit route where it meets with the approach route from the top.
- pkHogsUpper
Lat/Lon (WGS84): N 37.97219
W -110.53028
Elev: 5,175 Feet
Park here for access to the Hogs from the top. This is at the crest of a hill andjust as the road begins to veer from east to south east. The Hogs can be done as a loop route from here.
|