Canyoneering Route Description
Hog 3 Canyon (aka Razorback) - 3A II R
North Wash, Utah.
11-12-11, 9 people, 1 Day (Travel time in route 6.9 hours) - Time for
Miss Piggy (Hog 4) and Hog 3 (Razorback) combined.

Time Required - 3.5 to 5 hours
Distance - 3.6 miles Total, 0.6 miles Technical
Rappels - 1 Rappels, Longest Rappel 75 feet.
A couple of the down climbs may be arguably rappels adding to the
count.
Elevation Range - 5175 - 4355 Feet
Shuttle Required -No Vehicle - High Clearance
(possibly 4WD depending on road conditions)
Permit Required - No
Rappelling and anchor gear, Ropes and or pull cords for rappels up
to 75 feet and 50 feet of 1 inch webbing for sling placement. Wet
suit bottoms might be nice ONLY if there were recent rains AND it is
cold out. Even in cooler months a wet suit will likely not be
needed since the water is only in small patches and only to waist
deep and mostly avoidable.
Hog 3 (Razorback)
has only one mandatory rappel but a
few down climbs may be arguably
rappels so use your judgment and do
what you feel is safe. Hog 3
was definitely one I call a fun
short route.
In a few spots you
will likely have sharp protrusions
in the sandstone poking and
scrapping your back side. I
think this may be what gave Hog 3
the nick name of Razorback.
Some of the drops in Hog 3 look and feel like a rappel but are down
climbable for those with the skills to do it. The height of some
of the drops can be intimidating prove dangerous in the event of a fall.
Take your time when navigating the
start of some of the down climbs.
Portions of Hog 3
(Razorback) also involve stemming about 20 or 30 feet off the deck since
the walls are too narrow to travel at the bottom. These two
reasons are what give Hog 3 an R rating. If you are unfamiliar
with skinny canyons or high stemming take the time to get acquainted
before entering Hog 3. A good place to start for the skinny stuff
is a trip down Middle Leprechaun Canyon. In Leprechaun Canyon you
will also get the chance to try out short sections of stemming but not
too high up.
To get to the Trailhead
From the junction of highways 276 and 95, travel south on
highway 276 for 3.6 miles to a dirt road turn off on the left
(east) side of the road (extLandOZ-Hogs). Turn left (east)
onto the dirt road and drive about 2.1 miles to the crest of a
small hill (pkHogsUpper). This spot is also where
the road starts to veer from east to south east. Park
along side the road to start the hike over to the Hogs.
To leave the Exit Vehicle / Escape Pod
No exit vehicle required. The Hogs are done as loop
routes.
GPS coordinate information listed at the bottom. For information about waypoint naming and map symbols, refer to the
Glossary page.

Click the links for maps of the route.
Map of the drive in and the route.
Map of the route overview.
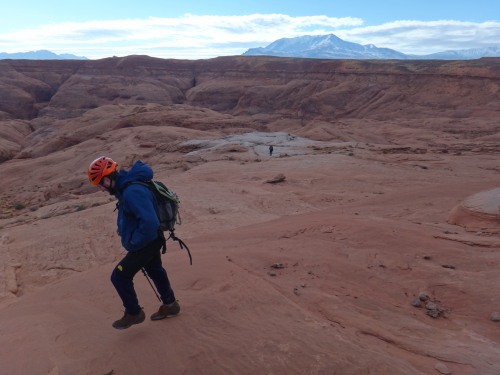
The Approach:
From the parking spot (pkHogsUpper)
walk across the open
desert north west at a
bearing of 30 degrees
for about 0.8 miles over
to the rim of the Hog
Canyon system
(wHogsTopRP-01).
This is also where the
southern end of a short
sandstone cliff band
starts. From
here you have a good
view to the east over
the Hog Canyon routes.
Note:
About 0.4 miles from the
parking spot you will
pass kind of near (jHogStndExTop) the
head of a drainage on
the right (east).
This drainage is used as
one of the exits up out
of the Hogs. You
likely will not notice
it when hiking in on the
approach route but I
thought it worth
mentioning as a helpful
hint if you are
navigating by map and
written route
description only.
When you get to the
sandstone cliff band
along the rim
(wHogsTopRP-01) walk
north along the rim for
about about 0.2 miles to
the top of a wide gently
sloped drainage leading
down southeast from the
rim here. This is
the top of the Hog 4 /
Miss Piggy route
(yHog4-MsPigyTp).
Continue north then
north west in the
rolling desert roughly
following the rim for
about 0.3 miles to the
head of a wide drainage
running down to the
south. This is the
top of Hog 1 - Boss Hawg
(yHog1Tp).
From the head of Hog 1
continue east across the
rolling desert over to
another drainage
dropping down to the
south. This is the
head of Hog 2 (yHog2Tp).
From the head of Hog 2
continue along the dirt
covered desert veering
southeast and following
the rim just below a
bench to the left
(north). About 0.3
miles past Hog 2 turn
right and head south
down from the rim onto a
very wide slick rock
ridge (jHog3).
Note:
If walk too far
east and miss this spot
you will soon find out
you have went too far
when you run into the
end of the dirt and hit
slick rock running down
to the the east.
If you do just back up a
few hundred feet and
look for a way down to
the south on slick rock.
As you walk down the
slick rock look about
300 feet ahead of you
for a large obvious
white patch of rock.
As you see this large
white patch of rock
route find your way down
to then just below the
white patch.
As you start down from
the rim to get to Hog 3, look down the slick rock for a large obvious
white patch of rock. Go down to then just below the white patch of
rock.
After getting just below
the white patch
(wHogThreeRP-01), veer
left and slowly curve
south ast down toward
the top of Hog 3 near a
bowl like area about 650
feet down and to the
southeast. Route
find your way along the
semi steep slick rock to
get down to the bowl.
Then look for the head
of where a set of cross
joints come together a
short distance east.
The head of Hog 3
(yHog3Tp) starts down
from where these cross
joints meet.
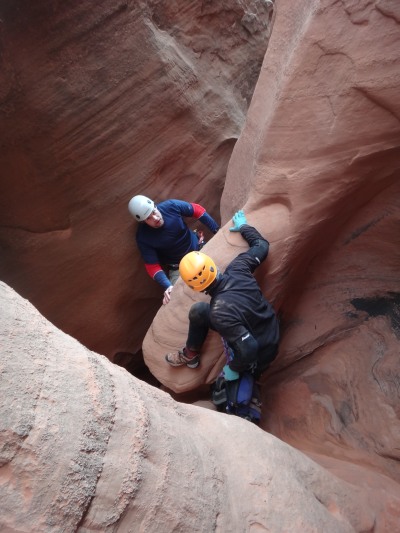
The Canyoneering / Technical Section:
From the top of
Hog 3 (yHog3Tp), travel
down the slot for about
30 or 40 feet of light
stemming to a down climb
/ open slide of about 10
feet. Just at the bottom
of the drop is another
down climb of about 12
feet that is a bit more
difficult so assisting
one another may be
helpful.
About 40 feet farther
down canyon is another
drop of about 30 feet.
This drop feels exposed
and is a bit awkward to
start out on but becomes
an easy stem / chimney
part way down.
This drop can optionally
be anchored from some
choke stones about 5
feet back to use a hand
line or set a rappel if
desired. This drop
is right where the
canyon turns sharp right
which is what makes the
start awkward. To
get out onto the down
climb you can stand up
then lean across canyon
and fall onto your
outstretched arms on the
opposite wall.
Near the bottom of the
30 foot drop is slide of
about 8 feet.
Next is a long section
of canyon to stem along
since the bottom is too
narrow to fit in down
below. In this
stemming section you
will may be as high as
25 feet above the deck
at times depending on
body size and comfort
level. In this
section are also two S
turns that make a sharp
right left jog.
Both of these S turns
have a drop in them as
you stem around the
corner making it a
little challenging.
It seems to be easier to
get around these corners
by staying a little high
as you stem around the
corner.
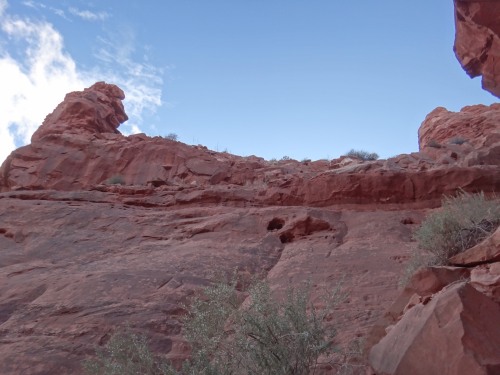
This is one of the S
turns to navigate around.
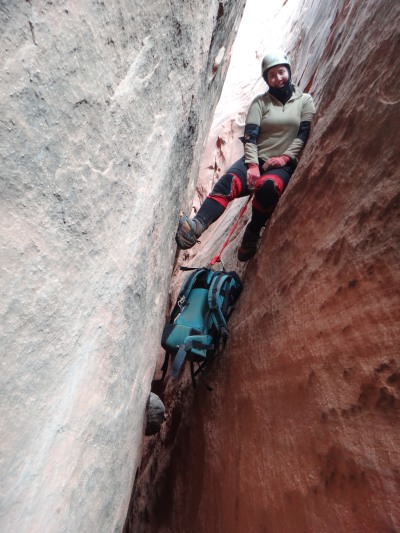
Stemming in the upper portion of Hog 3.
Next is a short break
from the stemming as you
get to a section
(wHogThreeRP-02) that is
a little wider and
allows walking for 60 or
70 feet. This
short reprieve is a
little over 400 feet
down canyon from the
head.
As you start into the
next slotted section is
another down climb of
about 30 feet that is
slightly sloped and easy
to slither down while
stemming between the
walls.
After the down climb is
a short section of more
stemming between the
walls at what ever
height you find
comfortable before
getting to a short walk
to a drop of about 30
feet down to a long
narrow pool. The
pool can be a little
over waist deep if full.
The down climb to the
pool starts out with an
awkward lean out to the
wall before getting down
into an easy to stem /
slide slot down to the
pool. It is
possible for taller
people to bridge over
the pool and stay
completely out of it.
Shorter people however
will have to wade
through.
After the pool is a wide
section of canyon to
walk along for a couple
hundred feet to where a
cross joints drop down
from RDC and LDC
(wHogThreeRP-03).
Either cross joint may
be a good escape spot if
you want to bail but the
LDC cross joint looks
like it would be
significantly easier.
Continue down canyon
over a couple scrambles
and some walking for
about 200 feet to the
top of rap 1.
Rap 1 (dHogThree-R1) is about
200 feet down canyon of
the cross joints
dropping down from each
side and is the only
mandatory rappel in the
canyon. Rap 1 is
anchored from choke
stones about 25 feet
back from the drop in an
S turn section.
Rap 1 offers an easy
rolling start to the
drop then quickly goes
vertical and then
bounces between slanted
walls. Rap 1 drops
about 75 feet if the
anchor webbing was
extended all the way
from the anchor over to
the top of the drop.
Note:
Be sure to extend the
webbing from the anchor
of rap 1 all the way
over to the top of the
drop. Extending
the webbing will make
your rope pull a lot
easier, prevent rope
groves from developing
at the top of the rap
and allow you to haul a
shorter rope through the
canyon.
After rap 1 you can take
off your harness and
enjoy. Down canyon
of rap 1 the canyon
widens out a lot giving
way to wash walking and
a few scrambles over
boulders.
About 0.2 miles down
canyon of rap 1 is the
start of a boulder
debris field
(wHogThreeRP-04) to
scramble through and
boulder hop in.
About 850 feet farther
down canyon is the end
of Hog 3 (yHog3-Bt)
where it drops into
another large wide open
drainage.
Note:
This is the main
drainage of Hog Canyon.
If you turn left and
walk down canyon to the
southeast it is just
over 2 miles to the Hog
Springs parking area.
If you turn right and
head northwest up canyon
you will get to the
bottom exits of Hogs 1
and 2 about 0.4 miles up
canyon.
The Exit(s):
When you
get to the bottom of Hog
3 (yHog3-Bt) you
have two choices for an
exit route. Option
one is the standard exit
which climbs up a ravine
southwest of Hog 4.
Option two is to climb
up the slick rock
between Hogs 1 and 2.
Exit Option One
- Standard Exit Route:
Option one is the
standard exit and is
about 1.2 miles back to
the parking spot for the
top entry to the Hog
System. This
option climbs up out of
the Hog Canyon area in a
rocky ravine to the flat
desert above. This
exit is shorter but
involves more scrambling
up boulders in the
ravine. This route
also does not involve
the difficult up climb
that the other option
has.
If you entered the Hogs
from the top and are
done for the day this is
the shortest and easiest
route back to the car.
To follow option 1,
from the bottom of Hog 3
(yHog3-Bt) walk west
directly across to the
other side of the
drainage you dumped
into. Route find
your way up the bank on
the west side up onto
the desert above.
The bank is about 40 or
50 feet high and a mick
of dirt and sandstone.
When you get to the top
of the bank
(wHogStndExRP-1), walk
north west traversing up
and along the dirt
covered hillside.
After about 400 feet the
route will begin to
level off a little into
a mix of rolling desert
and slick rock. As
the route levels off you
begin to get good views
toward the exit gully
/ravine to the north
west.
Note / Visual
Navigation Note:
As you get to a point
where you have good
views of the entire area
you will be able to see
Hog 3 to the northeast
and see over toward the
area for Hogs 1 and 2 to
the north. Look
north west for a large
ravine / gully running
north west up to the
rim. This gully /
ravine is the exit
route. To the left
(south or southwest)
will be a larger
drainage with an obvious
huge vertical head wall.
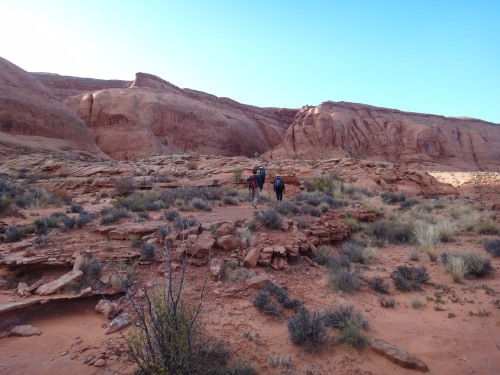
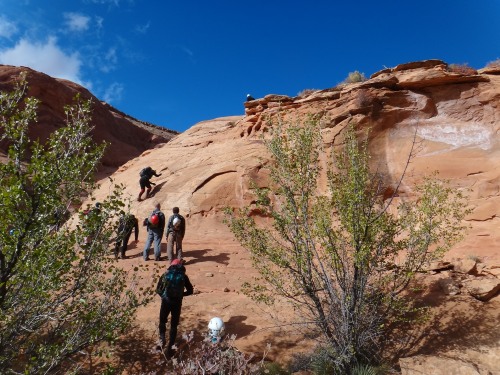
This is walking toward
the standard exit gully. Hogs 1 and 2 are to the right, the exit
gully is center image. Note the bottom of another canyon on the
left which has a huge vertical head wall which can be seen as you
continue the walk to the exit gully.
About 0.25 miles after
getting up out of the
drainage at the bottom
of Hog 3 the route
toward the exit gully
will cross over
(wHogStndExRP-2) a wide
slick rock drainage.
The point marked here
for crossing the
drainage is located at a
fork in the drainage
where the north fork
goes up to the exit
gully and the west fork
goes over to the side
canyon with the huge
head wall.
Cross over the drainage
and start traveling up
the slick rock running
up along the north side
of the drainage.
Following up out of this
drainage avoids
obstacles down in it.
About 450 feet after
crossing the drainage
you will get to what
feels like a top out in
the slick rock
(wHogStndExRP-3) where
you have a good view
over to the exit gully.
From this top out on
slick rock do not climb
any higher.
Instead traverse along
whatever route feels
comfortable to get over
and into the exit gully
a few hundred feet
ahead.
Scramble and hike your
way up the exit gully
for about 0.3 miles.
There is a lot of
scrambling on the way up
this gully but non of it
is overly difficult,
just a lot of it.
As you get near the top
of the gully you will
notice it begins to get
a lot steeper.
Keep an eye on the left
(southwest) wall and
look up high for an
obvious rock pinnacle.
Keep an eye on the left
wall as you get near the
top of the exit gully.
Look for this rock
pinnacle for a clue when
to start climbing the
left side wall along
ledges.
As you get roughly
parallel with the rock
pinnacle look for a
series of ledges to
climb up to get to the
ridge just above the
pinnacle. There
are multiple ways to
climb up the ledges.
Some of the spots to
climb up will feel a
little exposed and make
you think a little to
complete the moves.
There are only a couple
spots that may be
moderately difficult but
over all an easy series
of ledges to get up.
About 80 feet up you
will get to sloped dirt
to walk up.
After getting up onto
the ridge above the
pinnacle
(wHogStndExRP-5) walk up
the sloped dirt ridge
about 250 feet to join
the approach route in
the rolling desert (jHogStndExTop).
After meeting with the
approach route
(jHogStndExTop) veer
left and walk about 0.45
miles southwest on a
bearing of 216 degrees
back to the parking spot
for the top entry to the
Hogs (pkHogsUpper).
Exit Option Two
- Alternate Slick Rock
Exit:
Option two involves a difficult up
climb on steep slick
rock (generally rated as
a 5.7) then becomes an
over all easy route
following up slick rock
to the desert above.
This route is the longer
option back to the cars
at the top entry coming
in at about 2.4 miles.
This is a good exit to
use if you plan to do
more than one Hog in a
day. Using this
exit gets you to the
desert above the Hog
system between the tops
of Hogs 1 and 2 making
the traverse over to any
of the Hogs easy.
If you are planning to
do a second Hog after
your exit up, this exit
is a good choice as it
will get you to the rim
in a spot to quickly
head over to the head of
any of the other Hogs.
To follow exit option
2.... When you get
to the bottom of Hog 3
(yHog3-Bt) turn right
and go northwest up
canyon in the drainage
coming down from Hogs 1
and two. About 0.4
miles up canyon will be
a large drainage coming
in from the right
(east). This is
the bottom of Hogs 1 and
2 (yHog-1and2-Bt)
The drainage to the
right (east) is Hog 2
and the drainage
continuing up north is
Hog 1.
Look for a
smooth steep sloped
section of slick rock
starting up the nose
between Hogs 1 and 2.
The base of the climb is
on a ledge above the
vegetated canyon floor
next to Hog 1.
Note / Warning:
The first 25 to 30 feet
of this exit involves a
steeply sloped almost
smooth section of slick
rock and is generally
rated as a 5.7 up climb.
If you are confident of
your skills for a slab
style up climb for about
30 feet you are good to
go. If you are not
confident in your
ability you should have
someone along on the
route that is if you
intend to use this exit.
The first person up can
tie a rope to them
selves and offer a meat
anchored hand line for
every one else.
The good thing is the
hardest part of this
route is the very first
30 feet. If you
check out the climb up
and decide it is not
what you want to do you
have not committed too
much time to the effort.
If you check it out and
decide you do not want
to make the climb you
can turn around and
follow the standard exit
up out of the Hog
system.
If you make it up this
climb the rest of the
route up is easy and
will get you to the rim
between Hogs 1 and 2
ready to go over to the
head of another Hog.
This is is the first 30
foot climb up the slick
rock exit. If you
make it up this the rest
is an easy up hill slog
on slick rock to the
rim.
After getting up to the
top of the 30 foot up
climb (wHogAltExRP-1)
route find your way
north up the wide
wandering slick rock
ridge.
About 0.35 miles up the
ridge you will begin to
see a distinct pointy
slick rock peak about
0.2 miles ahead.
Continue the 0.2 miles
up the slick rock to the
top of the peak
(wHogAltExRP-2).
From the peak the route
levels off and continues
north along the now dirt
covered ridge.
A little over 500 feet
after the peak is the
base (wHogAltExRP-3) of
a sandstone cliff band
about 40 feet high.
To continue the exit up
and back to the cars
parked at the upper
parking area, find a
spot to climb / scramble
up onto the top of the
cliff band then continue
north west about 600
feet to meet up with the
route that travels along
the tops of the Hogs (jHogSlickRkEx).
There is no specific
landmark here.
Note:
From the base of the
cliff band
(wHogAltExRP-3) if you
plan to go over to Hog 2
or Hog 3 do not climb up
the cliff band.
Instead veer right and
follow the ledge system
about eastish about 700
feet over to the head of
Hog 2. Or continue
beyond the head of Hog 2
wrapping around south
east then south down to
the top of Hog 3 about
0.5 miles away.
After meeting up with
the approach route turn
left and head west about
250 feet over to the
head of Hog 1 (yHog1Tp).
From the top of Hog 1
roughly follow the rim
and route find your way
west then wrapping
around southwest through
the rolling desert.
About 0.35 miles from
the top of Hog 1 will be
a wide dirt ravine /
drainage dropping down
from the rim and heading
down southeast.
This is the top of Hog 4
(yHog4-MsPigyTp).
Note:
From the top of Miss
Piggy the top entry
parking area is about 1
mile southwest on a
bearing of 208 degrees.
Continue south along the
rim crossing over the
top of a small sandstone
cliff band
(wHogsTopRP-01) about
700 feet away.
After crossing over the
sandstone cliff band
route find your way
southwest through the
desert back to the road
where you parked your
cars at the top entry
(pkHogsUpper).
Downloadable GPX files
available at
BG-Gear Store
(easier than manual entry and a great way to support
Bluugnome).
Waypoint naming convention and map symbol information can be found on the Glossary page.
Elevations are approximate.
BEFORE
manually entering coordinates set your system to WGS84 datum and Lat/Lon hddd.ddddd° coordinate format.
Inconsistent datum's and coordinate formats will result in location errors.
Click to show / expand the list of waypoints below........
| Hog Three (1) - Drive in to Trailhead |
- extLandOZ-Hogs
Lat/Lon (WGS84): N 37.97361
W -110.56810
Elev: 4,770 Feet
Exit off highway 276 for the Land of OZ canyons and access to the top entry for the Hogs. This is between mile markers 3 and 4. Dirt road needs high clearance and 4WD is recommended as the road condition varies greatly.
- pkHogsUpper
Lat/Lon (WGS84): N 37.97219
W -110.53028
Elev: 5,175 Feet
Park here for access to the Hogs from the top. This is at the crest of a hill andjust as the road begins to veer from east to south east. The Hogs can be done as a loop route from here.
|
| Hog Three (2) - Approach |
- pkHogsUpper
Lat/Lon (WGS84): N 37.97219
W -110.53028
Elev: 5,175 Feet
Park here for access to the Hogs from the top. This is at the crest of a hill andjust as the road begins to veer from east to south east. The Hogs can be done as a loop route from here.
- jHogStndExTop
Lat/Lon (WGS84): N 37.97684
W -110.52602
Elev: 5,135 Feet
Top out of the standard gully exit route where it meets with the approach route from the top.
- wHogsTopRP-01
Lat/Lon (WGS84): N 37.98157
W -110.52342
Elev: 5,000 Feet
Southern end of a sandstone cliff band feature to walk along the top of on the approach into the Hogs from the top.
- yHog4-MsPigyTp
Lat/Lon (WGS84): N 37.98350
W -110.52262
Elev: 5,020 Feet
Top entry of Hog 4 - Miss Piggy. This is the head of a wide gentle sloped draiange leading down south east from the rim here.
- jHog1
Lat/Lon (WGS84): N 37.98538
W -110.52020
Elev: 5,050 Feet
From here turn southeast and walk about 100 feet to the rim and look for a spot to scramble down off the rim.
- jHogSlickRkEx
Lat/Lon (WGS84): N 37.98622
W -110.51788
Elev: NaN Feet
This is where the slick rock exit up out of the Hogs meets the approch route that travels along the rim around the heads of the Hogs. No specific land mark here.
- yHog2Tp
Lat/Lon (WGS84): N 37.98551
W -110.51537
Elev: 5,025 Feet
Top entry for Hog 2. This is where you scramble down into the start of Hog 2.
- jHog3
Lat/Lon (WGS84): N 37.98270
W -110.51291
Elev: 5,010 Feet
Leave the rim here to start south down a ridge to continue toward Hog 3.
- wHogThreeRP-01
Lat/Lon (WGS84): N 37.98238
W -110.51359
Elev: NaN Feet
Large white patch area on the slick rock on the way down to Hog 3.
- yHog3Tp
Lat/Lon (WGS84): N 37.98091
W -110.51233
Elev: 4,830 Feet
Top of Hog 3 where a set of cross joints meet.
|
| Hog Three (3) - The Canyon |
- yHog3Tp
Lat/Lon (WGS84): N 37.98091
W -110.51233
Elev: 4,830 Feet
Top of Hog 3 where a set of cross joints meet.
- wHogThreeRP-02
Lat/Lon (WGS84): N 37.98000
W -110.51309
Elev: NaN Feet
Break from the stemming for about 60 or 70 feet before dropping back into anohter section to stem down canyon in.
- wHogThreeRP-03
Lat/Lon (WGS84): N 37.97907
W -110.51355
Elev: NaN Feet
Cross joints drop down from both sides of the canyon here.
- dHogThree-R1
Lat/Lon (WGS84): N 37.97854
W -110.51377
Elev: NaN Feet
Rap 1 - Hog 3 (Razorback). Anchored from choke stones about 25 feet back and drops about 75 feet. Be sure to extend the anchor webbing all the way out on the drop to make the pull easier and prevent rope grooves.
- wHogThreeRP-04
Lat/Lon (WGS84): N 37.97568
W -110.51533
Elev: NaN Feet
Start of a boulder field to scramble and boulder hop down.
- yHog3-Bt
Lat/Lon (WGS84): N 37.97362
W -110.51589
Elev: 4,355 Feet
Bottom exit of Hog 3 (razorback). This is the end of the Hog 3 drainage where it joins into the main drainage below Hogs 1 and 2.
|
| Hog Three (4) - Standard Gully Exit |
- yHog3-Bt
Lat/Lon (WGS84): N 37.97362
W -110.51589
Elev: 4,355 Feet
Bottom exit of Hog 3 (razorback). This is the end of the Hog 3 drainage where it joins into the main drainage below Hogs 1 and 2.
- wHogStndExRP-1
Lat/Lon (WGS84): N 37.97335
W -110.51604
Elev: NaN Feet
Top of the bank to climb up for the start of the standard exit after Hog 3.
- wHogStndExRP-2
Lat/Lon (WGS84): N 37.97438
W -110.51938
Elev: 4,510 Feet
Exit route corsses over a wide slick rock drainage on the way to the exit gully. This is also where this drainage forks where the north fork goes up to the exit gully and the west fork goes over to the side canyon with the huge head wall.
- wHogStndExRP-3
Lat/Lon (WGS84): N 37.97488
W -110.52071
Elev: 4,540 Feet
Top of a sandstone section whith good views over to the exit gully.
- wHogStndExRP-4
Lat/Lon (WGS84): N 37.97491
W -110.52176
Elev: NaN Feet
Bottom of the exit gully.
- wHogStndExRP-5
Lat/Lon (WGS84): N 37.97667
W -110.52508
Elev: 5,020 Feet
On the ridge just above the rock pinnacle.
- jHogStndExTop
Lat/Lon (WGS84): N 37.97684
W -110.52602
Elev: 5,135 Feet
Top out of the standard gully exit route where it meets with the approach route from the top.
- pkHogsUpper
Lat/Lon (WGS84): N 37.97219
W -110.53028
Elev: 5,175 Feet
Park here for access to the Hogs from the top. This is at the crest of a hill andjust as the road begins to veer from east to south east. The Hogs can be done as a loop route from here.
|
| Hog Three (5) - Optional Slick Rock Exit |
- yHog-1and2-Bt
Lat/Lon (WGS84): N 37.97753
W -110.52006
Elev: 4,480 Feet
Bottom exit of both hogs 1 and 2. This is the confluence of the two routes.
- wHogAltExRP-1
Lat/Lon (WGS84): N 37.97774
W -110.52005
Elev: 4,481 Feet
Top of the climb at the base of the Slick Rock exit up out of the Hogs.
- wHogAltExRP-2
Lat/Lon (WGS84): N 37.98327
W -110.51826
Elev: 4,965 Feet
A pointy peak along the slick rock ridge.
- wHogAltExRP-3
Lat/Lon (WGS84): N 37.98465
W -110.51747
Elev: 5,010 Feet
Base of a slick rock cliff band about 40 feet high.
- jHogSlickRkEx
Lat/Lon (WGS84): N 37.98622
W -110.51788
Elev: NaN Feet
This is where the slick rock exit up out of the Hogs meets the approch route that travels along the rim around the heads of the Hogs. No specific land mark here.
- jHog1
Lat/Lon (WGS84): N 37.98538
W -110.52020
Elev: 5,050 Feet
From here turn southeast and walk about 100 feet to the rim and look for a spot to scramble down off the rim.
- yHog4-MsPigyTp
Lat/Lon (WGS84): N 37.98350
W -110.52262
Elev: 5,020 Feet
Top entry of Hog 4 - Miss Piggy. This is the head of a wide gentle sloped draiange leading down south east from the rim here.
- wHogsTopRP-01
Lat/Lon (WGS84): N 37.98157
W -110.52342
Elev: 5,000 Feet
Southern end of a sandstone cliff band feature to walk along the top of on the approach into the Hogs from the top.
- jHogStndExTop
Lat/Lon (WGS84): N 37.97684
W -110.52602
Elev: 5,135 Feet
Top out of the standard gully exit route where it meets with the approach route from the top.
- pkHogsUpper
Lat/Lon (WGS84): N 37.97219
W -110.53028
Elev: 5,175 Feet
Park here for access to the Hogs from the top. This is at the crest of a hill andjust as the road begins to veer from east to south east. The Hogs can be done as a loop route from here.
|