Canyoneering Route Description
TOD - Temple of Doom Canyon - 3(4)B III
Escalante National Monument,
Utah.
06-20-15, 3 people, 1 Day (Travel time in route 12 hours)
 Took a very long time exploring a long unknown exit with a few glitches.
Time Required - 7 to 9 hours
Distance - 6.6 miles Total, 0.7 miles Technical
Rappels - 4 Rappels, Longest Rappel 85 feet.
Elevation Range - 5790 - 4910 Feet
Shuttle Required - No Vehicle - High Clearance, 4WD if bad road conditions
Permit Required - No
Rappelling and anchor gear, Ropes and or pull cords for rappels up
to 85 feet and 40 feet of 1 inch webbing for sling placement. 2
potshots and a sandtrap will be need as well. Wet suits wont
be needed in hot weather weather. In moderate weather wet
suits may add some extra comfort in the upper slot but not needed
but are recommended in the final slot and keeper pothole. In
cold weather wetsuits are recommended.
The upper portion of TOD does not offer significant
technical challenge but is a fun route offering fun with, water filled and
easy to escape potholes, a few down climbs, short raps, swimming and an 800
foot long corridor to walk through wide enough to touch both sides with
outstretched arms.
The last 300 feet of TOD is very different as it drops
down to the Escalante River. The last 300 feet has some rappels that can be
a challenge to anchor and has one pothole that in the right conditions is a
serious keeper.
On our first visit here we did not know the short exit
so we went a very long way around up over the mesa to the north using a
route plotted via Google Earth. A little over a year later we went in
and descended the canyon with no technical gear using any bypasses possible
to just above the final narrows. From there we went and looked for a
way to get down to and up from the river close to the exit of TOD. We
found an easy upclimb up next to a set of moki steps. This makes
exiting up from the Escalante River much easier than on our first visit.
Since most of TOD is a series of open and narrow zones most of it can be
bypassed making the exit pretty straight forward by dropping down to the
river, climbing up the spot by the moki steps then reversing up canyon
bypassing where needed then reversing the approach back to the cars.
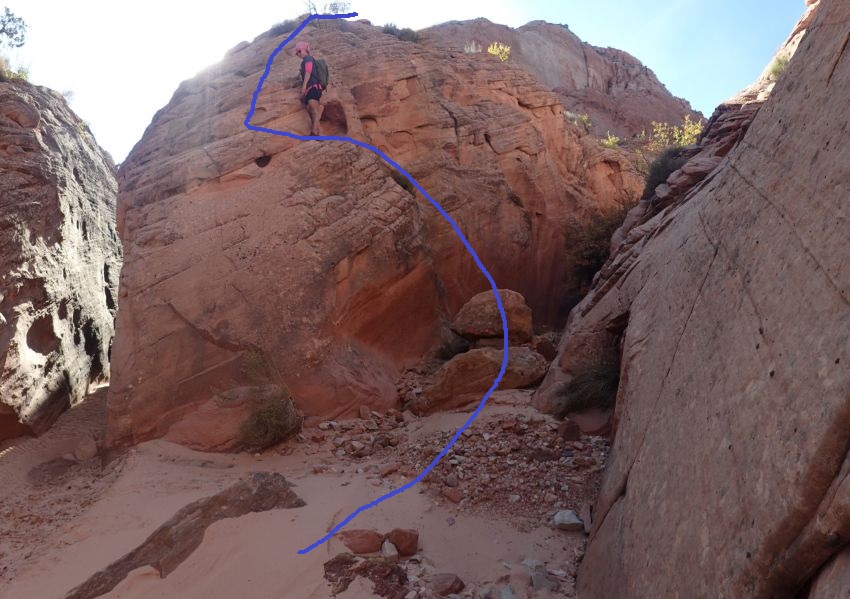
The short exit of TOD described here requires 2 notable
upclimbs. The first is up a crack about 15 feet up out of the Escalante
River. The crack is shaped well for foot and hand holds making for an easy
up climb. The second is an upclimb of about 10 feet in a narrow section
while reversing back up TOD Canyon. The in canyon narrow crack upclimb is
short and is very secure with your back on one wall and knees on the other
wall (knee pads will be useful for this).
While descending TOD remember remember key locations as
the exit involves reversing portions of the canyon and bypassing up an
around other sections. Remembering certain spots can make the exit go
a little more smooth.
Note:
TOD (Temple of Doom) Canyon
is in an area heavy with cross joints making navigation to and from the head
of the canyon a little difficult at times. The same cross joint activity
throughout the canyon makes it possible to reverse the canyon for an exit
but makes written directions a little convoluted. Be prepared for a little
route finding while reversing back up TOD for the exit.
Note:
There are a lot of waypoints
on the map for this canyon. TOD Canyon is a series of open and narrow
sections which the exit route travels back up canyon escaping in a couple
spots to walk the rim. The combination of the open closed nature and
reversing the canyon for exit led to there being more waypoint information
than usual.
TOD - Temple of Doom Canyon is given a technical rating
of 3 if you do not go down the lower slot to go down to the river. If
you drop down the final slot the technical rating jumps to a 4 due to a
keeper pothole.
Don't let the upper portion of TOD fool you into
thinking the canyon has nothing challenging to offer. The short final
slot of TOD is where the canyon is deep and committing and has one pothole
that can be a serious keeper in the right conditions.
Warning:
If the keeper pothole in the final slot is medium full where you will need
to be swimming to start the exit, it can be difficult to exit the pothole
(ask me how I know this). The walls are coated in slick clay and exiting the
pothole is into a narrow rolling slot with no features to grab. The
exit is also narrow which limits your mobility a lot. As
with all potholes, DO NOT send the entire party into the pothole until you
have someone out the other side.
Optionally you can go down TOD to
the top of the final slot then reverse back up canyon to exit or go over to
the exit and downclimb to the Escalante River and back up for a side trip
skipping the final slot. However,
completing the final slot is recommended. If you do not drop down the final
slot of TOD you will miss the more challenging section of canyon, not see
the huge chamber at the bottom and not get to go down to the Escalante
River.
Note:
The right fork of TOD up
canyon of where I have the head of the canyon labeled has a series of 5 or 6
potholes that are easy to bypass. These potholes are about 1000 feet up
canyon of the head / confluence of the forks in the right fork and could
offer some watertrap practice with drops of about 15 to 20 feet for those
interested.
To get to the Trailhead
From the city of Escalante drive about 9.6 miles east on Hwy 12
to the turn off on the right (south) to the Old Sheffield Road (extOldShefldRd).
OR
From the town of Boulder drive about 15 miles west on Hwy 12
to a turn off on the left (south) to the Old Sheffield Road (extOldShefldRd).
Note:
The Old Sheffield road is also
referred to as Spencer Flats Road.
Turn south off of highway 12 onto the Old Sheffield Road.
Follow south down the Old Sheffield Road staying on the main
dirt road passing the small side roads about the way.
About 5.7 miles after leaving highway 12 is a junction (ExSpencDhole)
where the main road makes a sweeping right hand turn going south
and a less traveled looking road continues straight (east).
Note:
Following the right hand bend to go
south goes out to an old drill hole site about 2.8 miles south.
Following the less traveled road to the east can be driven about
0.9 miles to a large sandstone patio for parking just before the
road becomes too sandy for vehicles. To go to the Spencer Canyon
or TOD Canyon parking area continue straight (east) to the
sandstone patio parking. A carefully driven passenger car can
sometimes drive this sandy and deeply rutted road but high
clearance and 4WD may be useful.
To go to Spencer or TOD (Temple of Doom) Canyon continue east
about 0.9 miles to the large sandstone patio parking area (PkOldSheff).
Park here to start the route.
To leave the Exit Vehicle / Escape Pod
No exit vehicle is needed. This is done as a loop / out and
back route.
GPS coordinate information listed at the bottom. For information about waypoint naming and map symbols, refer to the
Glossary page.

Click the links for maps of the route.
Map of the drive into the route.
Map of the entire route.
Zoomed in Map of the upper section section.
Zoomed in Map of the lower section section.
The Approach:
From the large slickrock
parking spot (PkOldSheff)
walk east on the sandy
Old Sheffield Road about
0.3 miles to another
large slickrock
(OldSheff01) area in the
dirt road (about 350
feet before reaching
this is a smaller
slickrock area).
Continue east along the
sandy road about 500
feet to where the road
gets to the bottom of a
sand hill in the road
(jSpencer1-TOD).
To go to TOD or Entry
Fork 1 for Spencer
Canyon turn left and
leave the road walking
north perpendicular to
the road. The slope of
the ground will make you
want to veer right (more
east). Resist the urge
and walk perpendicular
to the road about 700
feet to where the route
starts to meet rolling
slickrock. Walking
perpendicular to the
road will get you to
slickrock faster for
easier travel.
Note:
You can leave the road
almost anywhere since it
is open desert and easy
terrain. This point was
chosen to reduce the
amount of sand walking.
Leaving the road here
will get you to
slickrock to walk on
about 700 feet to the
northwest.
About 700 feet from the
road the route begins to cross
slickrock (TOD-01) and
travel gets easier.
Continue north along a
mix of rolling slickrock
and dirt for about 750
feet to a minor top out.
Note:
If you were going to
Entry Fork 1 for Spencer
Canyon you would turn
right to walk northeast
along rolling slickrock
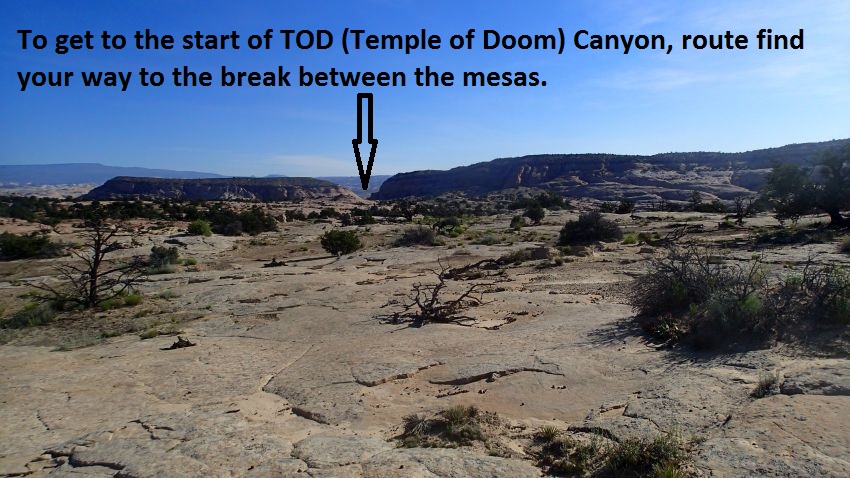
From the minor top out
(TOD-02) you have good
views over the area.
Continue just east of
north along rolling
slickrock and dirt
toward the break between
mesas about 1.8 miles
away. That break is the
start of TOD.
Continue north about
0.27 miles to another
minor top out (TOD-03)
in the mix of slickrock
and dirt. From here
continue to route find
your way just east of
north toward the break
between mesas.
About 0.53 miles farther
is a sharp turn (TOD-04)
in this shallow upper
fork of TOD. From here
follow north along the
side of shallow sandy
wash toward the break
between mesas. The upper
portion of this drainage
is a little thick.
Travel is easier to stay
up on the side and rim
walk along it.
Note:
Be sure the drainage you
are following is
traveling down toward
the break between mesas.
If the drainage is
instead traveling toward
the large canyon system
to that you could see
much earlier in the
approach and you may be
mistakenly dropping into
Spencer Canyon.
About 0.36 miles farther
two minor forks join
(TOD-05). Drop back into
the wash and continue
north down the wash.
About 0.33 miles farther
a minor side fork joins
from LDC (TOD-06) and
the main wash takes a
right turn and continues
down to TOD.
About 0.3 miles farther
is a drop (TOD-07) of
about 50 feet that is
bypassed on the RDC
side. Then route
find along the side of
the drainage for about
700 feet down to a large
confluence of forks.
From here you begin to
notice that this area is
a complex mixing of wash
and cross joint like
side ravines.
About 700 feet farther
is the top of TOD
(Temple of Doom) Canyon
(yTOD-Tp) where the
shallow upper forks join
forming the top of TOD.
The Canyoneering / Technical Section:
From the top of
TOD (Temple of Doom)
Canyon (yTOD-Tp)
downclimb a drop of
about 10 feet to a
pothole that could be
waist deep if full and
easy to get out of.
Between here and rap 1
are 2 pools over about
150 feet. The
first pool has downclimb
of about 5 feet to a
pool to swim / wade.
The second pool has a
drop of about 8 feet
with the last 3 feet
being a drop off and is
also a swim or deep
wade.
Rap 1 (d-TOD-R1) is
anchored by scrambling
up a few feet on the LDC
side to a small shrub
and drops about 30 feet
into a deep water filled
slot where you will wade
/ swim. Optionally a
sandtrap could be used
by climbing up on the
RDC side to ledge / side
slot with a lot of sand.
At the bottom of rap 1
is a water filled narrow
slot where you will swim
for abut 40 feet then a
downclimb of about 5
feet to a short pool to
swim then one more stem
style downclimb of about
10 feet to another
narrow water filled slot
to swim. A portion of
that final slot is very
narrow and you will need
to take your pack off
and squeeze through
while swimming. Stemming
up over the water is
next to impossible due
to slick mud.
Rap 1 and the long swim
after it can be bypassed
if desired by scrambling
up and over LDC from the
top of rap 1 then back
down sloped slickrock to
the canyon floor past
the water filled slot.
Just after the narrow
swims after rap 1 is a
short open area (TOD-08)
just before another slot
begins. If you bypassed
rap 1 this is where you
would drop back down
into the canyon.
Just past here is a slot
of about 200 feet long
with a couple small
downclimbs and some
water to swim.
Next is a short open
section (TOD-09) where a
ravine drops in on the
LDC side.
Remember this spot
as you will be
scrambling part way up
this ravine while
reversing portions of
the canyon to exit.
A short distance farther
will be the up canyon
end (TOD-10) of a deep
narrow water filled slot
about 400 feet long. At
the start of this slot
is a short downclimb to
the water filled floor.
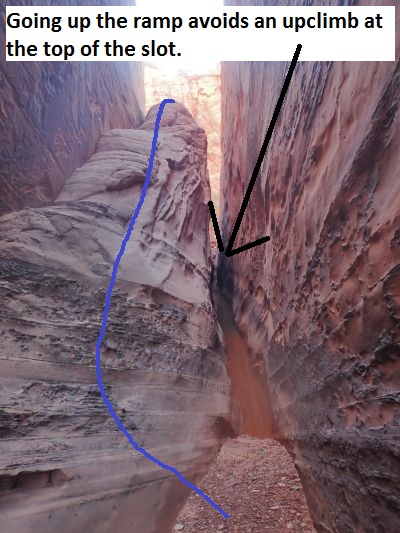
Optionally bypass the
drop by scrambling up to
a shelf on the RDC side
then go down a ramp to
bypass this first
section of water.
Remember this
ramp as you
will going up it while
reversing portions of
the canyon to exit.
Just after is a stem
style downclimb of about
10 feet to more water to
wade / swim. Evaluate
the 10 foot narrow
downclimb as
you go since you will
need to come back up
this for the short exit.
If in doubt
send one person down
then back up this drop
to be sure you can
reverse it when exiting.
From the lower end of
the long wade / swim
slot (TOD-11) starts a
short open section to
walk down to another
short slot.
The next slot is about
130 feet long with a
deep pothole to swim and
will likely require
partner assist to get up
out of. From the
lower end of the slot
(TOD-12) is a very short
open spot before getting
to another short slot.
This next short slot
(TOD-13) has a 15 foot
difficult downclimb at
the start where you will
likely need to fall /
jump down to water of
unknown depth. We
bypassed this slot
scrambling up steep
slickrock to go up and
over on the RDC side to
rap 2 to rappel back
down to the canyon
floor.
Rap 2 (d-TOD-R2) is
anchored from a tree on
the RDC rim and drops
about 30 feet back to
the canyon floor. This
rap is accessed after
going up and over to
bypass a short slot with
a difficult downclimb to
a pool. At the bottom of
rap 2 is short narrow
water filled slot to
swim before another
short open section.
At the end of the open
section (TOD-14) a side
ravine drops in on the
LDC / RUC side. Remember
this spot as
you will scramble up the
nose on the LDC side by
this ravine while
reversing portions of
the canyon to exit.
Continue about 100 feet
down to the start of an
800 foot long corridor.
From the start of the
800 foot long corridor
(TOD-15) it is a scenic
easy walk to the other
end (TOD-16).
After the corridor the
canyon opens to some
wide easy sand walking
for about 500 feet to
the start of the final
narrows.
From the start of the
final narrows (TOD-17)
it is about 60 feet to
Rap 3. This final
slot is where the
difficult technical
portion is depending on
water conditions.
This section of canyon
has keeper pothole that
can be difficult to
exit. If you do
not want to do this
lower slot you can
reverse up canyon to
begin the exit now.
Rap 3 (d-TOD-R3-4) is
anchored using a
sandtrap and uses about
50 feet of rope travel
over two stages with a
keeper pothole at the
bottom of the first
stage. If the pothole
midway through this rap
is not full of water it
can be a very difficult
challenge to get out of.
The exit of the pothole
is very narrow which
greatly limits your
mobility to climb out
and the walls are coated
with a thick layer of
super slick clay like
mud. You will need a
potshot tossed with
significant weight to
assist you out.
Rap 4 (about 50 feet
down canyon) is anchored
from rocks and drops
about 85 feet down into
a large deep chamber
like room.
Note:
A fun view of things
when down in the chamber
is to walk / crawl out
on the LDC ledge in the
chamber after rap 4.
There is one narrow spot
in the ledge to duck
past.
From the bottom of rap 4
galumph down the crack
to the end to a final
downclimb (TOD-18) of
about 8 feet to a pool
with an uneven bottom.
Sending down at least
two people on meat
anchor and having them
partner assist others
down works well for this
drop. The pool at the
bottom of the final
downclimb would likely
be a swimmer but
carefully walking on
sloped rock under the
water on the RDC side
goes go around in waist
deep water.
Walk about 130 feet out
to the Escalante River (yTODBt).
The Exit:
When you
get out to the Escalante
River (yTODBt) turn left
and walk north up the
Escalante River about
850 feet to the climb
out spot on the left
(west) side on the
inside of a left turn.
Note:
About 90 feet up stream
from the bottom of TOD
is a cave like feature
(TOD-Cave) you can scramble up into
on the left (west). This
is not the cave like
feature used to identify
the climb out crack
which is about 800 feet
farther north up the
Escalante River.
The spot to climb up out
of the Escalante River
(TOD-ShortExt1) is up
along a crack on the
left (west) side as you
walk north up river
around a left turn.
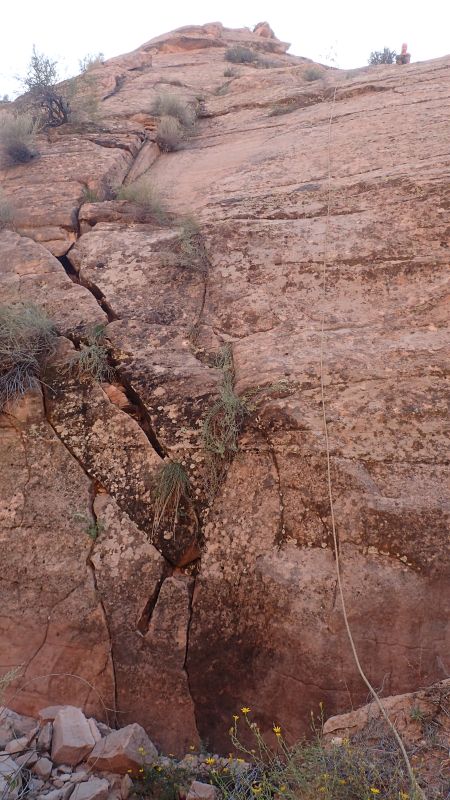
The climb out crack is
jagged looking providing
features that work well
for foot placement.
The first 15 feet are
almost vertical then the
wall gradually becomes
less steep allowing you
to scramble up to the
shelf above.
Note:
To help identify you
have the correct spot to
climb out you can walk
about 150 feet farther
up the Escalante River
and see a cave about 35
feet up from the canyon
floor. Unlike the cave
near the bottom of TOD
this cave has a vertical
wall below it that you
can not climb up to get
to the cave. A little
farther up the Escalante
from the cave is where
the canyon walls become
vertical and extend
upward over 100 feet. The climb out crack is
about 150 feet
downstream (back toward
TOD) of the cave.
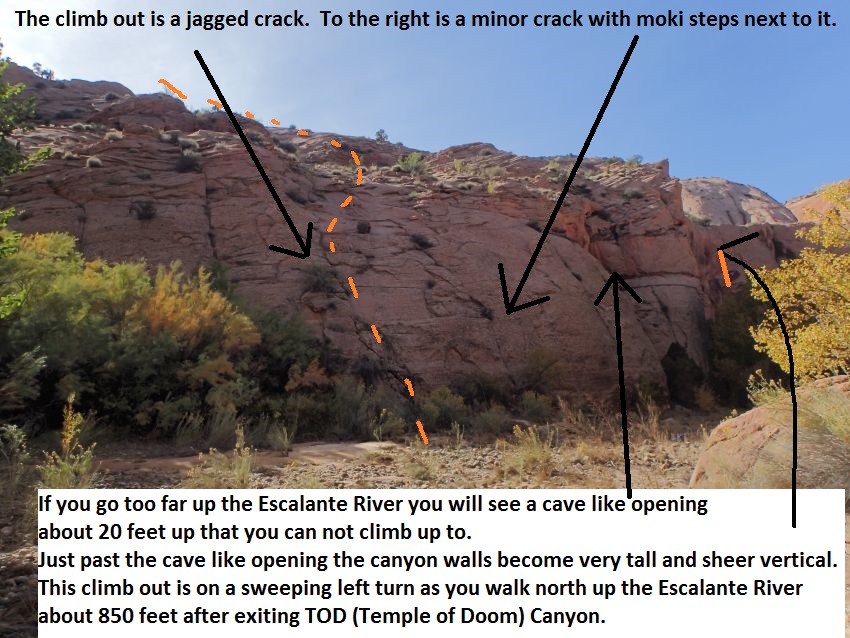
About 15 feet to the
right (north) of this
jagged crack is a minor
cleft / crack in the
wall with a set of moki
steps running up next to
that crack. Climbing up
the moki steps is more
difficult and exposed
than going up the jagged
crack. However, looking
for the moki steps is
also a good way of
knowing you are at the
correct exit spot.
After scrambling up to
the shelf above the
Escalante River
(TOD-ShortExt2) veer
left to walk south and
route find your way
about 700 feet over and
back down into TOD just
above the final slot. On
the way try to stay off
of the crypto. Walking
closer to the rim has
less crypto and offers
interesting views down
into large cracks.
Once back down in TOD
just above the final
slot (TOD-17) walk about
500 feet up canyon to
the lower end of the 800
foot walk through
corridor (TOD-16) then
walk up the corridor.
From the upper end of
the corridor (TOD-15)
continue up canyon for
about 100 feet to a
ravine on the RUC
(north) side.
From the ravine (TOD-14)
climb / scramble up a
nose on the RUC (north)
side between the ravine
and the slot leading up
to rap 2. To scramble up
the nose you will need
to walk about 40 feet up
the ravine to find a
ramp to scramble up.
Once up the nose route
find your way west up
canyon along the rim a
little over 200 feet a
ravine to cross
(TOD-ShortExt3).
While route finding
along the rim, cross the
ravine (TOD-ShortExt3)
then scramble west up
the steep slickrock on
the other side.
Note:
You could follow the
ravine down into the
canyon but doing so will
lead to slots you will
not be able to upclimb.
Continue along the rim
to exit.
A little over 400 feet
farther along the rim
find your way back down
into the canyon to the
lower end of a 400 foot
long slot (TOD-11).
Go up this slot where
you will swim / wade up
the slot. About mid way
back up this slot will
be a 10 foot stem style
upclimb that is very
secure using back on one
wall and knees on the
other. As you get
to the upper end of the
slot note a ramp on the
LUC (south) side that
you can walk up to
bypass the drop at the
top of this slot.
These two spots you
should remember from
descending the canyon.
From the upper end of
the 400 foot long slot
(TOD-10) continue up
canyon about 125 feet to
a ravine (TOD-09) on the
right (north).
Scramble up the gently
sloped slickrock on the
RUC (north) side just up
canyon of the side
ravine. Then route find
along the rim about 650
feet to where you can
scramble back down into
open wash up canyon of
the head of TOD
(TOD-ShortExt4).
Once down in the wash
above the head of TOD
(TOD-ShortExt4) you are
in the left fork above
the head. Turn
left to walk about 100
feet down the wash to
the head of the canyon
where the upper forks
join (yTOD-Tp).
Note:
From
where you dropped into
the north fork above the
head it
looks like a good idea
to start walking up the
wash to exit back to the
cars. Unfortunately
exiting up the wide sand
wash leads to short
sections of potholes to
walk around and more
convoluted cross joints
to navigate around.
The best option is to go
back the head of TOD
then reverse the exit
back to the cars.
From the head walk a
short distance up canyon
then go up the LUC side
to get around a drop.
From the top of the drop
(TOD-07) continue
southwest up the wash
reversing the approach
route back to the cars (PkOldSheff).
Downloadable GPX files
available at
BG-Gear Store
(easier than manual entry and a great way to support
Bluugnome).
Waypoint naming convention and map symbol information can be found on the Glossary page.
Elevations are approximate.
BEFORE
manually entering coordinates set your system to WGS84 datum and Lat/Lon hddd.ddddd° coordinate format.
Inconsistent datum's and coordinate formats will result in location errors.
Click to show / expand the list of waypoints below........
| TOD 1 - Drive to Trailhead |
- extOldShefldRd
Lat/Lon (WGS84): N 37.74259
W -111.44767
Elev: NaN Feet
Trun off to the Old Sheffield Raod. There are no signs indication what road you are turning onto.
Note:
The Old Sheffield road is also referred to as Spencer Flats Road.
- ExSpencDhole
Lat/Lon (WGS84): N 37.71297
W -111.37347
Elev: NaN Feet
Junction where the main road makes a sweeping right hand turn going south and a less traveled looking road continues straight (east).
Note:
Following the right hand bend to go south goes out to an old drill hole site about 2.8 miles south.
Following the less traveled road to the east can be driven about 0.9 miles to a large sandstone patio for parking just before the road becomes too sandy for vehicles. To go to the Spencer Canyon or TOD Canyon parking area continue straight (east) to the sandstone patio parking. A carefully driven passenger car can sometimes drive this sandy and deeply rutted road but high clearance and 4WD may be useful.
- PkOldSheff
Lat/Lon (WGS84): N 37.71035
W -111.35755
Elev: 5,790 Feet
Parking area where the Old Sheffield Road begins to turn very sandy and walking is the best idea. Park in this large flat slickrock area large enough for several cars. This parking spot is used to start the routes for Spencer Canyon, TOD (Temple of Doom) Canyon and the hike to the Cosmic Orange Juicer.
|
| TOD 2 - Approach |
- PkOldSheff
Lat/Lon (WGS84): N 37.71035
W -111.35755
Elev: 5,790 Feet
Parking area where the Old Sheffield Road begins to turn very sandy and walking is the best idea. Park in this large flat slickrock area large enough for several cars. This parking spot is used to start the routes for Spencer Canyon, TOD (Temple of Doom) Canyon and the hike to the Cosmic Orange Juicer.
- OldSheff01
Lat/Lon (WGS84): N 37.70878
W -111.35222
Elev: NaN Feet
A very large slickrock area in the dirt road. About 350 feet before reaching this is a smaller slickrock area.
- jSpencer1-TOD
Lat/Lon (WGS84): N 37.70846
W -111.35030
Elev: 5,770 Feet
The road gets to the bottom of a sand hill in the road and about 500 feet after walking past the huge slickrock area.
To go to TOD or Entry Fork 1 for Spencer Canyon turn left and leave the road walking north perpendicular to the road. The slope of the ground will make you want to veer right (more east). Resist the urge and walk perpendicular to the road about 700 feet to where the route starts to meet rolling slickrock. Walking perpendicular to the road will get you to slickrock faster for easier travel.
Note:
You can leave the road almost anywhere since it is open desert and easy terrain. This point was chosen to reduce the amount of sand walking. Leaving the road here will get you to slickrock to walk on about 700 feet to the northwest.
To go to the Entry Fork 2 for Spencer Canyon or hike out to the Cosmic Orange Juicer continue east on the sandy road.
- TOD-01
Lat/Lon (WGS84): N 37.71019
W -111.34952
Elev: NaN Feet
Route begins to cross slickrock and travel gets easier.
To go to Entry Fork 1 for Spencer Canyon turn right to walk northeast along rolling slickrock about 0.4 miles to drop into Entry Fork 1. If you stay close along the edge of slickrock and sand you will get to the entry fork 1 near its head. If you travel a little more north farther out into the slickrock area you may drop into the drainage a little farther down. It is not important to keep an exact bearing as you will be able to scramble down into the entry fork in one of many places.
To go to TOD Canyon continue north along a mix of rolling slickrock and dirt for about 750 feet to a minor top out.
- TOD-02
Lat/Lon (WGS84): N 37.71230
W -111.34868
Elev: NaN Feet
A minor top out in the slickrock where you have good views over the area. Continue just east of north along rolling slickrock and dirt toward the break between mesas about 1.8 miles away. That break is the start of TOD.
Note:
To the right (east) is a very large canyon system you can see which is entry fork 1 for Spencer Canyon.
- TOD-03
Lat/Lon (WGS84): N 37.71611
W -111.34778
Elev: NaN Feet
Another minor top out in the mix of slickrock and dirt. From here continue to route find your way just east of north toward the break between mesas.
- TOD-04
Lat/Lon (WGS84): N 37.72333
W -111.34415
Elev: 5,690 Feet
A sharp turn in this shallow upper fork of TOD. From here follow north along the side of shallow sandy wash toward the break between mesas. The upper portion of this drainage is a little thick. Travel is easier to stay up on the side and rim walk along it.
Note:
Be sure the drainage you are following is traveling down toward the break between mesas. If the drainage is instead traveling toward the large canyon system to that you could see much earlier in the approach and you may be mistakenly dropping into Spencer Canyon.
- TOD-05
Lat/Lon (WGS84): N 37.72839
W -111.34430
Elev: NaN Feet
Two minor forks join. Drop back into the wash and continue north down the wash.
- TOD-06
Lat/Lon (WGS84): N 37.73295
W -111.34559
Elev: NaN Feet
Minor side fork joins from LDC and the main wash takes a right turn and continues down to TOD.
- TOD-07
Lat/Lon (WGS84): N 37.73581
W -111.34143
Elev: NaN Feet
Bypass a drop of about 50 feet on the RDC side and route find along the side of the drainage for about 700 feet down to a large confluence of forks. From here you begin to notice that this area is a complex mixing of wash and cross joint like side ravines.
- yTOD-Tp
Lat/Lon (WGS84): N 37.73735
W -111.34129
Elev: 5,270 Feet
Top of TOD (Temple of Doom) Canyon where the shallow upper forks join forming the top of TOD.
Downclimb a drop of about 10 feet to a pothole that could be waist deep if full and easy to get out of. Between here and rap 1 are 2 pools over about 150 feet. The first pool has downclimb of about 5 feet to a pool to swim / wade. The second pool has a drop of about 8 feet with the last 3 feet being a drop off and is also a swim or deep wade.
Exit Note:
On the exit walk south up the left fork back the way you came. You will need to scramble up around the 50 foot drop you bypassed on the way in. After getting above the drop in the wash reverse the approach route back to the trailhead.
|
| TOD 2 - Canyon |
- yTOD-Tp
Lat/Lon (WGS84): N 37.73735
W -111.34129
Elev: 5,270 Feet
Top of TOD (Temple of Doom) Canyon where the shallow upper forks join forming the top of TOD.
Downclimb a drop of about 10 feet to a pothole that could be waist deep if full and easy to get out of. Between here and rap 1 are 2 pools over about 150 feet. The first pool has downclimb of about 5 feet to a pool to swim / wade. The second pool has a drop of about 8 feet with the last 3 feet being a drop off and is also a swim or deep wade.
Exit Note:
On the exit walk south up the left fork back the way you came. You will need to scramble up around the 50 foot drop you bypassed on the way in. After getting above the drop in the wash reverse the approach route back to the trailhead.
- d-TOD-R1
Lat/Lon (WGS84): N 37.73760
W -111.34077
Elev: NaN Feet
Rap 1 - TOD. Anchored by scrambling up a few feet on the LDC side to a small shrub and drops about 30 feet into a deep water filled slot where you will wade / swim. Optionally a sandtrap could be used by climbing up on the RDC side to ledge / side slot with a lot of sand.
At the bottom of rap 1 is a water filled narrow slot where you will swim for abut 40 feet then a downclimb of about 5 feet to a short pool to swim then one more stem style downclimb of about 10 feet to another narrow water filled slot to swim. A portion of that final slot is very narrow and you will need to take your pack off and squeeze through while swimming. Stemming up over the water is next to impossible due to slick mud.
Rap 1 and the long swim after it can be bypassed if desired by scrambling up and over LDC from the top of rap 1 then back down sloped slickrock to the canyon floor past the water filled slot.
- TOD-08
Lat/Lon (WGS84): N 37.73793
W -111.34039
Elev: NaN Feet
Short open area after the slot below rap 1 just before another slot begins. If you bypassed rap 1 this is where you would drop back down into the canyon.
Just past here is a slot of about 200 feet long with a couple small downclimbs and some water to swim.
- TOD-09
Lat/Lon (WGS84): N 37.73824
W -111.33977
Elev: NaN Feet
On the way down canyon this is the end of some pools to swim and a short open section where a ravine drops in on the LDC side.
Exit Note:
On the exit scramble up the gently sloped slickrock on the RUC (north) side just up canyon of the side ravine. Then route find along the rim about 650 feet to where you can scramble back down into open wash up canyon of the head of TOD.
- TOD-10
Lat/Lon (WGS84): N 37.73812
W -111.33929
Elev: NaN Feet
This is the up canyon end of a deep narrow water filled slot about 400 feet long. At the start of this slot is a short downclimb to the water filled floor. Optionally bypass the drop by scrambling up to a shelf on the RDC side then go down a ramp to bypass this first section of water. Remember this ramp as you will going up it while reversing portions of the canyon to exit. Just after is a stem style downclimb of about 10 feet to more water to wade / swim. Evaluate the 10 foot narrow downclimb as you go since you will need to come back up this for the short exit. If in doubt send one person down then back up this drop to be sure you can reverse it when exiting.
Exit Note:
After exiting the upper end of this slot continue up canyon about 125 feet to a ravine on the right (north). You will scramble up to the rim again just up canyon of the ravine.
- TOD-11
Lat/Lon (WGS84): N 37.73868
W -111.33813
Elev: NaN Feet
Lower end of a long wade / swim slot. A short open section to walk down to another short slot.
Exit Note:
On the exit return up this slot where you will swim / wade up the slot. About mid way back up this slot will be a 10 foot stem style upclimb that is very secure using back on one wall and knees on the other. As you get to the upper end of the slot note a ramp on the LUC (south) side that you can walk up to bypass the drop at the top of this slot. These two spots you should remember from descending the canyon.
- TOD-12
Lat/Lon (WGS84): N 37.73900
W -111.33739
Elev: NaN Feet
Down canyon end of a slot about 130 feet long with a deep pothole to swim and will likely require partner assist to get up out of. Then a very short open spot before getting to another short slot.
- TOD-13
Lat/Lon (WGS84): N 37.73915
W -111.33721
Elev: NaN Feet
Short slot with a 15 foot difficult downclimb at the start where you will likely need to fall / jump down to water of unknown depth. We bypassed this slot scrambling up steep slickrock to go up and over on the RDC side to rap 2 to rappel back down to the canyon floor.
- d-TOD-R2
Lat/Lon (WGS84): N 37.73950
W -111.33730
Elev: NaN Feet
Rap 2 - TOD is anchored from a tree on the RDC rim and drops about 30 feet back to the canyon floor. This rap is accessed after going up and over to bypass a short slot with a difficult downclimb to a pool. At the bottom of rap 2 is short narrow water filled slot to swim before another short open section.
- TOD-14
Lat/Lon (WGS84): N 37.73979
W -111.33678
Elev: NaN Feet
Down canyon end of a narrow slot after rap 2 where a side ravine drops in on the LDC / RUC side. Remember this spot as you will scramble up the nose on the LDC side by this ravine while reversing portions of the canyon to exit. Continue about 100 feet down to the start of an 800 foot long corridor.
Exit Note:
On the exit from TOD climb / scramble up a nose on the RUC (north) side between the ravine and the slot leading up to rap 2. To scramble up the nose you will need to walk about 40 feet up the ravine to find a ramp to scramble up. Once up the nose route find your way west up canyon along the rim a little over 200 feet a ravine to cross.
- TOD-15
Lat/Lon (WGS84): N 37.73983
W -111.33643
Elev: NaN Feet
Upper end of an 800 foot long narrow coridoor to walk that is very scenic to be in.
Exit Note:
On the exit continue up canyon after exiting the top end of the corridor for about 100 feet to a ravine on the RUC (north) side.
- TOD-16
Lat/Lon (WGS84): N 37.74078
W -111.33396
Elev: NaN Feet
Down canyon end of an 800 foot coridoor. The canyon opens to some wide easy sand walking for about 500 feet to the start of the final narrows.
Exit Note:
On the exit continue up canyon walking through this corridor.
- TOD-17
Lat/Lon (WGS84): N 37.74136
W -111.33235
Elev: 5,110 Feet
Start of the final slot of TOD. It is about 60 feet to Rap 3. This final slot is where the difficult technical portion is depending on water conditions. This section of canyon has keeper pothole that can be difficult to exit. If you do not want to do this lower slot you can reverse up canyon to begin the exit now.
- d-TOD-R3-4
Lat/Lon (WGS84): N 37.74135
W -111.33211
Elev: NaN Feet
Raps 3 and 4 - TOD.
Rap 3 is about 60 feet into the final slot and is anchored using a sandtrap and uses about 50 feet of rope travel over two stages with a keeper pothole at the bottom of the first stage. If the pothole midway through this rap is not full of water it can be a very difficult challenge to get out of. The exit of the pothole is very narrow which greatly limits your mobility to climb out and the walls are coated with a thick layer of super slick clay like mud. You will need a potshot tossed with significant weight to assist you out.
Rap 4 (about 50 feet down canyon) is anchored from rocks and drops about 85 feet down into a large deep chamber like room.
Note:
A fun view of things when down in the chamber is to walk / crawl out on the LDC ledge in the chamber after rap 4. There is one narrow spot in the ledge to duck past.
- TOD-18
Lat/Lon (WGS84): N 37.74139
W -111.33162
Elev: NaN Feet
From the bottom of rap 4 galumph down the crack to the end to a final downclimb (TOD-18) of about 8 feet to a pool with an uneven bottom. Sending down at least two people on meat anchor and having them partner assist others down works well for this drop. The pool at the bottom of the final downclimb would likely be a swimmer but carefully walking on sloped rock under the water on the RDC side goes go around in waist deep water.
Walk about 130 feet out to the Escalante River.
- yTODBt
Lat/Lon (WGS84): N 37.74138
W -111.33114
Elev: 4,920 Feet
Bottom of TOD where it meets the Escalante River.
To go to the short exit of TOD turn left and walk north up the Escalante River about 850 feet to the climb out spot on the left (west) side on the inside of a left turn.
Note:
About 90 feet up stream from the bottom of TOD is a cave like feature you can scramble up into on the left (west). This is not the cave like feature used to identify the climb out crack which is about 800 feet farther north up the Escalante River.
|
| TOD 3 - Exit |
- yTODBt
Lat/Lon (WGS84): N 37.74138
W -111.33114
Elev: 4,920 Feet
Bottom of TOD where it meets the Escalante River.
To go to the short exit of TOD turn left and walk north up the Escalante River about 850 feet to the climb out spot on the left (west) side on the inside of a left turn.
Note:
About 90 feet up stream from the bottom of TOD is a cave like feature you can scramble up into on the left (west). This is not the cave like feature used to identify the climb out crack which is about 800 feet farther north up the Escalante River.
- TOD-Cave
Lat/Lon (WGS84): N 37.74159
W -111.33116
Elev: NaN Feet
Cave / slot in the cliff wall about 90 feet north (upstream) of TOD.
- TOD-ShortExt1
Lat/Lon (WGS84): N 37.74348
W -111.33039
Elev: 4,910 Feet
Climb / scramble up out of the Escalante here to start the short exit for TOD (Temple of Doom) Canyon.
The climb out crack is on the left (west) side as you walk north up river around a left turn. The climb out crack is jagged looking providing features that work well for foot placement. The first 15 feet are almost vertical then the wall gradually becomes less steep allowing you to scramble up to the shelf above.
Note:
To help identify you have the correct spot to climb out you can walk about 150 feet farther up the Escalante River and see a cave about 35 feet up from the canyon floor. Unlike the cave near the bottom of TOD this cave has a vertical wall below it that you can not climb up to get to the cave. A little farther up the Escalante from the cave is where the canyon walls become vertical and extend upward over 100 feet. The climb out crack is about 150 feet downstream (back toward TOD) of the cave.
About 15 feet to the right (north) of this jagged crack is a minor cleft / crack in the wall with a set of moki steps running up next to that crack. Climbing up the moki steps is more difficult and exposed than going up the jagged crack. However, looking for the moki steps is also a good way of knowing you are at the correct exit spot.
- TOD-ShortExt2
Lat/Lon (WGS84): N 37.74322
W -111.33134
Elev: NaN Feet
After scrambling up to the shelf above the Escalante River veer left to walk south and route find your way about 700 feet over and back down into TOD just above the final slot. On the way try to stay off of the crypto. Walking closer to the rim has less crypto and offers interesting views down into large cracks.
- TOD-17
Lat/Lon (WGS84): N 37.74136
W -111.33235
Elev: 5,110 Feet
Start of the final slot of TOD. It is about 60 feet to Rap 3. This final slot is where the difficult technical portion is depending on water conditions. This section of canyon has keeper pothole that can be difficult to exit. If you do not want to do this lower slot you can reverse up canyon to begin the exit now.
- TOD-16
Lat/Lon (WGS84): N 37.74078
W -111.33396
Elev: NaN Feet
Down canyon end of an 800 foot coridoor. The canyon opens to some wide easy sand walking for about 500 feet to the start of the final narrows.
Exit Note:
On the exit continue up canyon walking through this corridor.
- TOD-15
Lat/Lon (WGS84): N 37.73983
W -111.33643
Elev: NaN Feet
Upper end of an 800 foot long narrow coridoor to walk that is very scenic to be in.
Exit Note:
On the exit continue up canyon after exiting the top end of the corridor for about 100 feet to a ravine on the RUC (north) side.
- TOD-14
Lat/Lon (WGS84): N 37.73979
W -111.33678
Elev: NaN Feet
Down canyon end of a narrow slot after rap 2 where a side ravine drops in on the LDC / RUC side. Remember this spot as you will scramble up the nose on the LDC side by this ravine while reversing portions of the canyon to exit. Continue about 100 feet down to the start of an 800 foot long corridor.
Exit Note:
On the exit from TOD climb / scramble up a nose on the RUC (north) side between the ravine and the slot leading up to rap 2. To scramble up the nose you will need to walk about 40 feet up the ravine to find a ramp to scramble up. Once up the nose route find your way west up canyon along the rim a little over 200 feet a ravine to cross.
- TOD-ShortExt3
Lat/Lon (WGS84): N 37.73958
W -111.33754
Elev: NaN Feet
On the exit continue across this ravine and scramble west up the steep slickrock on the other side.
Note:
You could follow the ravine down into the canyon but doing so will lead to slots you will not be able to upclimb. Continue along the rim to exit.
- TOD-11
Lat/Lon (WGS84): N 37.73868
W -111.33813
Elev: NaN Feet
Lower end of a long wade / swim slot. A short open section to walk down to another short slot.
Exit Note:
On the exit return up this slot where you will swim / wade up the slot. About mid way back up this slot will be a 10 foot stem style upclimb that is very secure using back on one wall and knees on the other. As you get to the upper end of the slot note a ramp on the LUC (south) side that you can walk up to bypass the drop at the top of this slot. These two spots you should remember from descending the canyon.
- TOD-10
Lat/Lon (WGS84): N 37.73812
W -111.33929
Elev: NaN Feet
This is the up canyon end of a deep narrow water filled slot about 400 feet long. At the start of this slot is a short downclimb to the water filled floor. Optionally bypass the drop by scrambling up to a shelf on the RDC side then go down a ramp to bypass this first section of water. Remember this ramp as you will going up it while reversing portions of the canyon to exit. Just after is a stem style downclimb of about 10 feet to more water to wade / swim. Evaluate the 10 foot narrow downclimb as you go since you will need to come back up this for the short exit. If in doubt send one person down then back up this drop to be sure you can reverse it when exiting.
Exit Note:
After exiting the upper end of this slot continue up canyon about 125 feet to a ravine on the right (north). You will scramble up to the rim again just up canyon of the ravine.
- TOD-09
Lat/Lon (WGS84): N 37.73824
W -111.33977
Elev: NaN Feet
On the way down canyon this is the end of some pools to swim and a short open section where a ravine drops in on the LDC side.
Exit Note:
On the exit scramble up the gently sloped slickrock on the RUC (north) side just up canyon of the side ravine. Then route find along the rim about 650 feet to where you can scramble back down into open wash up canyon of the head of TOD.
- TOD-ShortExt4
Lat/Lon (WGS84): N 37.73746
W -111.34163
Elev: NaN Feet
On the exit from TOD this is where you can see wide sandy wash up canyon and you can easily scramble down into the wash. Once down in the wash turn left to walk about 100 feet down the wash to the head of the canyon where the upper forks join.
Note:
From here it looks like a good idea to start walking up the wash to exit back to the cars. Unfortunately exiting up the wide sand wash leads to short sections of potholes to walk around and more convoluted cross joints to navigate around.
- yTOD-Tp
Lat/Lon (WGS84): N 37.73735
W -111.34129
Elev: 5,270 Feet
Top of TOD (Temple of Doom) Canyon where the shallow upper forks join forming the top of TOD.
Downclimb a drop of about 10 feet to a pothole that could be waist deep if full and easy to get out of. Between here and rap 1 are 2 pools over about 150 feet. The first pool has downclimb of about 5 feet to a pool to swim / wade. The second pool has a drop of about 8 feet with the last 3 feet being a drop off and is also a swim or deep wade.
Exit Note:
On the exit walk south up the left fork back the way you came. You will need to scramble up around the 50 foot drop you bypassed on the way in. After getting above the drop in the wash reverse the approach route back to the trailhead.
- TOD-07
Lat/Lon (WGS84): N 37.73581
W -111.34143
Elev: NaN Feet
Bypass a drop of about 50 feet on the RDC side and route find along the side of the drainage for about 700 feet down to a large confluence of forks. From here you begin to notice that this area is a complex mixing of wash and cross joint like side ravines.
- TOD-06
Lat/Lon (WGS84): N 37.73295
W -111.34559
Elev: NaN Feet
Minor side fork joins from LDC and the main wash takes a right turn and continues down to TOD.
- TOD-05
Lat/Lon (WGS84): N 37.72839
W -111.34430
Elev: NaN Feet
Two minor forks join. Drop back into the wash and continue north down the wash.
- TOD-04
Lat/Lon (WGS84): N 37.72333
W -111.34415
Elev: 5,690 Feet
A sharp turn in this shallow upper fork of TOD. From here follow north along the side of shallow sandy wash toward the break between mesas. The upper portion of this drainage is a little thick. Travel is easier to stay up on the side and rim walk along it.
Note:
Be sure the drainage you are following is traveling down toward the break between mesas. If the drainage is instead traveling toward the large canyon system to that you could see much earlier in the approach and you may be mistakenly dropping into Spencer Canyon.
- TOD-03
Lat/Lon (WGS84): N 37.71611
W -111.34778
Elev: NaN Feet
Another minor top out in the mix of slickrock and dirt. From here continue to route find your way just east of north toward the break between mesas.
- TOD-02
Lat/Lon (WGS84): N 37.71230
W -111.34868
Elev: NaN Feet
A minor top out in the slickrock where you have good views over the area. Continue just east of north along rolling slickrock and dirt toward the break between mesas about 1.8 miles away. That break is the start of TOD.
Note:
To the right (east) is a very large canyon system you can see which is entry fork 1 for Spencer Canyon.
- TOD-01
Lat/Lon (WGS84): N 37.71019
W -111.34952
Elev: NaN Feet
Route begins to cross slickrock and travel gets easier.
To go to Entry Fork 1 for Spencer Canyon turn right to walk northeast along rolling slickrock about 0.4 miles to drop into Entry Fork 1. If you stay close along the edge of slickrock and sand you will get to the entry fork 1 near its head. If you travel a little more north farther out into the slickrock area you may drop into the drainage a little farther down. It is not important to keep an exact bearing as you will be able to scramble down into the entry fork in one of many places.
To go to TOD Canyon continue north along a mix of rolling slickrock and dirt for about 750 feet to a minor top out.
- jSpencer1-TOD
Lat/Lon (WGS84): N 37.70846
W -111.35030
Elev: 5,770 Feet
The road gets to the bottom of a sand hill in the road and about 500 feet after walking past the huge slickrock area.
To go to TOD or Entry Fork 1 for Spencer Canyon turn left and leave the road walking north perpendicular to the road. The slope of the ground will make you want to veer right (more east). Resist the urge and walk perpendicular to the road about 700 feet to where the route starts to meet rolling slickrock. Walking perpendicular to the road will get you to slickrock faster for easier travel.
Note:
You can leave the road almost anywhere since it is open desert and easy terrain. This point was chosen to reduce the amount of sand walking. Leaving the road here will get you to slickrock to walk on about 700 feet to the northwest.
To go to the Entry Fork 2 for Spencer Canyon or hike out to the Cosmic Orange Juicer continue east on the sandy road.
- OldSheff01
Lat/Lon (WGS84): N 37.70878
W -111.35222
Elev: NaN Feet
A very large slickrock area in the dirt road. About 350 feet before reaching this is a smaller slickrock area.
- PkOldSheff
Lat/Lon (WGS84): N 37.71035
W -111.35755
Elev: 5,790 Feet
Parking area where the Old Sheffield Road begins to turn very sandy and walking is the best idea. Park in this large flat slickrock area large enough for several cars. This parking spot is used to start the routes for Spencer Canyon, TOD (Temple of Doom) Canyon and the hike to the Cosmic Orange Juicer.
|