Canyoneering Route Description
Holy Cow Canyon - 4A(B) III
Escalante National Monument, Utah.
2017-05-28, 6 people, 1 Day (Travel time in route 7.5 hours)

2018-04-07, 5 people, 1 Day (Travel time in route 6.5 hours)
2019-04-21, 12 people, 1 Day (Travel time in route 7.5 hours)
2020-06-14,
6 people, 1 Day (Travel time in route 5.75 hours)
2021-02-06, 6 people, 1
Day (Travel time in route 6.25 hours)
Time Required - 6 to 8 hours
Distance - 4.3 miles Total, 0.5 miles Technical
Rappels - 6 Rappels, Longest Rappel 100 feet.
Will need 120 foot rope.
Elevation Range - 5425 - 6125 Feet
Shuttle Required - No Vehicle - Passenger,
if bad road conditions High Clearance
Permit Required - No
Rappelling and anchor gear, Ropes and or pull cords for rappels up
to 120 feet and 20 feet of 1 inch webbing just in case. Wet
suits generally not needed in warm weather but a good idea with cool
weather and wet conditions. Sandtrap, a few potshots, Smooth
Operator or other retrievable anchor.
Holy Cow is on Little Bown Bench and offers incredible scenery, an upper section
with solid pothole practice, a lower section with skinny winding walls where
stemming to 10 or 15 feet up makes life easier and an incredible set of
arches near the end. Holy Cow, this canyon fun and pretty.
The approach we originally used was up a boulder filled
ravine, scrambling up very steep sections of slickrock to the mesa top then
following the mesa down to Holy Cow. Jenny West told me about a shorter
route she had used in the past to access the mesa. Her route follows a ramp
up the side of the cliff band to where you then also scramble slickrock to
the mesa top and follow down to Holy Cow. Jenny's route is shorter (more
direct), easier and does not encounter sections as steep as our original
approach. Thank you for sharing the route Jenny.
This route description has been updated to reflect the
newer, shorter, easier approach route. After using both approach
routes, it is thought this shorter one is also the easier one.
One spot on the approach described here has steep
exposed slab scrambling. Having a confident climber / scrambler along
can give great peace of mind if they go up and set a rope for a hand line
for others.
This canyon is not considered beginner friendly.
There should be a couple people along who are experienced with pothole style
canyons and retrievable anchors. The potholes will require a fair amount of
work and teamwork depending on conditions. A Sandtrap and potshots are
needed.
Some of the potholes in Holy Cow can be bridged over by
taller people. Having at least one person close to 6 foot tall can
speed things up as they can bridge over then assist shorter people out the
other side of potholes. With good partner assists and potshots shorter
people can just play through, but having a tall person is mighty helpful on
this route.
The clay / mud in this canyon can be very thick and
very slick! Be prepared for some work to haul each other up out of potholes
since the person being hauled will have zero traction with feet.
Bring at least 3 potshots. The first major pothole was
about 10 feet deep and we were able to partner assist out. If sand (er uh
clay) scours out this will be difficult or not possible. A potshot toss will
be required. The toss is a long one with a large flat patio on the other
side. Multiple potshots may be required to get sufficient weight. What you
can not see is a tight slot for the potshot to catch in on the other side of
the patio around a right hand corner. If you are unable to toss far
enough, use less sand and try to toss around the corner.
The final rap can be anchored using a Smooth Operator
from a bush and drops about 100 feet. A 120 foot rope works perfect for this
drop. Be very careful when rigging the Smooth Operator for this drop. The
bush has a couple pinch points that can trap the rope so do a test pull.
There are also choke stones in the crack leading to the drop that can stick
the rope and care must be taken to avoid getting the rope stuck.
How Holy Cow was named:
I had my
eye on this canyon for almost 2 years but had no idea how to get up to it.
November of 2016 I talked Tracy into scouting an approach that looked
possible on Google Earth. Turns out it did not go but we had a lot of fun
playing in the narrow subway slots and getting lost in slickrock loaves. May
of 2017 we found ourselves back in the area for the annual Saddle Fest and I
talked Tracy into trying out another option we spotted as a possibility on
the way out of the last scout. This time it went! So off to the canyon we
went.
After the first rappel, down a couple downclimbs and
getting to the first major pothole it looked a bit deep to partner assist so
we tried a potshot toss. The potshot toss needed to be done from a
semi-stemming position in a slot, over across large pothole, across a flat
patio then around a corner to what we later found out was a tight V-slot
that would work well to catch the potshot. It was an eye opener to be faced
with the fact that I did not have the physical power to make the toss. I
could only get the potshot most of the way across the flat patio and that
was still only a half full potshot! After eyeballing it a bit more we
decided we could climb back up-canyon if needed to reverse the route.
We decided to drop in and try partner assisting out. After moving a few
large rocks to step on, I played ladder and Tracy climbed up using my knee,
hand, shoulder then more hands. With my arms fully extended and Tracy
standing in them she was just able to wiggle out of the pothole. The very
thick clay like mud was everywhere and so thick your feet were useless to
assist climbing. Tracy tossed me a rope to haul me and packs up.
After a couple more downclimbs we got to another
pothole that we would need to rappel into this time. Knowing we could
still reverse the canyon at this point we decided to send only one of us
into the pothole and see how it felt. I was able to toss a potshot up over
the lip but it was not enough weight. Knowing we would not be able to
reverse this pothole we decided to retreat rather than toss more bags of
sand. Going into multiple pothole problems with only two people and
crazy slick clay was more than we wanted to get into. We had dinner
plans and Hells Backbone Grill later that eve!
Reversing the canyon would have been quick and easy if
it were not for the very-thick, very-slick clay mud everywhere. On one
upclimb we each took a turn flailing madly trying to get into a chute but
just kept sliding in. On a second try I was able to get up into the slot
with Tracy providing some foot spotting. That second attempt left me winded
for a couple minutes. All that flailing up that chute had us wondering if we
were going to be forced back down and through the canyon.
After getting to the bottom of the first rap we walked
the very wide shelf looking over the canyon below. It looked like we
had done most of the hard part and were disappointed we turned back.
Little did we know the canyon had A LOT more to offer, which we found out a
couple days later going through with friends. As we got near the end of the
canyon we did a couple raps to get to the canyon floor near the final rappel
to exit. Before turning down canyon to the final rappel I took a short walk
up canyon and was met by a 20-ish foot drop and could not see much above it.
Little did I know the gem of the canyon was just above that drop.
As Saddle Fest continued we talked about wanting to go
back and finish the canyon. A few friends joined us on the adventure 2 days
later. The canyon delivered fun challenges and awesome scenery all the way
through. This place turned out to be an absolute gem. The arch room is jaw
droppingly beautiful. Each of us kept saying it was one of the best things
we had seen in a canyon.
Tracy named the canyon Holy Cow. Originally she named
it due to the many small holes found in the rock on the approach and the
potholes we encountered on our first attempt. As time went by Holy Cow
had more meaning. The canyon offered more pothole fun than we thought and we
kept saying Holy Cow this is cool. About half way through the character of
the canyon changed to a winding and undulating walls in narrow slot. We kept
saying Holy Cow this is incredible. When we got to the arch room, the view
was incredible. We looked at two holes to chose from to continue down
canyon. Seeing that spot the Holy Cows were flying out of our mouths
like water. After going through one of the holes, a whole new level of Holy
Cow was uttered as we saw another arch along with a large undercut / chamber
on the side. What an incredible thing to see. After getting under that
next arch you could see another arch forming on the RDC wall and if you walk
over to the wall you can see sky through the crack. Under that arch is
a large cave / hole leading back 15 to 20 feet in the canyon wall. As
we looked this spot over we all took time to chill and enjoy it and kept
saying Holy COW!
Thanks to Jeremy, Rick, Kelton and Stephanie for
helping us finish this route!
To get to the Trailhead
From the town of Boulder Utah turn off of highway 12 onto the
Burr Trail Road. Follow the Burr Trail Road east for about
18.4 miles to an exit to a dirt road on the right (south) which
is the Wolverine Loop Road (extWolverine1).
Turn right (south) onto the Wolverine Loop Road and follow it
south about 5.6 miles to the a large junction (ExHorseCyn) where
the Horse Canyon road branches off to the right (west).
From the junction of Horse Canyon Road (ExHorseCyn), stay left
and continue on the Wolverine Loop road. About 4.6 miles
from the junction is a turn off (extWolverineTH) on the right
(west) to a short spur road for the Wolverine Creek Trailhead.
From the Wolverine Creek Turn off (extWolverineTH) stay straight
/ left on the Wolverine Loop Road and drive about 2.7 miles to
the turn off on right (exLilDeathHlw) for the Little Death
Hollow Trailhead. Turn right (south) and drive about 200
feet to the Little Death Hollow Trailhead (tLilDeathHlw) and
park. There is room for a quite a few cars here.
Note:
The hike in is down a drainage sometimes
referred to as Little
Death Hollow but on maps
is usually labeled as
Death Hollow. To avoid
confusion it is good to
be aware that this is a
different drainage from
the Death Hollow about
17 miles west of here
near the town of
Escalante.
To leave the Exit Vehicle / Escape Pod
No exit vehicle is needed. This is done as an out and back.
GPS coordinate information listed at the bottom. For information about waypoint naming and map symbols, refer to the
Glossary page.

Click the links for maps of the route.
Map of the drive into the route.
Map of the entire route.
Map of the Approach.
Map of the technical section.
The Approach:
From the trailhead (tLilDeathHlw)
walk southwest down the
huge wide open wash
following trails.
About 1 mile to a spot
along the trail
(jHolyCow-Apr) where you
can look straight up a
large prominent boulder
filled ravine running up
to the north. At the
head of the ravine a
weakness can be seen
where you can climb up
into the slot above.
There is no landmark at
the spot and the boulder
filled ravine is the
largest one you see.
Leave the trail (jHolyCow-Apr)
just past a very large
boulder sitting next to
the trail. From here you
can get a visual on the
approach route. Leave
the trail here and hike
about 900 feet west
across the desert toward
the rubble filled slope
at the base of the cliff
band. Looking west from
here note a large light
colored arch-like
indention in the cliff
band then note the
saddle just to the left
(south) of that. Just
below that saddle is a
ramp leading up the
cliff side to a small
patch of vegetation.
Route find your way to
that ramp.
Note:
A large boulder filled
ravine can be seen to
the north from here and
can optionally be used
to approach Holy Cow but
will add distance and
time to the route as
well as require
scrambling some sketchy
sections of steep
slickrock.
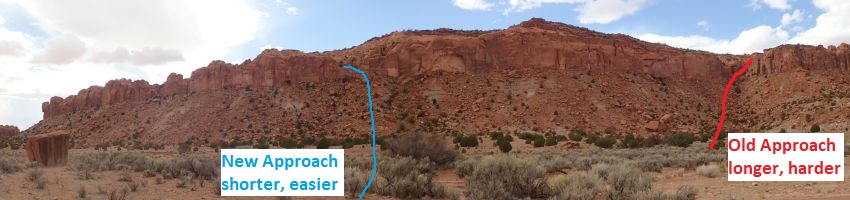 Overview of the old and new approach routes.
 Looking west from
here note a large light colored arch-like indention in the cliff band then note
the saddle just to the left (south) of that. Just below that saddle is a ramp
leading up the cliff side to a small patch of vegetation. Route find your way to
that ramp.
Looking west from
here note a large light colored arch-like indention in the cliff band then note
the saddle just to the left (south) of that. Just below that saddle is a ramp
leading up the cliff side to a small patch of vegetation. Route find your way to
that ramp.
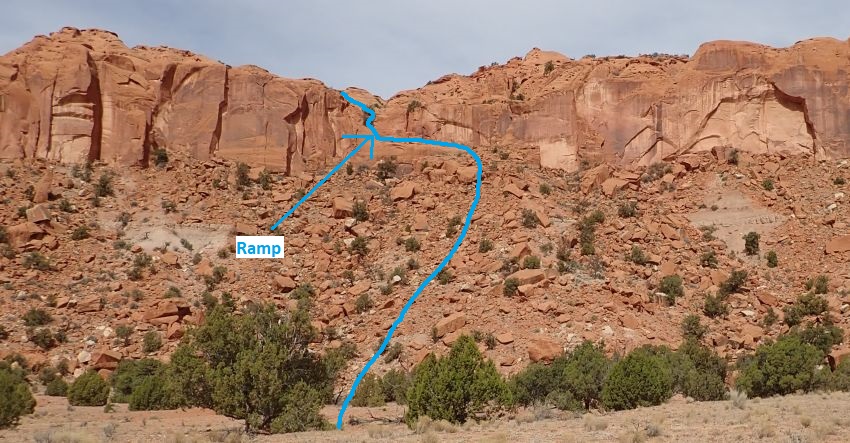
About 900 feet away is
the bottom (HolyCow01)
of the rubble filled
slopes leading up to the
cliff band. Route find
your way a little over
500 feet west up the
rubble toward the
slickrock ramp.
Scramble to then up this
slickrock ramp / fin
with some cowboy / moqui
steps. At the top of the
ramp (HolyCow02) is a
short upclimb where it
may be helpful for
partners to help with
backpacks. After getting
to the top of the
upclimb, scramble your
way west up the steep
slickrock domes for
about 160 feet to where
you get a good view of
the convoluted terrain
to the east.
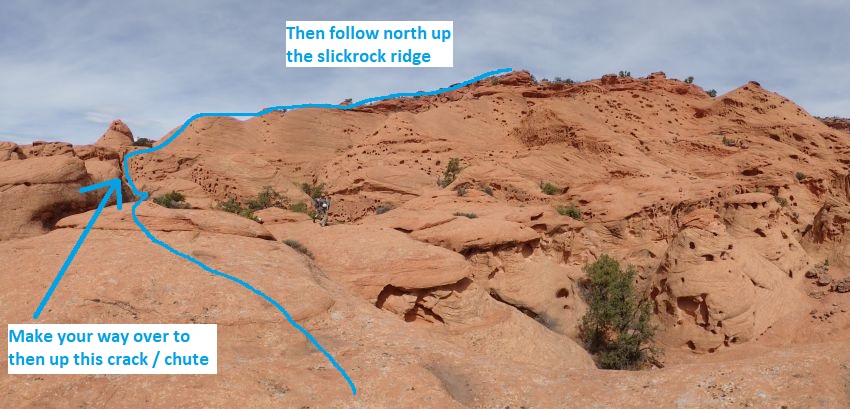
As you top out on a
slickrock dome
(HolyCow03), look west
over the convoluted mix
of slickrock domes and
valleys and note a crack
/ chute to upclimb just
below a small prominent
sandstone peak about 300
feet away. Route find
your way over to the
bottom of that chute.
 Look west over the
convoluted mix of slickrock
domes and valleys and note a
crack / chute to upclimb
just below a small prominent
sandstone peak about 300
feet away. Route find your
way over to the bottom of
that chute. Then
follow north up the
slickrock ridge.
Look west over the
convoluted mix of slickrock
domes and valleys and note a
crack / chute to upclimb
just below a small prominent
sandstone peak about 300
feet away. Route find your
way over to the bottom of
that chute. Then
follow north up the
slickrock ridge.
On the way over to the
chute will be a crack
(HolyCow04) to step over
and traverse just before
being able to drop down
into a vegetated section
leading over to the
crack / chute to
upclimb.
After getting to the top
of (HolyCow05) an easy
crack / chute to go up
of about 8 feet with
lots of features to aid
in the upclimb, turn
right (north) and
scramble your way up a
moderately steep
slickrock ridge. About
300 feet up the slick
rock you can scramble up
to the large dirt layer
above.
Once up onto the large
dirt shelf above
(HolyCow06), veer left
(mostly west) and walk
about 450 feet to where
you can scramble up to
the next higher dirt
level.
Once up onto the next
large dirt layer
(HolyCow07), continue
west for about 350 feet
to where you can look
down into the upper
portion of the Holy Cow
drainage.
When you can see down
(HolyCow08) into the
Holy Cow drainage, route
find your way about 600
feet down dirt slopes
down into Holy Cow.
You will likely find
your way down in Holy
Cow just below a drop
(HolyCow09) in the wash
of about 20 feet.
The shelf is about 20
feet and can be
scrambled down over
ledges if you happen to
drop in above it.
Turn left and follow
south down the Holy Cow
wash for a little over
500 feet to the top of
Holy Cow (yHolyCowTp).
The Canyoneering / Technical Section:
Rap 1 (yHolyCowTp)
is at the head of the
canyon anchored from a
tree up on the RDC side
and drops about 50 feet
with free hang most of
the way down. About 60
feet of rope will be
used from anchor to
ground.
A little over 100 feet
down canyon is a
downclimb of about 8
feet (HolyCow30).
Shortly down canyon is a
downclimb of about 12
feet with a choke stone
at the top making the
start of the downclimb
awkward. The exit from
the large sand-filled
pothole after the 12
foot downclimb has a
very narrow pinch to
stem a couple feet up
over.
Shortly down canyon is
the first deep pothole
(HolyCow31). This
pothole can be climbed
down into with a partner
assist and is about 10
feet deep on the down
canyon side. When we
were there a partner
assist got us up the
other side but if sand
(um clay mud) scours out
the pothole may become
deeper requiring a
potshot toss. The toss
is a long one with a
large flat patio on the
other side. Multiple
potshots may be required
to get sufficient
weight. What you can not
see is a tight slot for
the potshot to catch in
on the other side of the
patio around a right
hand corner. If you are
unable to toss far
enough, use less sand
and try to toss around
the corner.
Note:
A tall person can bridge
over then dynamically
run the side of this
pothole to cross. Most
people will be unable to
perform the task.
Just
after this pothole is a
sloped downclimb of
about 10 feet then rap 2
which is about 70 feet
from the first big
pothole.
Rap 2 (dHolyCowR2)
anchored from on of many
rocks using a Smooth
Operator or retrievable
anchor and drops about
12 feet down into a
pothole. The pothole is
about 9 feet deep and
can be partner assisted
out of and has a drop of
about 8 feet to
downclimb on the down
canyon side of the lip.
Shortly down canyon is a
series of 2 drops
(HolyCow32) of about 15
feet then 25 feet. Both
look like rappels but
can be downclimbed with
partner assist. The top
of each is easily
downclimbed but the last
6 feet of each will
require partner assist. At the bottom of the
second downclimb is a
long pool of waist to
chest deep water.
If no one wants to
bridge over this section
it is possible with
moderate effort to
partner assist down
into, up out of then
down the drop on the
other side.
Shortly down canyon is a
drop of about 10 feet
into a pothole then a
difficult exit out the
down canyon side using
potshots and / or
partner assist. This
pothole can be bridged
over by tall people but
has an awkward
transition on the down
canyon side. Having a
tall person of around 6
foot makes this pothole
crossing easier as they
can assist the others up
out of it after bridging
over. On the other side
of the pothole is a
downclimb of about 6
feet to a sandy area.
A little over 100 feet
down canyon is rap 3.
Rap 3 (dHolyCowR3-4)
anchored from a sandtrap
down in a pothole and
drops about 20 feet down
into a sand filled
chamber with rap 4 at
the other end.
Rap 4 at the bottom of
rap 3 is anchored from a
sandtrap and drops about
12 feet with an awkward
start in a skinny crack
to an overhang.
Raps 3 and 4 can be
combined into one rappel
if desired. Be careful
not to get the sandtrap
stuck.
Down canyon of rap 4 is
easy walking in a
corridor that then gives
way to short open wash
sections mixed with a
couple spots to galumph
a few feet in short
narrow spots.
About 300 feet down
canyon is a pinch in the
canyon with a downclimb
(HolyCow33) of about 8
feet to a small chamber
followed by a downclimb
of about 12 feet after
the chamber. The
downclimb out of the
chamber can be made much
easier by downclimbing
to a thin ledge about 5
feet down then travers
to the large ledge LDC.
Just after this double
downclimb is a very
scenic subway shaped
corridor leading to a
pinch with a drop
(HolyCow34).
The drop (HolyCow34) at
the end of the subway
corridor is a downclimb
of about 15 feet to
pothole with an easy to
escape. The brave people
in the group can can
bypass the pothole by
carefully walking a very
featured ledge on the
RDC side and make a
semi-dynamic run at the
other end to a larger
ledge. This ledge bypass
is exposed and the
features become small at
the end.
After the pothole
(rather you bypassed or
went down through) walk
along the RDC side to
bypass 2 potholes then
scramble back down to
the canyon floor by a
cross joint / drainage
on the LDC side.
Just after the cross
joint (HolyCow35) the
next 500 feet of canyon
has narrow and sometimes
skinny twisting and
undulating walls. Travel
could be done on the
canyon floor for most of
it but stemming up 10 to
15 feet will make life
easier through large
portions of this
section. This section is
very pretty and worth
taking the time to
admire.
Near the end of the
skinny section is a
downclimb (HolyCow36) of
about 6 feet that can be
awkward then shortly
down canyon is a
downclimb of about 12
feet. The 12 foot
downclimb is awkward at
the top as you drop down
into a crack with slick
walls but lots of
features. About 100 feet
farther down canyon is a
downclimb to the arches.
At the end of the narrow
section is a downclimb
(HolyCow37arch) of 12
feet that may need an
aggressive partner
assist to get down. For
the downclimb a rock
flake in the canyon
floor can be used to set
a handline then flicked
off the flake when
safely down. At
the bottom of the
downclimb is a chamber
like spot with an arch
to walk through or
around. Going under or
around that arch reveals
another larger arch
overhead and chamber
like area on the RDC
side with another arch
forming on along the
wall. Walking over
to the wall you
can see sky between the
arch and the wall. Going
up canyon from the side
wall arch is what almost
looks like a short cave
extending back 15 to 20
feet. This spot is truly
amazing and time should
be taken to enjoy it!!!
The next rap is just
past the arches.
Just past the arches is
rap 5.
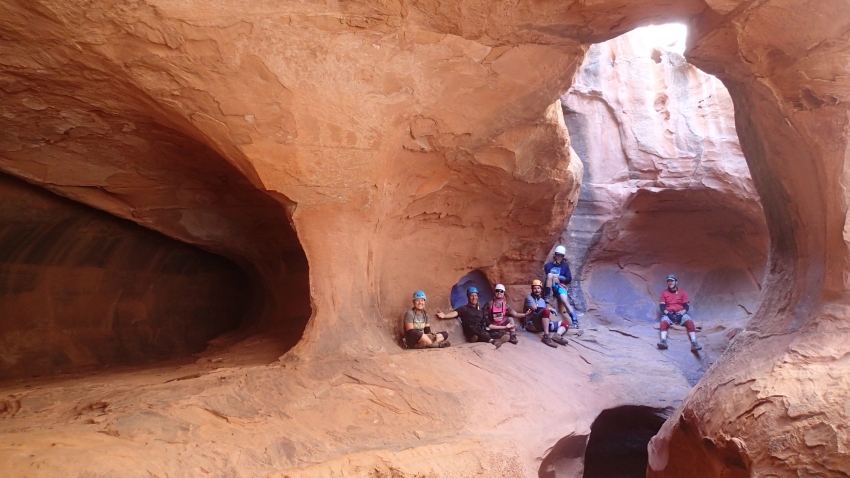 Under the arches! The
larger arch is not in the
picture and is just
overhead.
Under the arches! The
larger arch is not in the
picture and is just
overhead.
Rap 5 (dHolyCowR5) is
anchored from one of
many bushes and drops
about 25 feet down a
slope but will use about
50 feet of rope from
anchor to ground.
Be careful of
what bush is selected
for an anchor as some of
these have loose root
systems. Shortly down
canyon is a deep crack
forming that is easily
bypassed on the RDC side
then easy walking and
galumphing down to the
final rappel.
Rap 6 (dHolyCowR6) is
anchored using a
retrievable anchor
(Smooth Operator) from a
bush about head high on
the LDC side about 15
feet back from the drop
and drops about 100
feet. A 120 foot rope
works perfect for this
drop.
Note:
Be very careful when
rigging the Smooth
Operator for this drop.
The bush has a couple
pinch points that can
trap the rope so do a
test pull. There are
also chokestones in the
crack leading to the
drop that can stick the
rope and care must be
taken to avoid getting
the rope stuck.
From the bottom of rap 6
scramble your way down
through large boulder
debris for about 400
feet to where the
terrain levels off and
travel becomes mostly
walking (yHolyCowBt).
The Exit:
From
where the walking gets
easier (yHolyCowBt)
Continue down the wash
about 0.2 miles out to
the main Little Death
Hollow drainage (jHolyCow-Ext).
Note:
As you exit the Holy Cow
drainage and get to the
main wash it is tempting
to turn left and walk
northeast up the wash.
An option for easier
travel is to continue
across the large wash
and up the banks on the
other (south) side. Just
at the top of the bank
you will find the very
well used and easy to
walk main trail system
of Little Death Hollow.
Turn left and follow the
trails northeast about
1.8 miles back to the
trailhead (tLilDeathHlw).
Downloadable GPX files
available at
BG-Gear Store
(easier than manual entry and a great way to support
Bluugnome).
Waypoint naming convention and map symbol information can be found on the Glossary page.
Elevations are approximate.
BEFORE
manually entering coordinates set your system to WGS84 datum and Lat/Lon hddd.ddddd° coordinate format.
Inconsistent datum's and coordinate formats will result in location errors.
Click to show / expand the list of waypoints below........
| Holy Cow (1) - Drive In |
- extWolverine1
Lat/Lon (WGS84): N 37.92427
W -111.22069
Elev: NaN Feet
There are 2 exits for the Wolverine Loop Road off of the Burr Trail Road. This is the farthest northwest and is labeled on some maps as the Escalante Grand Staircase road 110 going south from here.
- ExHorseCyn
Lat/Lon (WGS84): N 37.85064
W -111.22351
Elev: NaN Feet
Turn off to Horse Canyon to the west on road 11120.
- extWolverineTH
Lat/Lon (WGS84): N 37.80409
W -111.20641
Elev: NaN Feet
Turn off to the Wolverine Trailhead off of the Wolverine Loop Road.
- exLilDeathHlw
Lat/Lon (WGS84): N 37.78455
W -111.18047
Elev: NaN Feet
Exit off of the Wolverine Loop Road to the Little Death Hollow Trailhead.
- tLilDeathHlw
Lat/Lon (WGS84): N 37.78402
W -111.18060
Elev: 5,550 Feet
Trailhead for Little Death Hollow. Space for quite a few cars to park.
The drainage down from here is sometimes referred to as Little Death Hollow but on maps is usually labeled as Death Hollow. To avoid confusion it is good to be aware that this is a different drainage from the Death Hollow about 17 miles west of here near the town of Escalante.
|
| Holy Cow (2) - Approach |
- tLilDeathHlw
Lat/Lon (WGS84): N 37.78402
W -111.18060
Elev: 5,550 Feet
Trailhead for Little Death Hollow. Space for quite a few cars to park.
The drainage down from here is sometimes referred to as Little Death Hollow but on maps is usually labeled as Death Hollow. To avoid confusion it is good to be aware that this is a different drainage from the Death Hollow about 17 miles west of here near the town of Escalante.
- jHolyCow-Apr
Lat/Lon (WGS84): N 37.77332
W -111.19234
Elev: 5,480 Feet
A spot on the trail just past a very large boulder sitting next to the trail. From here you can get a visual on the approach route. Leave the trail here and hike about 900 feet west across the desert toward the rubble filled slope at the base of the cliff band. Looking west from here note a large light colored arch-like indention in the cliff band then note the saddle just to the left (south) of that. Just below that saddle is a ramp leading up the cliff side to a small patch of vegetation. Route find your way to that ramp.
A large boulder filled ravine can be seen to the north from here and can optionally be used to approach Holy Cow but will add distance and time to the route as well as require scrambling some sketchy sections of steep slickrock.
- HolyCow01
Lat/Lon (WGS84): N 37.77445
W -111.19521
Elev: NaN Feet
Bottom of the rubble filled slopes leading up to the cliff band. Route find your way a little over 500 feet west up the rubble toward the slickrock ramp.
- HolyCow02
Lat/Lon (WGS84): N 37.77471
W -111.19702
Elev: NaN Feet
Scramble to then up this slickrock ramp / fin with some cowboy / moqui steps. At the top of the ramp is a short upclimb where it may be helpful for partners to help with backpacks. After getting to the top of the upclimb, scramble your way west up the steep slickrock domes for about 160 feet to where you get a good view of the convoluted terrain to the east.
- HolyCow03
Lat/Lon (WGS84): N 37.77454
W -111.19761
Elev: NaN Feet
As you top out on a slickrock dome here, look west over the convoluted mix of slickrock domes and valleys and note a crack / chute to upclimb just below a small prominent sandstone peak about 300 feet away. Route find your way over to the bottom of that chute.
- HolyCow04
Lat/Lon (WGS84): N 37.77450
W -111.19843
Elev: NaN Feet
A crack to step over and traverse just before being able to drop down into a vegetated section leading over to the crack / chute to upclimb.
- HolyCow05
Lat/Lon (WGS84): N 37.77441
W -111.19869
Elev: NaN Feet
Top of an easy crack / chute to go up of about 8 feet with lots of features to aid in the upclimb. From the top turn right (north) and scramble your way up a moderately steep slickrock ridge. About 300 feet up the slick rock you can scramble up to the large dirt layer above.
- HolyCow06
Lat/Lon (WGS84): N 37.77514
W -111.19919
Elev: 6,050 Feet
Scramble up onto a large dirt shelf above the slickrock. Veer left (mostly west) and walk about 450 feet to where you can scramble up to the next higher dirt level.
- HolyCow07
Lat/Lon (WGS84): N 37.77554
W -111.20062
Elev: 6,125 Feet
Scramble up onto the next higher dirt layer. Continue west for about 350 feet to where you can look down into the upper portion of the Holy Cow drainage.
- HolyCow08
Lat/Lon (WGS84): N 37.77581
W -111.20189
Elev: NaN Feet
Top of a dirt slope where you can see down into the Holy Cow drainage, route find your way about 600 feet down dirt slopes down into Holy Cow.
- HolyCow09
Lat/Lon (WGS84): N 37.77640
W -111.20379
Elev: NaN Feet
Shelf in the wash where you will likely drop into Holy Cow just below this shlef. The shelf is about 20 feet and can be scrambled down over ledges if you happen to drop in above it. Turn left and follow south down the Holy Cow wash for a little over 500 feet to the top of Holy Cow.
- yHolyCowTp
Lat/Lon (WGS84): N 37.77502
W -111.20417
Elev: 5,980 Feet
Top of Holy Cow. Rap 1 is here anchored from a tree up on the RDC side and drops about 50 feet with free hang most of the way down. About 60 feet of rope will be used from anchor to ground.
|
| Holy Cow (3) - Canyon |
- yHolyCowTp
Lat/Lon (WGS84): N 37.77502
W -111.20417
Elev: 5,980 Feet
Top of Holy Cow. Rap 1 is here anchored from a tree up on the RDC side and drops about 50 feet with free hang most of the way down. About 60 feet of rope will be used from anchor to ground.
- HolyCow30
Lat/Lon (WGS84): N 37.77466
W -111.20418
Elev: NaN Feet
Downclimb of about 8 feet. Shortly down canyon is a downclimb of about 12 feet with a choke stone at the top making the start of the downclimb awkward. The exit from the large sand-filled pothole after the 12 foot downclimb has a very narrow pinch to stem a couple feet up over.
- HolyCow31
Lat/Lon (WGS84): N 37.77439
W -111.20418
Elev: NaN Feet
First deep pothole. This pothole can be climbed down into with a partner assist and is about 10 feet deep on the down canyon side. When we were there a partner assist got us up the other side but if sand scours out the pothole may become deeper requiring a potshot toss. The toss is a long one with a large flat patio on the other side. Multiple potshots may be required to get sufficient weight. What you can not see is a tight slot for the potshot to catch in on the other side of the patio around a right hand corner. If you are unable to toss far enough, use less sand and try to toss around the corner.
Note:
A tall person can bridge over then dynamically run the side of this pothole to cross. Most people will be unable to perform the task.
Just after this pothole is a sloped downclimb of about 10 feet.
- dHolyCowR2
Lat/Lon (WGS84): N 37.77417
W -111.20428
Elev: NaN Feet
Rap 2 - Holy Cow. Anchored from on of many rocks using a Smooth Operator or retrievable anchor and drops about 12 feet down into a pothole. The pothole is about 9 feet deep and can be partner assisted out of and has a drop of about 8 feet to downclimb on the down canyon side of the lip.
- HolyCow32
Lat/Lon (WGS84): N 37.77404
W -111.20430
Elev: NaN Feet
Series of 2 drops of about 15 feet then 25 feet. Both look like rappels but can be downclimbed with partner assist. The top of each is easily downclimbed but the last 6 feet of each will require partner assist. At the bottom of the second downclimb is a long pool of waist to chest deep water.
Shortly down canyon is a drop of about 10 feet into a pothole then a difficult exit out the down canyon side using potshots and / or partner assist. This pothole can be bridged over by tall people but has an awkward transition on the down canyon side. Having a tall person of around 6 foot makes this pothole crossing easier as they can assist the others up out of it after bridging over. On the other side of the pothole is a downclimb of about 6 feet to a sandy area. If no one wants to bridge over this section it is possible with moderate effort to partner assist down into, up out of then down the drop on the other side.
- dHolyCowR3-4
Lat/Lon (WGS84): N 37.77361
W -111.20433
Elev: NaN Feet
Raps 3 and 4 - Holy Cow.
Rap 3 anchored from a sandtrap down in a pothole and drops about 20 feet down into a sand filled chamber with rap 4 at the other end.
Rap 4 at the bottom of rap 3 is anchored from a sandtrap and drops about 12 feet with an awkward start in a skinny crack to an overhang.
Raps 3 and 4 can be combined into one rappel if desired. Be careful not to get the sandtrap stuck.
Down canyon of rap 4 is easy walking in a corridor that then gives way to short open wash sections mixed with a couple spots to galumph a few feet in short narrow spots.
- HolyCow33
Lat/Lon (WGS84): N 37.77288
W -111.20487
Elev: NaN Feet
A pinch in the canyon with a downclimb of about 8 feet to a small chamber followed by a downclimb of about 12 feet after the chamber. The downclimb out of the chamber can be made much easier by downclimbing to a thin ledge about 5 feet down then travers to the large ledge LDC.
Just after this double downclimb is a very scenic subway shaped corridor leading to a pinch with a drop.
- HolyCow34
Lat/Lon (WGS84): N 37.77250
W -111.20482
Elev: NaN Feet
Downclimb of about 15 feet at the down canyon end of the subway corridor to pothole with an easy to escape. The brave people in the group can can bypass the pothole by carefully walking a very featured ledge on the RDC side and make a semi-dynamic run at the other end to a larger ledge. This ledge bypass is exposed and the features become small at the end.
After the pothole (rather you bypassed or went down through) walk along the RDC side to bypass 2 potholes then scramble back down to the canyon floor by a cross joint / drainage on the LDC side.
- HolyCow35
Lat/Lon (WGS84): N 37.77237
W -111.20487
Elev: NaN Feet
Just after the cross joint the next 500 feet of canyon has narrow and sometimes skinny twisting and undulating walls. Travel could be done on the canyon floor for most of it but stemming up 10 to 15 feet will make life easier through large portions of this section. This section is very pretty and worth taking the time to admire.
- HolyCow36
Lat/Lon (WGS84): N 37.77138
W -111.20542
Elev: NaN Feet
Near the end of the skinny section is a downclimb of about 6 feet that can be awkward then shortly down canyon is a downclimb of about 12 feet. The 12 foot downclimb is awkward at the top as you drop down into a crack with slick walls but lots of features. About 100 feet farther down canyon is a downclimb to the arches.
- HolyCow37arch
Lat/Lon (WGS84): N 37.77101
W -111.20553
Elev: NaN Feet
At the end of the narrow section is a downclimb of 12 feet that may need an aggressive partner assist to get down. At the bottom of the downclimb is a chamber like spot with an arch to walk through or around. Going under or around that arch reveals another larger arch overhead and chamber like area on the RDC side with another arch forming on along the wall. Walking over to the wall you can see sky between the arch and the wall. Going up canyon from the side wall arch is what almost looks like a short cave extending back 15 to 20 feet. This spot is truly amazing and time should be taken to enjoy it!!! The next rap is just past the arches.
- dHolyCowR5
Lat/Lon (WGS84): N 37.77094
W -111.20559
Elev: NaN Feet
Rap 5 - Holy Cow. Anchored from one of many bushes and drops about 25 feet down a slope but will use about 50 feet of rope from anchor to ground. Be careful of what bush is selected for an anchor as some of these have loose root systems. Shortly down canyon is a deep crack forming that is easily bypassed on the RDC side then easy walking and galumphing down to the final rappel.
- dHolyCowR6
Lat/Lon (WGS84): N 37.77040
W -111.20616
Elev: NaN Feet
Rap 6 - Holy Cow. Anchored using a retrievable anchor (Smooth Operator) from a bush about head high on the LDC side about 15 feet back from the drop and drops about 100 feet. A 120 foot rope works perfect for this drop.
Note:
Be very careful when rigging the Smooth Operator for this drop. The bush has a couple pinch points that can trap the rope so do a test pull. There are also chokestones in the crack leading to the drop that can stick the rope and care must be taken to avoid getting the rope stuck.
Scramble your way down through large boulder debris for about 400 feet to where the terrain levels off and travel becomes mostly walking.
- yHolyCowBt
Lat/Lon (WGS84): N 37.76930
W -111.20659
Elev: 5,470 Feet
Boulder hopping begins to level off and travel becomes easier walking. Continue down the wash about 0.2 miles out to the main Little Death Hollow drainage.
|
| Holy Cow (4) - Exit |
- yHolyCowBt
Lat/Lon (WGS84): N 37.76930
W -111.20659
Elev: 5,470 Feet
Boulder hopping begins to level off and travel becomes easier walking. Continue down the wash about 0.2 miles out to the main Little Death Hollow drainage.
- jHolyCow-Ext
Lat/Lon (WGS84): N 37.76781
W -111.20425
Elev: 5,425 Feet
Exit route of Holy Cow meets the Little Death Hollow trail here. As you exit the Holy Cow drainage and get to the main wash it is tempting to turn left and walk northeast up the wash. An option for easier travel is to continue across the large wash and up the banks on the other (south) side. Just at the top of the bank you will find the very well used and easy to walk main trail system of Little Death Hollow.
- jHolyCow-Apr
Lat/Lon (WGS84): N 37.77332
W -111.19234
Elev: 5,480 Feet
A spot on the trail just past a very large boulder sitting next to the trail. From here you can get a visual on the approach route. Leave the trail here and hike about 900 feet west across the desert toward the rubble filled slope at the base of the cliff band. Looking west from here note a large light colored arch-like indention in the cliff band then note the saddle just to the left (south) of that. Just below that saddle is a ramp leading up the cliff side to a small patch of vegetation. Route find your way to that ramp.
A large boulder filled ravine can be seen to the north from here and can optionally be used to approach Holy Cow but will add distance and time to the route as well as require scrambling some sketchy sections of steep slickrock.
- tLilDeathHlw
Lat/Lon (WGS84): N 37.78402
W -111.18060
Elev: 5,550 Feet
Trailhead for Little Death Hollow. Space for quite a few cars to park.
The drainage down from here is sometimes referred to as Little Death Hollow but on maps is usually labeled as Death Hollow. To avoid confusion it is good to be aware that this is a different drainage from the Death Hollow about 17 miles west of here near the town of Escalante.
|