Canyoneering Route Description
Forge Canyon - 3A III (IV)
Death Valley National Park, California.
03-21-09, 9 people, 1 Day (Travel time in route 10.7 hours)

Time Required - 9.5 to 11.5 hours
While the canyon itself is rate a III, a long shuttle is
required making this a long day.
Distance - 7.9 miles Total, 3.8 miles Technical
Rappels - 13 Rappels, Longest Rappel 200 feet.
Elevation Range - 5500 - 180 Feet Below Sea
Level
Shuttle Required -Yes 47 Miles Vehicle - Passenger
- 4WD - High Clearance
Permit Required - No
23 miles of the shuttle are dirt road. A high clearance vehicle
may make the drive just fine.
There are a couple of spots where 4WD may be needed if the road
conditions are bad.
Rappelling and anchor gear, Ropes and or pull cords for rappels up
to 200 feet and 100 feet of 1 inch webbing for sling placement.
Lots of webbing may be needed if no one has recently done the
canyon.
Rick Kent has been
exploring many untouched canyons in the Death Valley area and was
responsible for putting this trip together. A thank you goes out to
Rick for inviting us along on the first descent of Forge Canyon.
In late spring the flowers on the drive into the trailhead through
Gold Valley are incredible.
The approach route gains about 1700 feet in a little over 2.5 miles,
most of the elevation gain is in the last mile of the approach. The
first 2 miles in the actual canyon is full of steep slopes with
loose scree, rocks and multiple down climbs. That first 2 miles
is not enjoyable as the travel is awkward. The last 1.2 miles of
the canyon is where all the fun is. There are 13 rappels and lots
of fun down climbs to work out. The exit from the canyon is another
1.3 mile walk across the alluvial fan for Forge Canyon.
Then the dreaded 47 mile shuttle back to the entry vehicle(s).
To get to the Trailhead
From the Bad Water parking lot drive south on highway 178
approximately 48.1 miles to a turn off on the left (north west)
to a dirt road (ExtFrnCk-178). The turn off will have a sign
saying Furnace Creek Wash Road (on some maps this is labeled as
Greenwater Valley Road). As a side note: shortly before
reaching the turn off will be another turn off with the same
name to the right, note this is not the one you want.
After turning left onto the dirt road drive north west 10.6
miles to a junction with another dirt road (ExtTwrdGoldVly) and
turn left onto the this dirt road. Drive another 2.5 miles to a
fork in the road (ExtGoldValley1) and continue left. Drive
another 5.2 miles to another fork (ExtGoldValley2) and continue
right. Drive another 3.0 miles to another fork (ExtGoldValley3)
and turn left. Drive another 1.5 miles to any spot you find
convenient to pull off the side of the road (tBlckSmithCyns).
This trail head can be used for a few canyons starting from the
Smith Mountain area.
Optionally you can turn left at ExtGoldValley2 then right at the
next road junction then on to the spot to park. This will save
about 2.7 miles but involves slightly rougher road.
To leave the Exit Vehicle / Escape Pod
From the Badwater parking lot, drive south on highway 178
approximately 21.5 miles and pull over to the side of the road
where convenient (pkForgeBt). There are no designated parking areas just
find a spot you feel comfortable with.
GPS coordinate information listed at the bottom. For information about waypoint naming and map symbols, refer to the
Glossary page.

Click the links for maps of the route.
Map of the drive into the route.
Map of the entire route.
The Approach:
From the trailhead (tBlckSmithCyns), travel due west along the
relatively flat floor of Gold Valley.
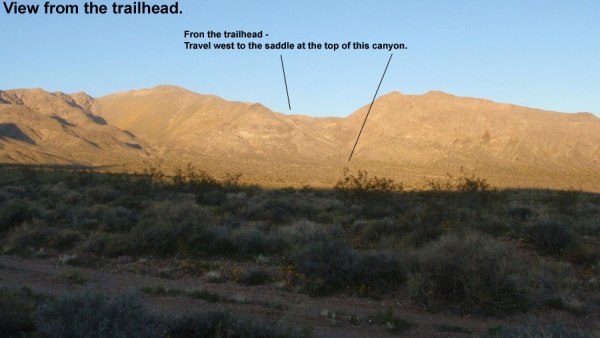
This is a view from where you parked at the trail head. Labeled
to give a rough idea of where to go.
After about 1.1 miles there is a large flat rock (wBlckSmthRP-01).
This rock is near the mouth of the canyon that has to be ascended as
part of the approach. The rock is about waist high and perfect for
setting packs on for a quick break. From the rock, continue west up the canyon ahead.
Once in the canyon the route becomes steeper with more rocks to maneuver around.
A little over a half mile up the canyon, is a large rock fall
area(wBlckSmthRP-02). The rock fall is bypassed by climbing high on
the left side of the canyon to get up and around the rock fall.
Drop back to the canyon floor about 500 feet up canyon of the rock
fall.
When you get back down to the canyon floor above the rock fall area,
continue up canyon staying right at the forks and follow up the more
wide open drainage. On maps this will be slightly right
(north) of the line drawn to show the watercourse.
Continue up canyon another 0.4 miles to where it tops out on a
saddle (wBlckSmthRP-03). From this saddle is a great view of the
top of Shoestring Canyon to the west and Telescope Peak (looks good
when snow covered) way off in the distance.
From the top of the canyon on the saddle (wBlckSmthRP-03), turn left
and head south (186°) 0.2 miles to another saddle (yForgeTp). This
second saddle is marked as the top entry for Forge Canyon to the
south. If you would like to bag a peak while in the area this is
the time to do it. The peak 0.4 miles to the southwest is Smith
Mountain.
The Canyon / Technical Section:
From the Top Entry to Forge Canyon (yForgeTp), travel down the
canyon to the south. Forge Canyon quickly becomes steep and full of
loose rock. A few hundred feet from the saddle is a scree filled
chute that gives access to the steep rock filled canyon floor below.
The areas of the canyon with sand and small gravel are fun in that
they feel like you are walking down a steep bank of snow. Each step
is cushioned by the flow of the rock under you. You can go pretty
fast down these sections. In contrast are the steep sections still
steep but covered in small to medium sized rocks. Falling here
would tear you up pretty bad. It is very awkward to walk over these
sections while trying to keep your feet from rolling out from under
you.
About 0.4 miles below top of the canyon is a 15 foot down climb that
is best done without packs on (wForgeRP-01). Lowering your packs
here with a length of webbing is a good idea.
Shortly after the down climb is a steeply sloped section of gray /
black rock on your way down canyon. Then the canyon levels off a
little and begins to narrow with a vertical wall on the right.
About 0.2 miles further is a big drop (wForgeRP-02). This big drop
is bypassed by climbing around LDC to a steep slope that bypasses
the drop. The slope is full of loose medium to large rocks. It is
easy to knock some loose and send it rolling down the slope.
Traveling one at a time down this slope will speed things up. Each
person can travel faster down the slope knowing they will not knock
rocks down on another person. Traveling fast one at a time is
faster and safer than the whole group trying to be careful while
traveling near each other.
Continuing down canyon are a few down climbs along the way with some
flat wash sections between, before getting to a second big drop 0.2
miles down canyon. This second big drop (wForgeRP-03) is down
climbed over a series of drops RDC. Parts of this climb down a
series of drops are slick from polished rock.
0.3 miles down canyon is pretty easy travel down the wash to a short
sloped section of polished pink rock.
Another 0.6 miles down canyon is another large drop in the canyon.
This drop is a series of 2 drops. Climb around the first part RDC
then climb down the second part right down the middle.
About 400 feet down are a couple short easy down climbs. The bottom
down climb leads to the top of Rap 1. Rap 1 is about 2.3 miles down
from the top of canyon.
Rap 1 (dForgeR1) is anchored from a cairn style anchor in the wash
just above the rappel. From the top of Rap 1 you can see the rest
of Forge Canyon wind away from you toward the valley floor off in
the distance. Rap 1 drops 200 feet down a mostly vertical wall.
There is a ledge about 40 feet up from the bottom before going
vertical again.
About 350 feet down canyon of rap 1 is a down climb that is easier
if the packs are lowered. The top part is easy to navigate but
steep. As your feet have about 5 feet left before getting to the
bottom the down climb goes almost vertical on a textured but slick
polished rock. I found it best to lower myself as far as possible
then just slide down the last part of the down climb. A couple
hundred feet after this down climb is rap 2.
Rap 2 (dForgeR2) is anchored from a boulder protruding from the
ground RDC. The rappel uses about 110 feet of rope as it goes down
over a series of drops and vertical sections. The start is a bit
over hung but easy to negotiate since there are walls on each side
to use for stabilization.
Rap 3 (dForgeR3) is about 250 feet down canyon of rap 2. Rap 3 is
anchored from a large rock lying in debris at the top of the rap.
Rap 3 drops about 65 feet down a smooth almost vertical wall. From
the top of Rap 3 you can see rap 4 about 100 – 200 feet down canyon.
Rap 4 (dForgeR4) is anchored from one of many large rocks sitting at
the top of the rap and drops about 70 feet. It starts out slopped
but soon goes vertical about the last 50 feet.
Rap 5 (dForgeR5) is about 100 feet down canyon from rap 4. Rap 5 is
anchored from a cairn anchor and drops about 50 feet down a
water-polished wall with a small pothole mid way down.
Below rap 5 is a section of wash walking with a few slopes of rock
to walk down. This section goes on for about 0.2 miles before
reaching rap 6.
Rap 6 (dForgeR6) is anchored from a large rock feature LDC. Rap 6
drops 30 feet along a rough wall.
Down canyon from rap 6 is easy wash walking with a couple sloped
rock sections to walk down. About 0.2 miles down canyon is a 12
foot down climb just before reaching rap 7.
Rap 7 (dForgeR7) is anchored by a cairn style anchor with some huge
rocks in the front. Rap 7 drops 50 feet down a sloped wall.
A short distance down canyon from rap 7 you will notice a dark black
stripe running diagonally down the canyon wall. The bottom of this
black stripe points to the anchor for rap 8 LDC. Raps 8, 9 and 10
are stacked right next to each other with about 50 feet between
raps.
Rap 8 (dForgeR8-10) is anchored by a large rock LDC at the top of
the rappel. Rap 8 drops about 40 feet down a rough wall. Rap 8 can
be down climbed by climbing down the rough wall RDC of the rap.
This is a little sketchy and is safer if rappelled.
Rap 9 is about 50 feet down canyon of rap 8. The top of the rap is
LDC in a narrow section. The first drop you see does not offer a
good start for a rappel since the start is overhung and the anchor
would need to be right at the top of the rap. Go down canyon around
the large rock you find yourself next to. From there you will find
the anchor for Rap 9 on a large rock. Rap 9 starts down a narrow
space between a huge boulder and the canyon wall. Rap 9 starts on a
slope then goes vertical. The overall drop is 80 feet. A long
length of webbing is suggested for rap 9 to allow an easier pull.
Rap 10 is about 50 feet down canyon of rap 9. The anchor for Rap 10
is a cairn style anchor. Rap 10 is a 3 stage rap that turns on the
way down. Each ledge has some horizontal distance to walk. The
overall rope length needed is 190 feet. The drops for each stage
are about 60, 30, and 60. Care should be taken not to twist the
ropes. Because of the turn on this rappel the pull is difficult and
getting the ropes twisted can make the pull extremely difficult or
impossible.
Down canyon of rap 10 are a couple down climbs with multiple ways
down so find what works for you. About 500 feet down canyon is Rap
11.
Rap 11 (dForgeR11) might possibly be considered a down climb by
some. It is an awkward down climb with very little flat ground
directly below. If down climbed a belay from the top should be used
with the last person being spotted from below. Rap 11 is anchored
from a small rock feature LDC while the rap itself is RDC. The
total drop is about 15 feet with some overhang, adding to the
awkwardness if down climbed.
Rap 12 is a little over 400 feet down canyon from rap 11. On the
way to rap 12 is a long easy slopped slick rock section to get down,
followed by a narrow flat wash. At the end of the narrow flat wash
is the top of rap 12.
Rap 12 (dForgeR12) is anchored from cairn style anchor LDC. Rap 12
starts down over a couple potholes then drops 60 feet down a smooth
almost vertical wall.
Shortly after rap 12 is a down climb over some large boulders. The
shortest drop is LDC but the easiest down climb is right down the
center. The down climb is easy but looks more difficult than it
is. Next are more long narrow sections of flat wash and one easy
down climb of about 8 feet, before reaching a long narrow down climb
about 0.3 miles down canyon of rap 12.
The long narrow down climb (wForgeRP-04) is down a moderately sloped
slot with enough of an overhang above it to use as friction to keep
from slipping. About 10 feet from the bottom is a near vertical
drop. We found it easiest to help each other down with webbing.
Some were able to stem the shallow chute at the bottom and down
climb the last 10 feet but this will not be the case with most
people.
After the long narrow down climb is easy wash walking with a few
easy down climbs.
Rap 13 (dForgeR13 ) is the last rap and is about 0.2 miles down
canyon of the long narrow down climb. Rap 13 is anchored from a
medium sized rock at the top of the rappel. Rap 13 drops 30 feet.
About 500 feet after rap 13, the canyon begins to widen and you can
see you are nearing the end of the technical section (yForgeBt).
The Exit:
After exiting the canyon (yForgeBt) walk across the alluvial fan of
Forge Canyon. Looking down canyon to south west you will see a
large hill in the middle of the alluvial fan. Stay right (north) to
skirt around the north side of the hill.
Once around the hill you will be able to see highway 178 (Badwater
Road) a little over 0.8 miles to the west. Make your way across the
alluvial fan to the exit vehicle to complete the route.
Downloadable GPX files
available at
BG-Gear Store
(easier than manual entry and a great way to support
Bluugnome).
Waypoint naming convention and map symbol information can be found on the Glossary page.
Elevations are approximate.
BEFORE
manually entering coordinates set your system to WGS84 datum and Lat/Lon hddd.ddddd° coordinate format.
Inconsistent datum's and coordinate formats will result in location errors.
Click to show / expand the list of waypoints below........
| Forge Canyon 1 - Drive to Exit Vehicle Parking |
- sBadWater282
Lat/Lon (WGS84): N 36.23001
W -116.76791
Elev: -282 Feet
Sign at Bad Water Stating 282 feet below sea level
- pkForgeBt
Lat/Lon (WGS84): N 35.98406
W -116.73418
Elev: -180 Feet
Park vehicle along side of road here as the escape pod from Forge Canyon.
|
| Forge Canyon 2 - Drive to Upper Trailhead |
- sBadWater282
Lat/Lon (WGS84): N 36.23001
W -116.76791
Elev: -282 Feet
Sign at Bad Water Stating 282 feet below sea level
- pkForgeBt
Lat/Lon (WGS84): N 35.98406
W -116.73418
Elev: -180 Feet
Park vehicle along side of road here as the escape pod from Forge Canyon.
- extFrnCk-178
Lat/Lon (WGS84): N 35.96640
W -116.36372
Elev: 2,100 Feet
Hwy 178 and Furnace Creek Wash Rd
- extTwrdGoldVly
Lat/Lon (WGS84): N 36.05575
W -116.50741
Elev: 3,090 Feet
Turn off of Furnace Creek Wash road (Greenwater Valley road) toward Gold Valley.
- extGoldValley1
Lat/Lon (WGS84): N 36.05790
W -116.55112
Elev: NaN Feet
Turn left here to go toward Gold Valley, Black Smith trailhead or Willow Canyon trailhead.
- extGoldValley2
Lat/Lon (WGS84): N 36.02142
W -116.62266
Elev: 4,243 Feet
Turn right here to go toward Gold Valley, Black Smith trailhead or Willow Canyon trailhead. Left is shorter to Black Smith TH but rougher.
- extGoldValley3
Lat/Lon (WGS84): N 36.04561
W -116.65862
Elev: NaN Feet
Turn right here to go toward Willow Canyon. Turn left to go to Black Smith trailhead.
- tBlckSmithCyns
Lat/Lon (WGS84): N 36.02642
W -116.64468
Elev: 3,813 Feet
Spot to pull over along the dirt road. This is the start trailhead for some of the canyons in the Smith Mountain area named with the Black Smith Theme.
|
| Forge Canyon 3 - Approach |
- tBlckSmithCyns
Lat/Lon (WGS84): N 36.02642
W -116.64468
Elev: 3,813 Feet
Spot to pull over along the dirt road. This is the start trailhead for some of the canyons in the Smith Mountain area named with the Black Smith Theme.
- wBlckSmthRP-01
Lat/Lon (WGS84): N 36.02573
W -116.66427
Elev: 4,130 Feet
A large flat rock about waist high to set packs etc on. Makes a good break spot before ascending the canyon to the saddle.
- wBlckSmthRP-02
Lat/Lon (WGS84): N 36.02417
W -116.67476
Elev: NaN Feet
This is the bottom of a rock fall area. Climb high on the left side as you ascend to bypass the rock fall. Drop back to the canyon floor about 500 feet up canyon.
- wBlckSmthRP-03
Lat/Lon (WGS84): N 36.02175
W -116.68098
Elev: 5,320 Feet
Saddle at the top of the canyon. To the west is a good view of the start of Shoestring Canyon. Telescope Peak looks good way off in the distance looking beyond Shoestring.
- yForgeTp
Lat/Lon (WGS84): N 36.01912
W -116.68132
Elev: 5,502 Feet
Top Entry to Forge Canyon. This is on a saddle at the top of the canyon. Access to Smith Mountain is up a ridge from this point if you want to bag the peak.
|
| Forge Canyon 4 - Canyon and Exit |
- yForgeTp
Lat/Lon (WGS84): N 36.01912
W -116.68132
Elev: 5,502 Feet
Top Entry to Forge Canyon. This is on a saddle at the top of the canyon. Access to Smith Mountain is up a ridge from this point if you want to bag the peak.
- wForgeRP-01
Lat/Lon (WGS84): N 36.01340
W -116.68296
Elev: 4,530 Feet
Down Climb of about 15 feet. Lowering packs here is a good idea.
- wForgeRP-02
Lat/Lon (WGS84): N 36.01093
W -116.68415
Elev: 4,320 Feet
Big drop in canyon. Climb around LDC to a steep slope of loose med and large rocks to bypass.
- wForgeRP-03
Lat/Lon (WGS84): N 36.00644
W -116.68722
Elev: 3,650 Feet
Second big drop in Forge Canyon. Down climb along a series of drops RDC.
- dForgeR1
Lat/Lon (WGS84): N 35.99731
W -116.69665
Elev: 2,720 Feet
Rap 1 in Forge Canyon. Drops 200 feet and anchored from a cairn style anchor.
- dForgeR2
Lat/Lon (WGS84): N 35.99669
W -116.69770
Elev: NaN Feet
Rap 2 in Forge Canyon. Uses 110 feet of rope and drops over a series of ledges. Anchored from a small boulder protruding from the ground.
- dForgeR3
Lat/Lon (WGS84): N 35.99646
W -116.69844
Elev: NaN Feet
Raps 3 in Forge Canyon. Drops 65 feet down smooth almost vertical wall. Anchored from large rock lying at top of rappel.
- dForgeR4
Lat/Lon (WGS84): N 35.99644
W -116.69898
Elev: 2,235 Feet
Rap 4 in Forge Canyon. Drops 70 feet with the last 50 being vertical. Anchored from one of a few large rocks at the top of the rap.
- dForgeR5
Lat/Lon (WGS84): N 35.99656
W -116.69918
Elev: 2,162 Feet
Rap 5 in Forge Canyon. Drops 50 feet and is anchored from a cairn style anchor.
- dForgeR6
Lat/Lon (WGS84): N 35.99518
W -116.70197
Elev: 1,940 Feet
Rap 6 in Forge Canyon. Anchored from a large rock feature LDC and drops about 30 feet.
- dForgeR7
Lat/Lon (WGS84): N 35.99489
W -116.70465
Elev: NaN Feet
Rap 7 in Forge Canyon. Drops 50 down sloped wall and anchored from cairn style anchor.
- dForgeR8-10
Lat/Lon (WGS84): N 35.99466
W -116.70583
Elev: NaN Feet
Raps 8, 9 and 10 in Forge Canyon.
Rap 8 by black stripe on wall, anchored from large rock and drops 40 feet down rough wall.
Rap 9 drops 80 feet and is anchored by a rock at top of rappel.
Rap 10 anchored from a cairn anchor and drops 150 feet over 3 stages, difficult rope pull. The total rope length needed is about 190 feet.
- dForgeR11
Lat/Lon (WGS84): N 35.99343
W -116.70581
Elev: NaN Feet
Rap 11 in Forge Canyon. Drops 15 feet and anchored from small rock feature LDC. It can be down climbed but will be awkward.
- dForgeR12
Lat/Lon (WGS84): N 35.99237
W -116.70634
Elev: 1,110 Feet
Rap 12 in Forge Canyon. Anchored from a cairn anchor and drops about 60 feet over a couple pot holes.
- wForgeRP-04
Lat/Lon (WGS84): N 35.98994
W -116.71002
Elev: 820 Feet
Long narrow down climb with near vertical end of about 10 feet.
- dForgeR13
Lat/Lon (WGS84): N 35.98865
W -116.71303
Elev: 590 Feet
Rap 13 in Forge Canyon. Anchored from a medium sized rock at the top of the rappel and drops about 30 feet.
- yForgeBt
Lat/Lon (WGS84): N 35.98838
W -116.71429
Elev: 510 Feet
Bottom exit from Forge Canyon. This is where the canyon widens out and it is obvious you are done with the technical stuff.
- pkForgeBt
Lat/Lon (WGS84): N 35.98406
W -116.73418
Elev: -180 Feet
Park vehicle along side of road here as the escape pod from Forge Canyon.
|