Canyoneering Route Description
Buttercup Canyon - 3A III
Death Valley National Park,
California.
02-09-13, 7 people, 1 Day (Travel time in route 8.5 hours)
 Via the North Approach not the South Approach.
11-17-13, 3 people, 1 Day (Travel time in route 12.5 hours) --
Time for doing BOTH Buttercup and Humperdinck Canyons.
Time Required - 7.5 to 9.5 hours
Distance - 6.1 miles Total, 0.3 miles Technical
Rappels - 6 Rappels, Longest Rappel 200 feet.
Elevation Range - 210 - 1790 Feet
Shuttle Required - No Vehicle - High Clearance, 4WD
Permit Required - No
Rappelling and anchor gear, Ropes and or pull cords for rappels up
to 200 feet and 70 feet of 1 inch webbing for sling placement.
A compass and or a GPS can be very useful to point you toward your
cars on the exit. The exit involves about 2 miles of walking
the open desert and the cars will not be in sight. See the
exit details for more info.
The Princes Bride area is a collection of canyons north of
Stovepipe Wells in the Cottonwood Mountains on the Panamint Range. The
Princess Bride Collection offers a few fun semi short canyons. But you do
need a high clearance 4WD vehicle to safely go enjoy them.
Thanks to Scott Swaney for locating these canyons,
initiating the explorations of them and freely sharing the information.
Parking spots are limited and the spots are only large
enough for one or two vehicles. When driving out to the Princess Bride
Canyons try to leave excess vehicles at Stovepipe Wells and take only one or
two vehicles to the parking spot to start the canyons. When choosing
vehicles it is best to use the ones with 4WD and some clearance since there
are a couple spots with deep rutted sand.
The vehicles will likely not be visible after exiting
the canyon and you walk back across the desert toward them. A GPS or a
compass and map can be very helpful to get you pointed back to the cars
after exiting the canyon. If you follow the natural flow of the open
desert and the wash like areas, you may find yourself wandering off course.
Buttercup Canyon uses the the South Approach route.
Buttercup Canyon is a short canyon worth visiting but did not seem to stand
out as an awesome place.
Note:
There are two approach
routes used for the
Princess Bride Canyons,
North Approach or South
Approach. While
each approach route
keeps the distance to a
minimum for specific
canyons, either approach can be
used to access any of
the Princess Bride
Canyons. There is an easy
0.7 mile route
connecting the upper
ends of the approaches
running between the tops
of Fire Swamp and
Inconceivable Canyons.
The North Approach is
best used for;
Pit of Despair,
Cliffs of Insanity and Fire Swamp
Canyons.
The South Approach is
best used for;
Inconceivable, Buttercup,
Humperdinck,
Prepare to Die
and Miracle Max Canyons.
Travel from upper end of
North Approach to upper
end of South Approach:
To travel from Fire
Swamp to Inconceivable
route find your way
south about 0.2 miles to
a saddle
(wP-BrideCct01).
From the saddle route
find your way down the
slope south about 350
feet down into a wash
(wP-BrideCct02)
traveling down to the
south. About 900
feet down the drainage
is a confluence where
side drainage join from
east and west
(wP-BrideCct03).
Of note the drainage
going east from here
leads up to the top of
what looks like a steep
canyon running down the
face of the mountain
when viewed from the
valley floor.
Continue south down the
main wash about 500 feet
passing another drainage
joining in from the west
(wP-BrideCct04).
Follow the drainage
south about 0.2 miles to where it bends
and begins to travel
almost due east (InconceivableTp).
This is the top of
Inconceivable Canyon and
is the upper end of the
South Approach route.
Travel from upper end of
South Approach to upper
end of North Approach:
To travel from the top
of Inconceivable to the
top of Fire Swamp, walk
north up the
Inconceivable drainage
about 0.2 miles to where
a small side drainage
joins in from the west
(wP-BrideCct04).
Continue north up the
drainage about 500 feet
to where a couple side
drainage join from east
and west
(wP-BrideCct03).
Of note the drainage
going east from here
leads up to the top of
what looks like a steep
canyon running down the
face of the mountain
when viewed from the
valley floor.
Continue north up the
drainage about 900 feet
to the upper end of the
wash (wP-BrideCct02).
Travel north up the
slope about 350 feet to
a saddle
(wP-BrideCct01).
Thee route find your way
north about 0.2 miles
down to the top of Fire
Swamp Canyon
(yFireSwampTp).
To get to the Trailhead
The drive directions start from the gas station in Stovepipe
Wells Death Valley. Stovepipe Wells is a small community
on Highway 190 about mid way between Panamint Springs and
Furnace Creek.
From the convenience store / gas station in Stovepipe Wells (wStovpipeStore)
look for the paved road on the southwest side of the store that
leads west away from highway 190 which leads out toward Marble
and Cottonwood Canyons (Cottonwood Canyon Road). Drive west on the road
passing the camp ground along the way.
About 0.5 miles from highway 190 will be a fork in the road (ExtStovAirStrp).
The fork to the left goes over to an airstrip and is paved.
Stay right at this fork and travel on the dirt road going west.
Note:
Be aware that a few spots early on in this road have deep sand
with ruts that will give some vehicles trouble. High clearance
4WD is recommended for travel on this dirt road. Road
conditions do change depending on rains, vehicular traffic and
if the roads have been graded recently. While it is possible to
get passenger vehicles with all wheel drive through the sand it
is not recommended. A vehicle with clearance is helpful to get
through the deep rutted sections. The 4WD may not be used most
of the time but with the sand it could make the difference
between being stuck and being able to pull through a rough patch
Follow the dirt road west about 5 miles to where it bends to the
right to the northwest (Pk-PrBrideS). This bend in the
road is a good place to park if you are following the South
Approach route.
If you are going to be following the North Approach route,
continuing past the bend about 0.4 miles to a wide spot in the
road where you can park a couple vehicles (Pk-PrBrideN).
Note:
There are various turnouts or wide spots in the road which are
generally intended to be used for vehicles to pass one another
and are only large enough for one or two cars to park. The
locations of the wide spots will change over time depending on what is done
each time the the road is grated.
To leave the Exit Vehicle / Escape Pod
No exit vehicle is needed. This is done as an out and back
route.
GPS coordinate information listed at the bottom. For information about waypoint naming and map symbols, refer to the
Glossary page.

Click the links for maps of the route.
Map of the drive into the route.
Map of the entire route.
Map of the technical section.
The Approach:
From the parking spot (Pk-PBrideS)
begin the South Approach
by walking southwest
across open desert.
To follow the South
Approach walk southwest
across open desert on a
bearing of about 204
degrees (true) toward
the bottom of a ridge
about 2.25
miles away. From
the parking area the
ridge to aim for is
toward the south end of
the visible range. The
picture below will help.
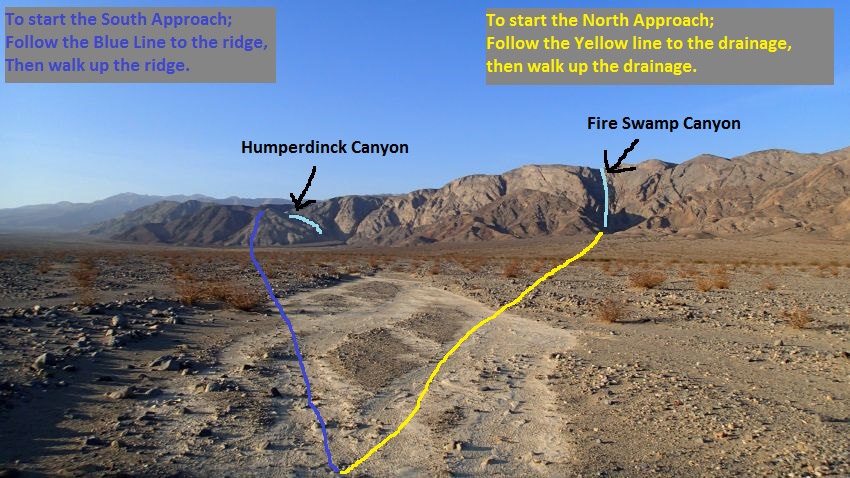
Follow the Yellow line to the drainage to begin the North Approach. Follow the Blue line to
the ridge start the South Approach.
This view is from
the parking spot for
South Approach
route. The
view will be
slightly different
from the parking
spot for the North
Approach route.
About 2.25 miles after
leaving the parking spot
is the base of the ridge
(wP-BrideS-01) you will
start to travel up.
Start walking southwest
up the steep ridge.
After about 0.37 miles
the ridge tops out
(wP-BrideS-02) about 700
feet higher than the
base. The canyon on the
right (northwest) of
this top out is
Humperdinck Canyon.
From the top out
continue southwest down
the other side toward a
saddle (jPBrideS) about
330 feet away.
Note:
The saddle (jPBrideS) is
where you will choose a
direction depending on
your chosen route.
If you are going to
Miracle Max or Prepare
to Die Canyons you will
follow up the ridge to
the southwest. If
you plan to do
Humperdinck, Buttercup
or Inconceivable Canyons
you will drop down the
west side of the
saddle down the steep
slope into the
Humperdinck drainage.
To continue to
Humperdinck, Buttercup
or Inconceivable Canyon
drop down the steep
slope on the west side
of the saddle down into
the drainage for
Humperdinck Canyon
(yHumperdinkTp).
To continue to Buttercup
and Inconceivable
Canyons cross
Humperdinck Canyon then
start going up the steep
slope on the west side.
About 450 feet up the
slope is a level-ish
spot on the slope
(wP-BrideS-03).
Continue northwest up
the slope.
About 900 feet farther
up the slope is the top
of a crappy looking
canyon / drainage
(wP-BrideS-04) that runs
down to the northeast.
Continue northwest up
the slope.
About 250 feet farther
up the slope is a top
out (wP-BrideS-05).
From this top out a
gentle ridge runs up to
the west. Do not
follow up the ridge.
Instead continue
northwest contouring
down and over to the
Buttercup drainage about
0.2 miles away northwest
on a bearing of about
330 degrees (true).
The walk over to the
Buttercup drainage is
easy and fairly
intuitive as you contour
northwest staying above
the cliff band dropping
off to the south.
After dropping down into
the Buttercup Drainage
walk east down the wash
a short distance to
where the canyon begins
to drop fast (yButtercupTp).
The Canyoneering / Technical Section:
Where the canyon
starts to drop fast (yButtercupTp)
it is a wide open steep
rock area. Route
find and downclimb your
way down this section.
As you get down the
first series of drops
you will start to notice
an obvious ledge on the
LDC side just above a
coupe of short drops to
small sandy flat spots.
Make your way down to
the ledge above the two
drops then bypass those
two short drops by
scrambling up and over
to the right (south).
As you make your way
down the steeply sloped
rock to bypass the short
drops make your way down
to a small flat sandy
area at the top of a
very big drop.
That sandy spot is where
you will find the anchor
for rap 1.
Rap 1 (dButtercupR1) is
about 250 feet down
canyon from the head, is
anchored from a cairn
anchor in a flat sandy
hole and drops about 200
feet down a slightly
sloped wall with lots of
loose rock. Be
careful not to knock
rock down on your
partners or the rope
below.
Down canyon of rap 1 are
a couple short easy
downclimbs and one easy
downclimb of 12 to 15
feet.
Rap 2 (dButtercupR2) is
about 350 feet down
canyon of rap 1, is
anchored from a cairn
style anchor and drops
about 40 feet down a
gently sloped wall.
Just after rap 2 are 3
downclimbs of about 15
feet each. The
first of the downclimbs
may be a little
difficult and is best
downclimbed on the RDC
side. Mixed in
with the downclimbs is a
pot hole of about 5 feet
deep.
Rap 3 (dButtercupR3) is
about 200 feet down
canyon of rap 2, is
anchored from a cairn
style anchor on the LDC
side and uses about 100
feet of rope travel
going over two stages.
Right after is a dc of
15 to 20 feet stem style
with slick rock making
it more difficult
followed by another
downclimb of about 8
feet over a boulder.
Rap 4 (dButtercupR4-5)
is about 70 feet down
canyon of the bottom of
rap 3, is anchored from
a pinch point in a pile
of boulders and drops
about 90 feet down a
vertical chute.
Rap 5 is right at the
bottom of rap 4, is
anchored from a pinch
point formed by a large
boulder and the RDC
canyon wall and begins
by rappelling down
through a rabbit hole
under the large boulder.
Rap 5 drops about 35
feet to a ledge under
the boulder then
continues down a sloped
wall using a total of
190 feet of rope.
From the top of rap 5
the view is deceiving
and it looks like a 200
foot rope will not reach
but it does.
Rap 6 is about 40 feet
down canyon of the
bottom of rap 5 anchored
from a rock pile about
30 feet back from the
drop and will use about
130 feet of rope travel
from anchor to ground.
The last 50 feet of rap
6 can be easily
downclimbed.
A few hundred feet of
wash walking and light
boulder hopping gets you
to a side canyon
dropping in from RDC
down a section of white
rock and with a slot
running down through it.
That white rock section
is the bottom of
Humperdinck Canyon where
it dumps into Buttercup
Canyon (yButterHumpBt).
The Exit:
From the
bottom of Humperdinck
Canyon (yButterHumpBt)
continue down the
Buttercup drainage that
soon starts cutting
through a slot carved
down into a conglomerate
layer. The
conglomerate slot is a
very pretty section of
the canyon with nothing
technical but a couple 3
foot scrambles.
About 0.2 miles down
canyon of where
Humperdinck joined in is
the confluence where
Inconceivable Canyon
joins in (yIncnceiveBt)
from the left (west).
Continue northeast down
the Buttercup drainage
still in the deep
conglomerate slot.
As you pass the
confluence of
Inconceivable Canyon the
conglomerate slot you
are in will gradually
get wider. About
0.27 miles past the
confluence of
Inconceivable Canyon the
conglomerate slot is
coming to an end and is
very wide. When
you get to a point where
the side walls of the
slot are only about 10
feet high (jP-BrideExt)
you will be greeted with
open desert ahead to the
north east. As you
exit the conglomerate
slot you will want to
walk back to your cars
but they will not be in
sight.
From the end of the
conglomerate slot (jP-BrideExt)
the cars are about 1.9
miles away and not in
view. If you have
GPS you can plot a go to
for the waypoint where
you parked your cars and
go for it.
Note -
Navigation Hint:
From the exit of the
conglomerate slot
walking directly toward
the cars will have you
walking across the
alluvial fan and will be
tedious walking.
The easiest walking for
the exit is to veer
right (north east) and
walk out toward the more
flat wash systems then
follow them north back
to the car. This
will save you from too
much tedious walking.
However doing this with
nothing to point you
toward the cars could
end you you wandering
the desert for a while
since the washes are
wide and wondering and
the cars or road are not
visible until you get
pretty close to them.
If you have a compass
you can set a course of
18 degrees magnetic
north (which is 31
degrees true north here)
to be pointed directly
at the cars.
To navigate back to the
cars visually you can
use the mountain range
way off in the distance
to the north.
Looking at the mountain
range locate the pointed
peak in the image below
which is Thimble Peak.
Look for the dip along
the range to the left of
Thimble Peak then aim
for the left side of the
dip. The image
below will make this
more clear.
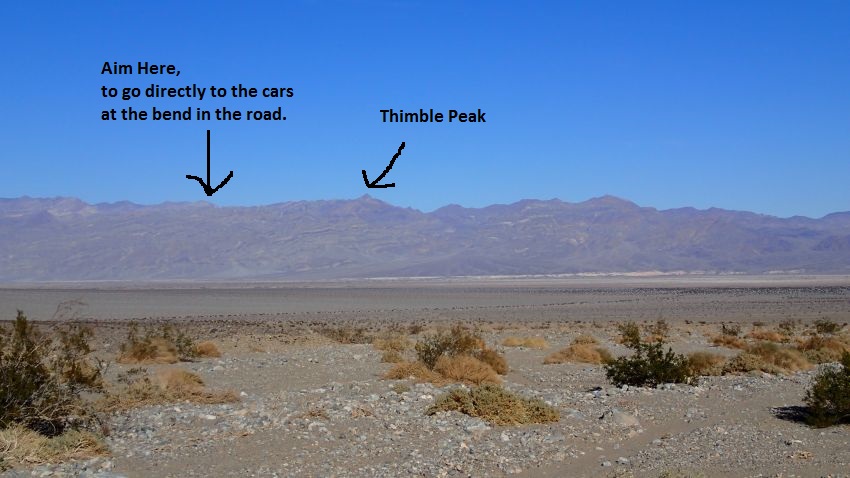
When you exit the
conglomerate slot you
can visually navigate to
the cars by locating the
point noted in the
picture and walking a
straight line to it.
Which ever method you
chose to navigate back,
walk 1.9 miles to the
cars to complete the
route (Pk-PBrideS).
Downloadable GPX files
available at
BG-Gear Store
(easier than manual entry and a great way to support
Bluugnome).
Waypoint naming convention and map symbol information can be found on the Glossary page.
Elevations are approximate.
BEFORE
manually entering coordinates set your system to WGS84 datum and Lat/Lon hddd.ddddd° coordinate format.
Inconsistent datum's and coordinate formats will result in location errors.
Click to show / expand the list of waypoints below........
| Buttercup Canyon (1) - Drive in to Trailhead |
- wStovpipeStore
Lat/Lon (WGS84): N 36.60663
W -117.14688
Elev: 0 Feet
Convenience store / gas station at Stove Pipe Wells.
- ExtStovAirStrp
Lat/Lon (WGS84): N 36.60696
W -117.15503
Elev: NaN Feet
Turn off to go over to an airstrip. To drive out toward the Marble and Cottonwood Canyon area stay left at the fork to drive west.
- Pk-PBrideS
Lat/Lon (WGS84): N 36.61036
W -117.24602
Elev: 210 Feet
A bend to the right while driving the road out toward Marble Canyon. If following the South Approach route to the Princess Bride Canyons park hear near the bend in the road.
|
| Buttercup Canyon (2) - Approach |
- Pk-PBrideS
Lat/Lon (WGS84): N 36.61036
W -117.24602
Elev: 210 Feet
A bend to the right while driving the road out toward Marble Canyon. If following the South Approach route to the Princess Bride Canyons park hear near the bend in the road.
- wP-BrideS-01
Lat/Lon (WGS84): N 36.58107
W -117.26235
Elev: 640 Feet
Bottom of the ridge to start the climb up the South Approach for the Princess Bride Canyons.
- wP-BrideS-02
Lat/Lon (WGS84): N 36.57768
W -117.26737
Elev: 1,440 Feet
Top out on the first ridge of the South Approach. Continue southwest down the other side of the top out.
- jPBrideS
Lat/Lon (WGS84): N 36.57685
W -117.26773
Elev: 1,410 Feet
A saddle about 330 feet after going over a peak along the ridge.
To go to Humperdinck, Buttercup or Inconceivable Canyons drop down the steep slope to the north west down into Humperdinck Canyon.
To go to Miracle Max or Prepare to Die Canyons continue southwest up along the ridge.
- yHumperdinkTp
Lat/Lon (WGS84): N 36.57689
W -117.26846
Elev: 1,330 Feet
Top of Humperdinck Canyon. At this point the dranage is a wide wash with little to nothing of interest above here. To drop down Humerdinck Canyon travel north down the wash. If you are continuing to Buttercup of Inconceivable Canyons cross the wash and start up the steep slope to the west.
- wP-BrideS-03
Lat/Lon (WGS84): N 36.57765
W -117.26968
Elev: 1,470 Feet
A levelish spot along the slope up out of Humperdinck Canyon on the way to Buttercup and Inconceivable Canyons.
- wP-BrideS-04
Lat/Lon (WGS84): N 36.57904
W -117.27219
Elev: 1,755 Feet
Top of a crappy looking canyon / draiange running down to the northeast. Continue northwest up the slope.
- wP-BrideS-05
Lat/Lon (WGS84): N 36.57952
W -117.27271
Elev: 1,790 Feet
Slope tops out here. To continue to Buttercup and Inconceivable Canyons continue northwest contouring down to the Buttercup drainage about 0.2 miles northwest.
- yButtercupTp
Lat/Lon (WGS84): N 36.58211
W -117.27378
Elev: 1,665 Feet
Top of Buttercup Canyon. This where the canyon starts to drop steeply down with wide open flat wash up canyon of here.
|
| Buttercup Canyon (3) - The Canyon and Exit |
- yButtercupTp
Lat/Lon (WGS84): N 36.58211
W -117.27378
Elev: 1,665 Feet
Top of Buttercup Canyon. This where the canyon starts to drop steeply down with wide open flat wash up canyon of here.
- dButtercupR1
Lat/Lon (WGS84): N 36.58166
W -117.27318
Elev: 1,490 Feet
Rap 1 - Buttercup Canyon. Is about 250 feet down canyon from the head, is anchored from a cairn anchor in a flat sandy hole and drops about 200 feet down a slightly sloped wall with lots of loose rock. Be careful not to knock rock down on your partners or the rope below.
- dButtercupR2
Lat/Lon (WGS84): N 36.58179
W -117.27191
Elev: NaN Feet
Rap 2 - Buttercup Canyon. Is about 350 feet down canyon of rap 1, is anchored from a cairn style anchor and drops about 40 feet down a gently sloped wall. Just after rap 2 are 3 downclimbs of about 15 feet each. The first of the downclimbs may be a little difficult and is best downclimbed on the RDC side.
- dButtercupR3
Lat/Lon (WGS84): N 36.58204
W -117.27125
Elev: NaN Feet
Rap 3 - Buttercup Canyon. Is about 200 feet down canyon of rap 2, is anchored from a cairn style anchor on the LDC side and uses about 100 feet of rope travel going over two stages. Right after is a dc of 15 to 20 feet stem style with slick rock making it more difficult followed by another downclimb of about 8 feet over a boulder.
- dButtercupR4-5
Lat/Lon (WGS84): N 36.58215
W -117.27059
Elev: NaN Feet
Raps 4 and 5 - Buttercup Canyon.
Rap 4 is about is about 70 feet down canyon of the bottom of rap 3, is anchored from a pinch point in a pile of boulders and drops about 90 feet down a vertical chute.
Rap 5 is right at the bottom of rap 4, is anchored from a pinch point formed by a large boulder and the RDC canyon wall and begins by rappelling down through a rabbit hole under the large boulder. Rap 5 drops about 35 feet to a ledge under the boulder then continues down a sloped wall using a total of 190 feet of rope. From the top of rap 5 the view is deceiving and it looks like a 200 foot rope will not reach but it does.
- dButtercupR6
Lat/Lon (WGS84): N 36.58237
W -117.26995
Elev: NaN Feet
Rap 6 - Buttercup Canyon. Is about 40 feet down canyon of the bottom of rap 5, anchored from a rock pile about 30 feet back from the drop and will use about 130 feet of rope travel from anchor to ground. The last 50 feet of rap 6 can be easily downclimbed.
- yButterHumpBt
Lat/Lon (WGS84): N 36.58270
W -117.26890
Elev: 735 Feet
Bottom of Humperdinck Canyon where it drops into the side of Buttercup Canyon. This also below the end of the technical portion of Buttercup Canyon.
- yIncnceiveBt
Lat/Lon (WGS84): N 36.58528
W -117.26697
Elev: 635 Feet
Confluence of the Buttercup and Inconceivable Draianges. This is in a deep slot carved through conglomerate rock.
- jP-BrideExt
Lat/Lon (WGS84): N 36.58765
W -117.26333
Elev: 560 Feet
This is where the conglomerate slot is now very wide and comming to and end the side walls are about 10 feet high on both sides.
- Pk-PBrideS
Lat/Lon (WGS84): N 36.61036
W -117.24602
Elev: 210 Feet
A bend to the right while driving the road out toward Marble Canyon. If following the South Approach route to the Princess Bride Canyons park hear near the bend in the road.
|