Canyoneering Route Description
Miracle Max Canyon - 3A III
Death Valley National Park,
California.
01-18-14, 4 people, 1 Day (Travel time in route 7.5 hours)

Time Required - 6 to 8 hours
Distance - 9.0 miles Total, 0.6 miles Technical
Rappels - 4 Rappels, Longest Rappel 150 feet.
Elevation Range - 210 - 2050 Feet
Shuttle Required - No Vehicle - High Clearance, 4WD
Permit Required - No
Rappelling and anchor gear, Ropes and or pull cords for rappels up
to 150 feet and 60 feet of 1 inch webbing for sling placement. The
large amount of webbing recommended for only 4 rappels is due to the
possibility of ALL anchors getting washed out.
The Princes Bride area is a collection of canyons north of
Stovepipe Wells in the Cottonwood Mountains on the Panamint Range. The
Princess Bride Collection offers a few fun semi short canyons. But you do
need a high clearance 4WD vehicle to safely go enjoy them.
Thanks to Scott Swaney for locating these canyons,
initiating the explorations of them and freely sharing the information.
Parking spots are limited and the spots are only large
enough for one or two vehicles. When driving out to the Princess Bride
Canyons try to leave excess vehicles at Stovepipe Wells and take only one or
two vehicles to the parking spot to start the canyons. When choosing
vehicles it is best to use the ones with 4WD and some clearance since there
are a couple spots with deep rutted sand.
The vehicles will likely not be visible after exiting
the canyon and you walk back across the desert toward them. A GPS or a
compass and map can be very helpful to get you pointed back to the cars
after exiting the canyon. If you follow the natural flow of the open
desert and the wash like areas, you may find yourself wandering off course.
Miracle Max Canyon uses the the South Approach route.
The technical section of Miracle Max Canyon has only 4 rappels and no
challenging downclimbs. All the rappels are in a section of canyon
less than 400 feet long. Do not let the lack of technical fun and
challenges deter you from enjoying this route. Miracle Max is
extremely scenic and worth visiting! For scenic value I highly
recommend Miracle Max Canyon.
Warning!!
I know of two parties that have visited Miracle Max Canyon less than a year
prior to my first visit here. All the way through the canyon we found
ZERO evidence of anchors. The water catchment area above Miracle Max
Canyon is huge which can lead to big floods when the area does get rains.
With this comes the possibility of having all anchors washed out leaving no
trace of previous parties. What this means to you is to always be
prepared to rig brand new anchors for the rappels. Miracle Max Canyon
uses cairn anchors using rocks found in the canyon. It is a very good
idea to send down one person on each rappel to investigate the availability
of anchor materials (rocks). If flooding has washed away anchor
materials you will need to farm them from above or below the rappel.
Those left at the top can throw rocks down if needed.
Note:
There are two approach
routes used for the
Princess Bride Canyons,
North Approach or South
Approach. While
each approach route
keeps the distance to a
minimum for specific
canyons, either approach can be
used to access any of
the Princess Bride
Canyons. There is an easy
0.7 mile route
connecting the upper
ends of the approaches
running between the tops
of Fire Swamp and
Inconceivable Canyons.
The North Approach is
best used for;
Pit of Despair,
Cliffs of Insanity and Fire Swamp
Canyons.
The South Approach is
best used for;
Inconceivable, Buttercup,
Humperdinck,
Prepare to Die
and Miracle Max Canyons.
Travel from upper end of
North Approach to upper
end of South Approach:
To travel from Fire
Swamp to Inconceivable
route find your way
south about 0.2 miles to
a saddle
(wP-BrideCct01).
From the saddle route
find your way down the
slope south about 350
feet down into a wash
(wP-BrideCct02)
traveling down to the
south. About 900
feet down the drainage
is a confluence where
side drainage join from
east and west
(wP-BrideCct03).
Of note the drainage
going east from here
leads up to the top of
what looks like a steep
canyon running down the
face of the mountain
when viewed from the
valley floor.
Continue south down the
main wash about 500 feet
passing another drainage
joining in from the west
(wP-BrideCct04).
Follow the drainage
south about 0.2 miles to where it bends
and begins to travel
almost due east (InconceivableTp).
This is the top of
Inconceivable Canyon and
is the upper end of the
South Approach route.
Travel from upper end of
South Approach to upper
end of North Approach:
To travel from the top
of Inconceivable to the
top of Fire Swamp, walk
north up the
Inconceivable drainage
about 0.2 miles to where
a small side drainage
joins in from the west
(wP-BrideCct04).
Continue north up the
drainage about 500 feet
to where a couple side
drainage join from east
and west
(wP-BrideCct03).
Of note the drainage
going east from here
leads up to the top of
what looks like a steep
canyon running down the
face of the mountain
when viewed from the
valley floor.
Continue north up the
drainage about 900 feet
to the upper end of the
wash (wP-BrideCct02).
Travel north up the
slope about 350 feet to
a saddle
(wP-BrideCct01).
Thee route find your way
north about 0.2 miles
down to the top of Fire
Swamp Canyon
(yFireSwampTp).
To get to the Trailhead
The drive directions start from the gas station in Stovepipe
Wells Death Valley. Stovepipe Wells is a small community
on Highway 190 about mid way between Panamint Springs and
Furnace Creek.
From the convenience store / gas station in Stovepipe Wells (wStovpipeStore)
look for the paved road on the southwest side of the store that
leads west away from highway 190 which leads out toward Marble
and Cottonwood Canyons (Cottonwood Canyon Road). Drive west on the road
passing the camp ground along the way.
About 0.5 miles from highway 190 will be a fork in the road (ExtStovAirStrp).
The fork to the left goes over to an airstrip and is paved.
Stay right at this fork and travel on the dirt road going west.
Note:
Be aware that a few spots early on in this road have deep sand
with ruts that will give some vehicles trouble. High clearance
4WD is recommended for travel on this dirt road. Road
conditions do change depending on rains, vehicular traffic and
if the roads have been graded recently. While it is possible to
get passenger vehicles with all wheel drive through the sand it
is not recommended. A vehicle with clearance is helpful to get
through the deep rutted sections. The 4WD may not be used most
of the time but with the sand it could make the difference
between being stuck and being able to pull through a rough patch
Follow the dirt road west about 5 miles to where it bends to the
right to the northwest (Pk-PrBrideS). This bend in the
road is a good place to park if you are following the South
Approach route.
If you are going to be following the North Approach route,
continuing past the bend about 0.4 miles to a wide spot in the
road where you can park a couple vehicles (Pk-PrBrideN).
Note:
There are various turnouts or wide spots in the road which are
generally intended to be used for vehicles to pass one another
and are only large enough for one or two cars to park. The
locations of the wide spots will change over time depending on what is done
each time the the road is grated.
To leave the Exit Vehicle / Escape Pod
No exit vehicle is needed. This is done as an out and back
route.
GPS coordinate information listed at the bottom. For information about waypoint naming and map symbols, refer to the
Glossary page.

Click the links for maps of the route.
Map of the drive into the route.
Map of the entire route.
Map of the loop section.
Map of the technical section.
The Approach:
From the parking spot (Pk-PBrideS)
begin the South Approach
by walking southwest
across open desert.
To follow the South
Approach walk southwest
across open desert on a
bearing of about 204
degrees (true) toward
the bottom of a ridge
about 2.25
miles away. From
the parking area the
ridge to aim for is
toward the south end of
the visible range. The
picture below will help.
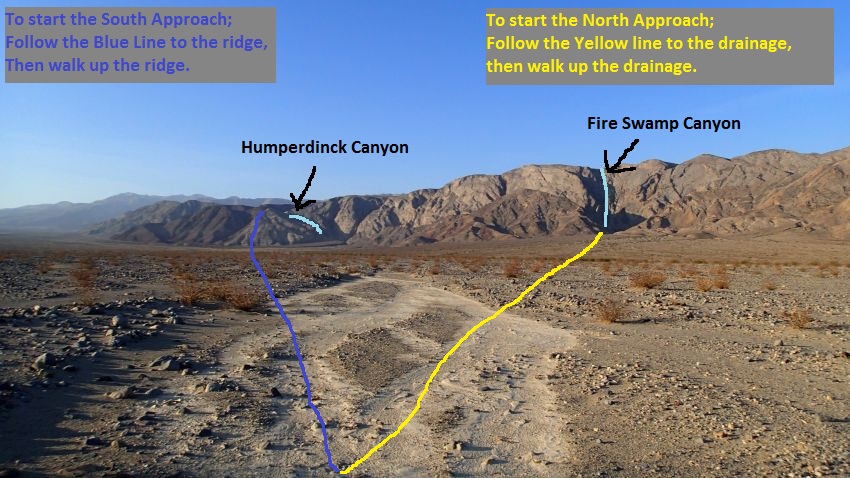
Follow the Yellow line to the drainage to begin the North Approach. Follow the Blue line to
the ridge start the South Approach.
This view is from
the parking spot for
South Approach
route. The
view will be
slightly different
from the parking
spot for the North
Approach route.
About 2.25 miles after
leaving the parking spot
is the base of the ridge
(wP-BrideS-01) you will
start to travel up.
Start walking southwest
up the steep ridge.
After about 0.37 miles
the ridge tops out
(wP-BrideS-02) about 700
feet higher than the
base. The canyon on the
right (northwest) of
this top out is
Humperdinck Canyon.
From the top out
continue southwest down
the other side toward a
saddle (jPBrideS) about
330 feet away.
Note:
The saddle (jPBrideS) is
where you will choose a
direction depending on
your chosen route.
If you are going to
Miracle Max or Prepare
to Die Canyons you will
follow up the ridge to
the southwest. If
you plan to do
Humperdinck, Buttercup
or Inconceivable Canyons
you will drop down the
west side of the
saddle down the steep
slope into the
Humperdinck drainage.
To continue to
Miracle Max Canyon
continue south up the
ridge from the saddle (jPBrideS).
About 0.2 miles from the
saddle the ridge will
become less steep and
level off a little (jPrepareToDie).
When you get to the the
less steep portion of
the ridge you will be
near the head of the
large drainage that has
been on your left and
you will have a view to
the southwest down to a
wide open flat area.
Note:
If you were going to
Prepare to Die Canyon
you would leave the
ridge and drop down
toward the wide open
flat area to the
southwest.
To continue to Miracle
Max Canyon stay on the
ridge and follow it up
to the west. As
you walk the ridge you
should notice a pointed
peak ahead (to the west)
on the ridge about 0.5
miles away which is what
you will be going up to.
Follow the ridge all the
way over to the pointed
peak. As you get
closer to the peak the
route will start to get
very steep. When
you get about 100 or 150
feet from the peak
(wMiracleMxRP01) veer
left and begin to
traverse south just
below the peak to walk
over onto the ridge
running down to the
south.
After you get onto the
ridge running down to
the south walk only a
few hundred feet along
the ridge
(wMiracleMxRP02).
You can pretty much drop
down off this ridge any
time you like and the
sooner the better since
walking in the wash
below will be easier.
Route find your way west
down the dirt and rock
slope down into the very
wide drainage below.
The wide drainage below
to the west is one of
the large drainages
leading down to Miracle
Max.
Once you get down into
the Miracle Max Drainage
(wMiracleMxRP03) walk
south downstream.
About 0.25 miles down
stream is a scramble
down of about 4 feet
followed by some boulder
debris blocking the wash
(wMiracleMxRP04).
It is an easy crawl on
the sand under these
boulders.
About 0.25 miles down
the wash is a confluence
where you drop into
another large wash (yMiracleMaxTp).
This confluence is up
canyon of the technical
stuff and this is where
the canyon starts to
take on a more deep cut
feel.
The Canyoneering / Technical Section:
From the
confluence of large
washes (yMiracleMaxTp)
continue east down
canyon about 0.23 miles
to where the canyon
turns (wMiracleMxRP05)
left to begin heading
north where a side
ravine joins in from the
right (south).
About 300 feet farther
is a scramble down of
about 8 feet
(wMiracleMxRP06).
About 550 feet farther
is a scramble down of
about 4 feet
(wMiracleMxRP07).
About 400 feet farther
is a downclimb of about
8 feet over a choke
stone boulder.
Just after this down
climb the canyon makes a
sharp left as it get to
the top of rap 1.
Near rap 1 is a notch in
the canyon wall where
you can walk up to get a
good view. From
the notch you can see a
small portion of the
lower parts of Miracle
Max then the wash
leading out from the
bottom and you can see
over to the bottom of
Prepare to Die Canyon.
Reminder!
Cairn anchors have been
know to be washed out of
here leaving no trace of
anchors. If
anchors and anchor
material is washed out
from previous flooding
you will need to rebuild
the anchors. Send
someone down to look for
anchors or anchor
material and let those
at the top know if they
need to send down more
rocks for new anchors.
Rap 1 (dMiracleMxR1-2)
is anchored from a large
rock about 20 feet back
and drops about 55 feet
down a slightly sloped
trough. Rap 1 will
need about 75 feet of
rope travel.
Rap 2 is about 50 feet
down canyon of rap 1
with a short 3 foot
scramble between.
Rap 2 is anchored from a
cairn anchor and drops
about 60 feet down a
slightly sloped wall.
Rap 3 is near the bottom
of rap 2, is anchored
from a cairn anchor and
drops about 150 feet
down a vertical wall.
Rap 4 (dMiracleMxR4) is
about 70 feet from the
bottom of rap 3, is
anchored from a cairn
anchor made with very
large rocks and drops
about 105 feet down a
slightly sloped wall.
About 80 feet after rap
4 the wash is wide open
and there is a side
ravine / canyon dropping
in from the left (yMiracleMaxBt).
The Exit:
From the
bottom of Miracle Max (yMiracleMaxBt)
walk east down the wash.
About 600 feet down
canyon is a large wide
ravine joining in on the
LDC (north) side which
is the bottom of Prepare
to Die Canyon
(yPrepar2DieBt).
Continue down the wash
following along the LDC
(north) side.
About 0.35 miles after
passing Prepare to Die
Canyon the wash will
fork (wMiracleMxRP08).
Follow the left fork
following the wash that
wraps around the base of
the mountain and begins
to head north.
About 0.33 miles farther
you will pass by a
yellowish colored point
then see a long and
large ravine running
down the mountain.
About 0.32 miles farther
you will go next to a
more reddish colored
point on the mountain
(wMiracleMxRP09).
As you wrap around the
reddish point you will
begin to see the Funeral
Mountains come into view
to the northeast.
From this reddish point
the cars are 2.72 miles
away and may not be
visible. If you
have a GPS plot a go to
for the waypoint where
you parked your cars and
go for it.
Note -
Navigation Hint:
If you have a compass
you can set a course of
16 degrees magnetic
north (which is 29
degrees true north here)
to be pointed directly
at the cars 2.72 miles
away.
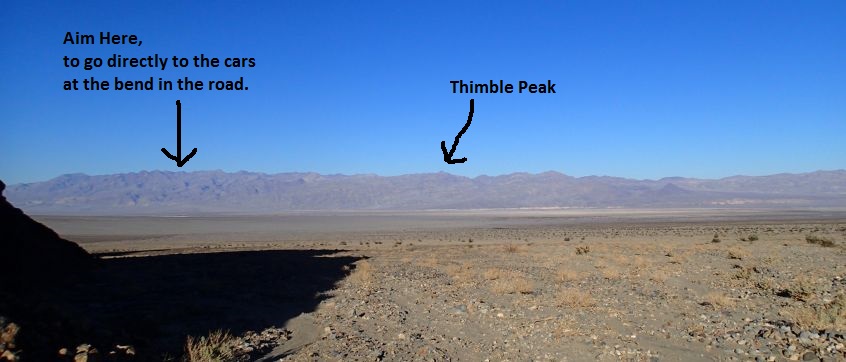
To navigate back to the
cars visually you can
use the Funeral mountain
range way off in the
distance to the
northeast. Looking at
the mountain range
locate the pointed peak
in the image below which
is Thimble Peak. Look
almost to the far left
of the range and note
the region shown in the
image below. Walk
toward that portion of
the mountains 2.72 miles
to get to your car.
When you round the red
point you
can visually navigate to
the cars by locating the
point noted in the
picture and walking a
straight line to it.
Which ever method you
chose to navigate back,
walk 2.72 miles to the
cars to complete the
route (Pk-PBrideS).
Downloadable GPX files
available at
BG-Gear Store
(easier than manual entry and a great way to support
Bluugnome).
Waypoint naming convention and map symbol information can be found on the Glossary page.
Elevations are approximate.
BEFORE
manually entering coordinates set your system to WGS84 datum and Lat/Lon hddd.ddddd° coordinate format.
Inconsistent datum's and coordinate formats will result in location errors.
Click to show / expand the list of waypoints below........
| Miracle Max (1) - Drive in to Traiulhead |
- wStovpipeStore
Lat/Lon (WGS84): N 36.60663
W -117.14688
Elev: 0 Feet
Convenience store / gas station at Stove Pipe Wells.
- ExtStovAirStrp
Lat/Lon (WGS84): N 36.60696
W -117.15503
Elev: NaN Feet
Turn off to go over to an airstrip. To drive out toward the Marble and Cottonwood Canyon area stay left at the fork to drive west.
- Pk-PBrideS
Lat/Lon (WGS84): N 36.61036
W -117.24602
Elev: 210 Feet
A bend to the right while driving the road out toward Marble Canyon. If following the South Approach route to the Princess Bride Canyons park hear near the bend in the road.
|
| Miracle Max (2) - Approach |
- Pk-PBrideS
Lat/Lon (WGS84): N 36.61036
W -117.24602
Elev: 210 Feet
A bend to the right while driving the road out toward Marble Canyon. If following the South Approach route to the Princess Bride Canyons park hear near the bend in the road.
- wP-BrideS-01
Lat/Lon (WGS84): N 36.58107
W -117.26235
Elev: 640 Feet
Bottom of the ridge to start the climb up the South Approach for the Princess Bride Canyons.
- wP-BrideS-02
Lat/Lon (WGS84): N 36.57768
W -117.26737
Elev: 1,440 Feet
Top out on the first ridge of the South Approach. Continue southwest down the other side of the top out.
- jPBrideS
Lat/Lon (WGS84): N 36.57685
W -117.26773
Elev: 1,410 Feet
A saddle about 330 feet after going over a peak along the ridge.
To go to Humperdinck, Buttercup or Inconceivable Canyons drop down the steep slope to the north west down into Humperdinck Canyon.
To go to Miracle Max or Prepare to Die Canyons continue southwest up along the ridge.
- jPrepareToDie
Lat/Lon (WGS84): N 36.57402
W -117.26970
Elev: 1,680 Feet
Top of a steep section of the ridge where it levels off a little.
To continue toward Miracle Max Canyon follow the ridge to the west.
To go to Prepare to Die Canyon veer left and drop down toward the wide flat like area to the southwest.
- wMiracleMxRP01
Lat/Lon (WGS84): N 36.57319
W -117.27831
Elev: 2,050 Feet
This point is just before getting up to the pointed peak at the top of the ridge. When you are about 100 feet from reaching the peak, veer to the left and traverse to the south to get over onto a ridge running down to teh south.
- wMiracleMxRP02
Lat/Lon (WGS84): N 36.57053
W -117.27874
Elev: NaN Feet
An arbitrary point along the ridge running down to the south. After you get onto this ridge route find your way west down into the very large drainage to the west.
- wMiracleMxRP03
Lat/Lon (WGS84): N 36.56895
W -117.28037
Elev: 1,850 Feet
Down in the Miracle Max Drainage.
- wMiracleMxRP04
Lat/Lon (WGS84): N 36.56616
W -117.27963
Elev: 1,800 Feet
Scramble of about 3 feet followed by some boulder debris blocking the wash which you can crawl under.
- yMiracleMaxTp
Lat/Lon (WGS84): N 36.56345
W -117.27859
Elev: 1,700 Feet
Top of Miracle Max Canyon. This is where two of the large washes above the technical section join.
|
| Miracle Max (3) - The Canyon and Exit |
- yMiracleMaxTp
Lat/Lon (WGS84): N 36.56345
W -117.27859
Elev: 1,700 Feet
Top of Miracle Max Canyon. This is where two of the large washes above the technical section join.
- wMiracleMxRP05
Lat/Lon (WGS84): N 36.56443
W -117.27498
Elev: NaN Feet
Canyon turns left to begin heading north where a side ravine joins in from the right (south).
- wMiracleMxRP06
Lat/Lon (WGS84): N 36.56524
W -117.27521
Elev: 1,619 Feet
Easy scramble down about 8 feet.
- wMiracleMxRP07
Lat/Lon (WGS84): N 36.56677
W -117.27516
Elev: NaN Feet
Scramble down of about 4 feet.
- dMiracleMxR1-3
Lat/Lon (WGS84): N 36.56779
W -117.27464
Elev: NaN Feet
Raps 1 thru 3 - Miracle Max Canyon.
Just before getting to rap 1 is a downclimb over a boulder of about 8 feet. Also near the top of rap 1 is a notch in the canyon wall where you can get a view down over the exit of the canyon.
Rap 1 is anchored from a large rock about 20 feet back and drops about 55 feet down a slightly sloped trough. Rap 1 will need about 75 feet of rope travel.
Rap 2 is about 50 feet down canyon of rap 1 with a short 3 foot scramble between. Rap 2 is anchored from a cairn anchor and drops about 60 feet down a slightly sloped wall.
Rap 3 is near the bottom of rap 2, is anchored from a cairn anchor and drops about 150 feet down a vertical wall.
- dMiracleMxR4
Lat/Lon (WGS84): N 36.56831
W -117.27433
Elev: NaN Feet
Rap 4 - Miracal Max Canyon. Is about 70 feet from the bottom of rap 3, is anchored from a cairn anchor made with very large rocks and drops about 105 feet down a slightly sloped wall.
- yMiracleMaxBt
Lat/Lon (WGS84): N 36.56858
W -117.27418
Elev: 1,240 Feet
Bottom of Miracle Max Canyon. This is also the bottom of a side ravine / canyon joining in from LDC.
- yPrepar2DieBt
Lat/Lon (WGS84): N 36.56927
W -117.27236
Elev: 1,404 Feet
Bottom of Prepare to Die Canyon where it drops down into the Miracle Max Drainage.
- wMiracleMxRP08
Lat/Lon (WGS84): N 36.56626
W -117.26770
Elev: 1,040 Feet
Wash forks here. To exit Miracle Max and head back over to the Princess Bride parking spots follow the left fork as it wraps around the base of the mountain.
- wMiracleMxRP09
Lat/Lon (WGS84): N 36.57233
W -117.25931
Elev: NaN Feet
Going around a reddsh colored point. As you round the red point the Funeral Mountans come into view to the northeast. If you do not have GPS but do have a compass you can walk on a bearing of 16 degrees true north or 29 degrees magnetic north for 2.72 miles to get to the cars.
- Pk-PBrideS
Lat/Lon (WGS84): N 36.61036
W -117.24602
Elev: 210 Feet
A bend to the right while driving the road out toward Marble Canyon. If following the South Approach route to the Princess Bride Canyons park hear near the bend in the road.
|