Canyoneering Route Description
Questionable Decision Canyon - 4A IV
Red Rock Canyon, Nevada
2012-10-27, 7 people, 1 Day (Travel time in route 12 hours) Took a much longer approach
2016-05-21, 4 people, 1 Day (Travel time in route 15.75 hours) Did what we call the expensive route and had multiple issues
2020-04-24, 3 people, 1 Day (Travel time in route 12.5 hours)

Time Required - 10 to 13 hours
Distance - 4.5 miles Total, 0.4 miles Technical
Rappels - 14 Rappels, Longest Rappel 180 feet.
Elevation Range - 3650 - 6380 Feet
Shuttle Required - No Vehicle - Passenger
Permit Required - No
Rappelling and anchor gear, Ropes and or pull cords for rappels up
to 180 feet and 50 feet of webbing for sling placement. Having
a second long rope is a good idea as there are many places on this
route you can stick a rope on rappel.
Please remember, canyoneering is not the only sport
enjoyed in this area. The area is a popular climbing area with a lot of
routes going up and down. Some anchors in the lower canyon may not make
sense as a canyoneer. Please be respectful and leave anchors in place even
though they may not make sense from your perspective. You are not the only
one on the mountain. Be mindful of not dropping rocks or doing anything that
could effect anyone below you.
There are only a few spots of water and all in the
upper canyon. In warm and hot months a wetsuit is not needed. In cooler
months a wet suit is might be nice since the water is in areas that see
little sun. I suggest avoiding this canyon in cold months just so you do not
need to carry a wetsuit. Most water can be avoided if you enjoy wide
stemming / bridging. Even avoiding the water most people will get wet to
about waist deep in one spot.
Note / Warning:
Since people may add or move
anchors depending on what they are willing or able to downclimb, your rappel
count may differ slightly from that of the route description.
There are a lot
of choke stones and pinch points where you may get a rope stuck, especially with carabiners and knots in
the rope. Be careful of rope placement and rigging to help prevent a stuck
rope. Bringing 2 ropes the are long enough for the longest rappel may be a
good idea for this route. In the event you do stick a rope you still have an
extra one to get you down safely.
Typically single rope rappels are preferred for safety
but there are many places in this canyon where a double strand rappel may be
preferred to reduce the possibility of getting ropes stuck since double
strand rappels will not have carabiners or knots in the rope during pull.
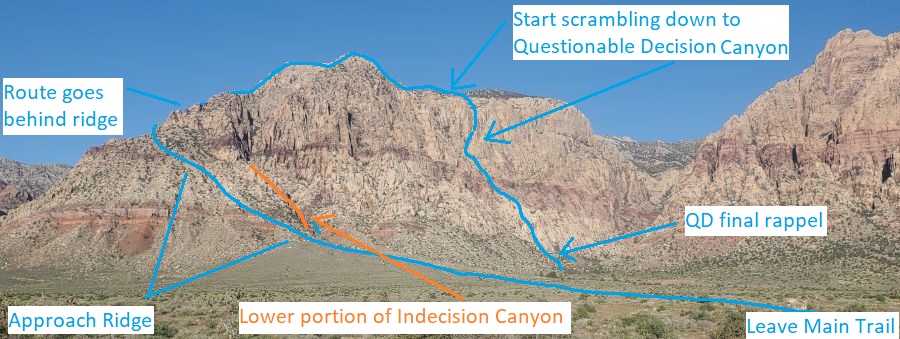
Some portions of the approach
route follow convoluted terrain, some portions have use trails and cairns
and other parts do not. Pay attention to maps, GPS, route description or
memory to get you there, but do not depend on cairns getting you there.
There are use trails on the approach ridge that can be misleading and tempt
you to harder terrain later. If
following this approach route for the first time, allow a little extra time
for route finding. Once you have navigated the approach route once
successfully, future visits will go much faster. Once up on top of the
mountain, GPS may be helpful to ensure you drop down the correct drainage
into the intended canyon. A helpful image is also provided in the
route description.
The upper half of
the Questionable Decision has a lot of down climbing through narrow slots
where knee and elbow pads are recommended.
Note / Navigation Warning:
Route finding from the
end of the upper section to find the correct way down the start of the lower
section can be
tricky. Choosing wrong way leads to a route that,
while fun, requires longer rope and involves a rappel where you need to
traverse way off of the fall line and is notorious for getting
ropes stuck. A GPS will not be helpful for avoiding this mistake. The route
description has images to help find the correct route down.
The lower
half or Questionable Decision has a significant amount of down climbing and
some of it quite exposed as you route find down some steep and semi open
areas of slickrock.
To get to the Trailhead
From the junction of highway 215 and Charleston Blvd (highway
159), drive west on Charleston Blvd (highway 159) about 11.1
miles to the trailhead for First Creek (tFirstCreekTH) on the
right.
To leave the Exit Vehicle / Escape Pod
No exit vehicle is needed. This is done as a loop route.
GPS coordinate information listed at the bottom. For information about waypoint naming and map symbols, refer to the
Glossary page.

Click the links for maps of the route.
Map of the entire route.
Map of the approach up the mountain.
Map of the technical section.
The Approach:
From the First Creek TH
(tFirstCreekTH) walk
west on the main trail
for about 0.9 miles.
After walking about 0.9
miles, leave the trail
(QD-01) you can leave
the trail pretty much
anywhere in this general
area and start walking
southwest across open
desert. There is no one
best spot to leave the
trail. While
walking the rolling
desert you may find a
intermittent use trails.
Note:
Look southwest and note
the approach ridge and
notice the wide gently
sloped hill coming down
from the ridge toward
the main trail. Leave
the trail when you get
near where the bottom of
that gradually sloped
hill gets closest to the
main trail.
About 0.6 miles after
leaving the trail
(QD-02) the gently
sloped hill meets
steeper rocky red dirt
layer. Start up with a
short scramble then
continue up following
intermittent use trail.
Route find up toward a
large spire-like boulder
/ out cropping in the
bouldery white rocks
above about 250 feet
away. Route find just to
the left of the
spire-like rock. As you
start up into the
bouldery white rock
layer, the route becomes
well cairned with some
use trails forming.
Note / Warning:
There are
use trails that will
lead you where you do
not want to go. Some use
trails follow less steep
terrain veering more
south contouring around
the hillside but lead to
more difficult terrain
around the other side.
Since some of those use
trails are well used and
on more level terrain,
it can be tempting to
follow them. Resist the
urge to contour around
and continue going up
where you will encounter
a few easy scrambles. It
is best to go up the
steeper slope to the
white rock spire like
boulder.
Just after getting above
the red layer and
starting into the white
layer (QD-03), use
trails form leading off
to the left (more
southish) contouring
around to the south side
of the ridge following
more gentle terrain.
Resist the urge to
follow these use trails
as they will lead to
amore difficult and
convoluted route.
Continue up the steeper
terrain going up more
west then southwest.
Shortly up into the whit
rock layer is this short
section to scramble up
(QD-04).
Continuing up, the route
begins to have more
sustained scrambling
(QD-05) as you go up
through the white rock
bouldery layer. The
route is cairned well
and involves a few spots
of 4th class scrambles
mixed with easy walking
on short use trails.
Soon the route does a
right-left jog (QD-06)
as you get near the
crest of the ridge.
Follow through the
right-left jog then
scramble through a 30
foot long sloped crack
to get up to wider more
open terrain on the
crest of the ridge.
Continue southwest up
the wider more open
ridge.
About 900 feet farther
up the ridge is the base
of a big, flat, smooth
faced wall (QD-07). Walk
south along the base of
the wall following a
well cairned route as it
wraps around to the
right and starts
contouring to the west
toward a wide bouldery
ridge.
After wrapping around
the route has a section
that is heavily cairned
(QD-08) and the route
begins going north op
the ridge line. After a
short scramble follow up
a forming brush filled
gully with a prominent
dead tree seen farther
up the gully. Almost 300
feet farther the gully
begins to top out on a
ridge where you will
need to turn left and
start west up the ridge.
About 300 feet farther
and shortly after
turning west up the
ridge is the base of
vertical rock (QD-09)
you can not go up.
Continue west following
the cairned route down
through some boulder
debris for about 200
feet to drop into a wide
vegetated area near the
base of another long
gully going up to the
northwest.
From the base of a wide
vegetated gully (QD-10)
going up to the nothwest,
follow northwest up the
gully for about 700 feet
to where it tops out at
the crest of a ridge
line.
About 600 feet farther
the gully tops out
(QD-11) as it meets the
crest of a ridge and a
huge sheer drop off on
the other side. There
are sometimes cairns
near the top of the
gully lead to a scramble
up to the left to get
out of the gully up onto
the ridge. Once on the
ridge, continue
northwest up the ridge
line following a well
cairned route.
About 350 feet farther
the route drops off of
ridge (QD-12) and into a
steep gully still
continuing up to the
northwest. Follow up the
heavily cairned route
northwest up the steep
gully and some 4th class
scrambling. Viewed from
the bottom the
scrambling looks more
difficult than it is.
After about 300 feet,
the route levels off
into a wide level
vegetated area just
below Indecision Peak.
In the wide open
vegetated level area
just below Indecision
Peak (QD-13). Walk west
through a wide semi flat
vegetated area which
slowly transforms into a
ridge running down to
the west. Follow the
ridge west with a mix of
scrambling and walking
and the occasional
cairn.
Note:
If you want to go to
Indecision Peak for the
views or to sign the
register, it is an easy
3 minute scramble about
150 feet north up to the
peak.
Almost 600 feet farther
is a small cave like
feature under a boulder
(QD-14). Depending on
your chosen route to
walk this area you might
not notice this cave.
Continuing west along
the ridge from here
begins to have more
scrambling and goes up
onto a very minor peak
about 300 feet away.
From the small minor
peak (QD-15) scramble
west down to a small
saddle. Do not drop into
the forming ravine on
the right (north) as
that is not the canyon
you are aiming for.
Note /
navigation aid:
As you drop down to the
saddle look along the
ridge about 300 feet
beyond the saddle and
note a redish rock and
dirt area. The route
past the saddle will
follow just right (northish)
of the ridge and go over
to the red dirt and rock
area.
A little over 300 feet
farther is a large
saddle (QD-16). Going
northwest directly up
the ridge is not
possible due to vertical
sections of rock. Follow
northwest along but
contouring just to the
right (north) of the
ridge and route find up
to the reddish rock and
dirt area. Do not drop
down the large ravine to
the northeast as that is
not the canyon you want
to be in.
About 300 feet farther
the route traverses
through the red dirt and
rock zone (QD-17).
Continue about 200 feet
to the crest of the
ridge where views of
Questionable Decision
Peak come into view.
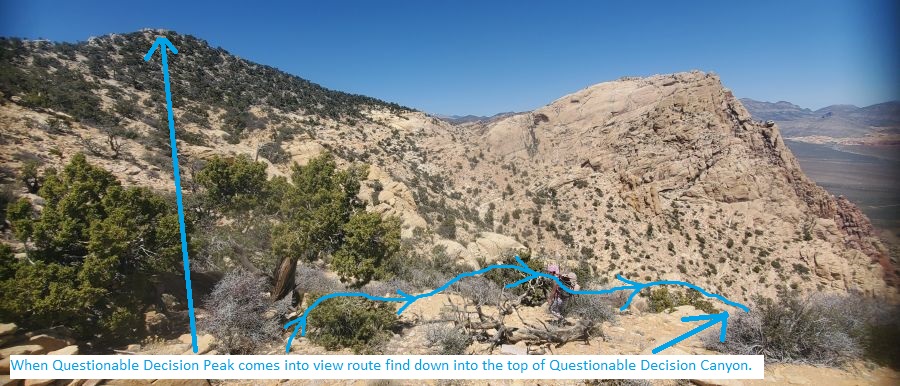
Now on the other side of
the red dirt and rock
area ()QD-18 where you
can now see Questionable
Decision Peak about 0.25
miles northwest and can
see the wide ravine of
upper Questionable
Decision Canyon forming
and dropping down to the
north. Turn right and
route find northish down
the ravine about 600
feet to the top of
Questionable Decision
Canyon (yQuestionTp).
The Canyoneering / Technical Section:
Top of a slickrock
drainage (yQuestionTp)
dropping down at the
head of Questionable
Decision Canyon. There
are two options for rap
1. Scramble down the
slot / chute to the top
of rap 1 in the water
course. Or walk the RDC
(east) ledge about 100
feet over to a pile of
rocks for an alternate
rap 1 from the RDC rim.
Rap 1 (dQD-R1a) water
course rappel, anchored
LDC from a tree and
drops about 130 feet
down a mostly vertical
wall.
Rap 1b (dQD-R1b) RDC rim
rappel, anchored from a
pile of rocks on the RDC
rim and drops about 125
feet to the canyon
floor.
Shortly down canyon is
the next rap.
Rap 2 (dQD-R2) anchored
from 2 bolted hangers
LDC about head high and
drops about 40 feet down
a narrow slot to small
ledge. This rap can be
downclimbed but might be
a little spicy at the
top the top.
Starting from the ledge
at the bottom of the rap
starts a series of 5
elevator style
downclimbs ranging from
20 to 35 feet each
before getting to the
next rap.
Note:
Some of the downclimbs
may have anchors
depending on choices
made by previous
parties. If using
anchors for these drops
be very aware of pinch
points that can prevent
rope pull. Having
a confident down climber
go last and provide meat
anchor for others can
help reduce the odds of
getting ropes stuck.
Rap 3 (dQD-R3) anchored
LDC from a single bolted
hanger and drops about
50 feet over two stages
down a slightly sloped
slot. This rap can be
downclimbed but the
first few feet getting
into the downclimb is a
little awkward and the
rest being a pretty easy
stem style downclimb. An
option to make rope pull
easier is to rappel only
the first stage, pull
the ropes then downclimb
the easier second stage.
Shortly down canyon is a
large boulder (QD-19)
with a scramble /
downclimb on the RDC
side to a pool that when
full will be about waist
deep with no way to
bypass it. On the other
side of the pool is a
short downclimb over a
smaller chokestone
before getting to the
next rappel.
Rap 4 (dQD-R4) anchored
LDC from a single bolted
hanger about head high
and drops about 60 feet
down an almost vertical
narrow slot.
Continuing down canyon
are three long but easy
elevator / stem-style
downclimbs in narrow
slot with the longest
being about 50 to 60
feet. The second
downclimb has a chest
deep pool at the bottom
but with effort you can
stem over it.
Rap 5 (dQD-R5) anchored
LDC from 2 bolted
hangers and drops a
total of about 90 feet
down a tight slot. Only
the first 50 feet needs
to be rappelled and the
last 40 feet is a
moderately easy elevator
/ stem style downclimb.
Rap 6 (dQD-R6) anchored
LDC from 2 bolted
hangers and drops about
40 feet down a slot that
widens creating some
free hang on the rappel.
Continuing down canyon
is a short stem style
downclimb followed by a
long sloped downclimb
just before getting out
to an open vegetated
area.
Shortly down canyon is a
short open and vegetated
area (QD-20) after a
couple downclimbs. Veer
right route east about
125 feet to the top of a
pour off dropping down
to the north again.
At the top of a pour off
(QD-21) dropping down to
the north, downclimb /
scramble down to the top
of the next rap about 80
feet down canyon.
Rap 7 (dQD-R7-8)
anchored from tree and
drops about 40 feet with
free hang on the bottom
half.
Rap 8, at the bottom of
rap 7, anchored from a
boulders and drops about
130 feet over two
stages. While on rappel
you walk over / down an
arch that may be easily
overlooked because you
may be walking on it.
The last 30 feet of the
rap can be downclimbed.
Continue down through a
boulder debris area.
Just before reaching the
next rap you can
downclimb through a hole
under a huge boulder.
Rap 9 (dQD-R9-10)
anchored from a small
tree and drops about 60
feet over a huge boulder
to the top of a crack
where the next rap
starts.
Rap 10, right at the
bottom of rap 9,
anchored from a boulder
and drops about 140 feet
through a chute / slot.
The lower 50 feet of
this rap can be
downclimbed with
moderate difficulty.
Note:
The anchor webbing needs
to be extended about 35
feet to get to the top
of the chute / slot to
prevent the many choke
stones from catching the
rope during pull.
At the bottom of rap 10
is a large sandstone
platform. From the
platform downclimb a
sloped slot about 30
feet down to a large
level and very vegetated
area with a lot of
cairns leading various
directions.
In this large, level,
and heavily vegetated
area (QD-22) you will see
cairns leading in
various directions. Do
not be tempted to follow
these cairns right or
left (east or west).
Instead stay in the dirt
watercourse and continue
north about 70 feet to
the top of a 2 steep
slots / chutes dropping
down to the north.
Note /
Navigation: In this area the
many cairns are mostly
put there by climbers to
help find their routes.
The cairns leading right
and left (east and west)
will be tempting as they
follow more level
terrain and appear to be
well used. I have not
explored where the
cairns lead to the left
(west) but have seen
where the cairns to the
right (east) lead. The
cairns east lead to
another route down that
is notorious for having
a rappel that is much
longer, requires the
rappeller to drop way
off of the fall line and
is notorious for
sticking ropes. We call
that the expensive
route. To avoid this
issue do not follow
cairns right or left.
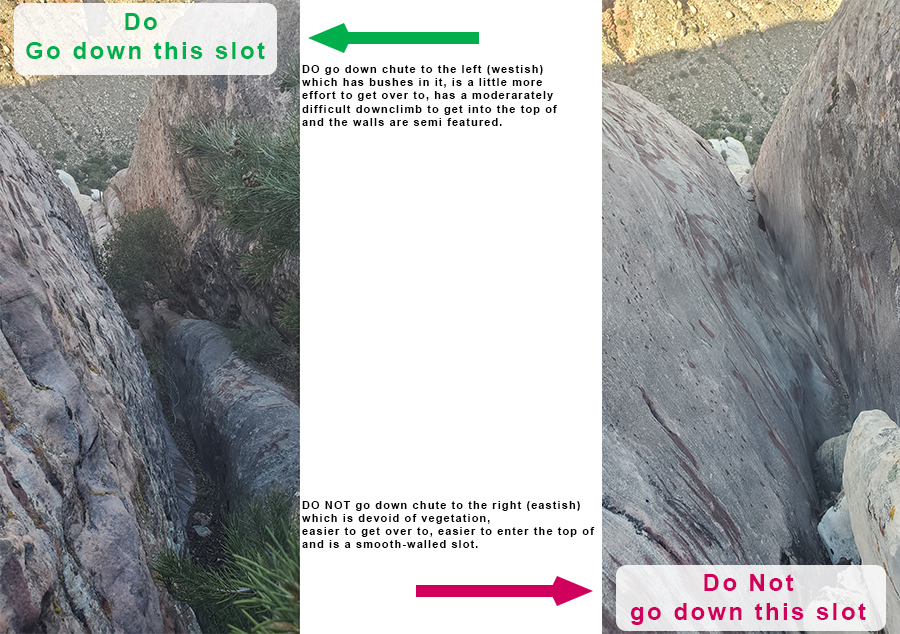
At this northern end of
the vegetated dirt area
(QD-23NavChute) are 2
chutes dropping down to
the north.
DO go
down the chute to the
left (westish) which has
bushes in it, is a
little more effort to
get over to, has a
moderately difficult
downclimb to get into
the top of and the walls
are semi featured.
DO NOT go down the chute
on the right (eastish)
which is devoid of
vegetation, easier to
get over to, easier to
enter the top of and is
a smooth-walled slot.
The first 10 feet of
downclimbing into the
Correct chute is a
little awkward where a
handline from a tree at
the top may be useful.
Once in the chute the
scrambling is sloped and
easy downclimbing /
scrambling for about 90
feet before reaching an
8 foot vertical
downclimb.
The vertical downclimb
of about 8 feet (QD-24)
is exposed and very
awkward. A partner
assist is highly
recommended here even
though some people may
not need one. The
geometry of the
downclimb bells out out
a little and can be
awkward and push you out
to being uncomfortably
exposed. Providing
partner assist from
above and or below can
also be awkward as there
is no flat area for good
footing.
After this downclimb,
continue with more easy
sloped scrambling down
to a brief level zone.
From the brief semi
level spot with some
vegetation (QD-25) and a
more open feel. Contour
left (west) and continue
scrambling down pink and
white striped sandstone.
As you continue down
follow the easiest for
about 100 feet then
slowly contour to the
right (more eastish)
down to the start of
more slot.
From the thick
vegetation at the start
of more deep slot
(QD-26). Dropping down
this slot goes over some
boulders with two easy
downclimbs of about 6 to
8 feet. Shortly
down canyon is a 15 foot
drop and is the next
rap.
Rap 11 (dQD-R11)
anchored from a choke
stone and drops about 15
feet. Optionally this
rappel can be
downclimbed bit is a
little wide and may be
awkward for some. The
Anchor for the drop is
set a little bit down in
the slot under your feet
and some parties may
downclimb this drop and
not notice the anchor at
all.
Continuing down canyon
will be two more easier
downclimbs of about 15
feet each before
reaching the next
rappel.
Rap 12 (dQD-R12-13)
anchored from a pinch
point between a choke
stone and canyon wall
and drops about 140 feet
with the last 35 feet
being downclimable from
a ledge. Very near the
bottom of the rap is the
top of the next rap.
Note / warning:
Just before
reaching the top of the
rap is a small tree at
the top of a vertical
slot where you may find
climbers anchors. Pass
the tree and downclimb
the narrow slot down to
a brief level spot with
a chockstone which is
the anchor for the
rappel. Just past the
choke stone anchor the
slot starts down steeply
and pinches down to
about 1.5 inches wide.
To keep from sticking
your ropes, it is best
to extand the anchor
webbing down into this
crack and use a
traditional pull
rigging. To start the
rappel, while on rope,
you will need to stem
out past the crack then
gently pendulum back
under the crack to then
rappel down mostly free
hanging. When going back
under the crack, be
careful not to drag rope
on the walls above to
prevent cutting your
rope. From the top this
rappel looks very airy
and a little daunting,
but once over the skinny
crack you can see to the
bottom where the rappel
ends down in a
collection of boulders.
Rap 13 anchored from one
of many boulders and
drops about 75 feet to a
huge shelf where the
next rap is.
Note: At the top of this
rap is a long sandstone
rock wedged between the
walls about head high
and is remeniscent of a
log jambed horizontally
between the walls. This
wedged rock is very
interesting as I have
never seen anything
quite like it. The
wedged rock is sometimes
used by climbers for
descents after climbing
routes.
Rap 14 - (dQD-R14)
anchored from a small
tree near the far west
of a big ledge and drops
about 180 feet to a
ledge a short distance
above the canyon floor.
That ledge is the end of
the technical canyon
(yQuestionBt).
Note:
There are also some
bolted hangers on the
far east of the ledge
but I have not tried
that route down yet.
The Exit:
From
bottom of Questionable
Decision (yQuestionBt)
where the final rap
drops you to a ledge
just above the canyon
floor. Walk the ledge to
the right (east) over to
slopes leading down
toward First Creek.
After the slopes leading
down toward First Creek
become more gentle
(QD-27) and allow travel
to the east, route find
your way east where you
will find social trails
forming leading to the
well used trails
following along the
south bank of First
Creek and back to the
trailhead. Staying high
and not going down into
First Creek seems to
work best as you contour
around. The First
Creek TH (tFirstCreekTH)
and your car is about
1.7 miles away.
Downloadable GPX files
available at
BG-Gear Store
(easier than manual entry and a great way to support
Bluugnome).
Waypoint naming convention and map symbol information can be found on the Glossary page.
Elevations are approximate.
BEFORE
manually entering coordinates set your system to WGS84 datum and Lat/Lon hddd.ddddd° coordinate format.
Inconsistent datum's and coordinate formats will result in location errors.
Click to show / expand the list of waypoints below........
| Questionable Decision (1) - Approach |
- tFirstCreekTH
Lat/Lon (WGS84): N 36.08138
W -115.44797
Elev: 3,650 Feet
First creekTrail Head on Charleston.
- QD-01
Lat/Lon (WGS84): N 36.08006
W -115.46407
Elev: NaN Feet
To go to Questionable Decision or Indecision Canyons, you can leave the trail pretty much anywhere in this general area and start walking southwest across open desert. There is no one best spot to leave the trail. While walking the rolling desert you may find a intermittent use trails.
Look southwest and note the approach ridge and notice the wide gently sloped hill coming down from the ridge toward the main trail. Leave the trail when you get near where the bottom of that gradually sloped hill gets closest to the main trail. Leave the trail wherever feels best and start hiking rolling desert toward the hill.
- QD-02
Lat/Lon (WGS84): N 36.07320
W -115.47028
Elev: NaN Feet
Gently sloped hill meets steeper rocky red dirt layer. Start up with a short scramble then continue up following intermittent use trail. Route find up toward a large spire-like boulder / out cropping in the bouldery white rocks above about 250 feet away. Route find just to the left of the spire-like rock. As you start up into the bouldery white rock layer, the route becomes well cairned with some use trails forming.
Note / Warning: There are use trails that will lead you where you do not want to go. Some use trails follow less steep terrain veering more south contouring around the hillside but lead to more difficult terrain around the other side. Since some of those use trails are well used and on more level terrain, it can be tempting to follow them. Resist the urge to contour around and continue going up where you will encounter a few easy scrambles. It is best to go up the steeper slope to the white rock spire like boulder.
- QD-03
Lat/Lon (WGS84): N 36.07256
W -115.47030
Elev: NaN Feet
Just after getting above the red layer and starting into the white layer, use trails form leading off to the left (more southish) contouring around to the south side of the ridge following more gentle terrain. Resist the urge to follow these use trails as they will lead to amore difficult and onvoluted route. Continue up the steeper terrain going up more west then southwest.
- QD-04
Lat/Lon (WGS84): N 36.07241
W -115.47053
Elev: NaN Feet
Shortly up into the whit rock layer is this short section to scramble up.
- QD-05
Lat/Lon (WGS84): N 36.07211
W -115.47061
Elev: NaN Feet
Continuing up, the route begins to have more sustained scrambling as you go up through the white rock bouldery layer. The route is cairned well and involves a few spots of 4th class scrambles mixed with easy walking on short use trails.
- QD-06
Lat/Lon (WGS84): N 36.07164
W -115.47127
Elev: NaN Feet
Route does a right-left jog as you get near the crest of the ridge. Follow through the right-left jog then scramble through a 30 foot long sloped crack to get up to wider more open terrain on the crest of the ridge. Continue southwest up the wider more open ridge.
- QD-07
Lat/Lon (WGS84): N 36.06940
W -115.47262
Elev: NaN Feet
Base of a big, flat, smooth faced wall. Walk south along the base of the wall following a well cairned route as it wraps around to the right and starts contouring to the west toward a wide bouldery ridge.
- QD-08
Lat/Lon (WGS84): N 36.06942
W -115.47308
Elev: NaN Feet
Heavily cairned route begins going north op the ridge line. After a short scramble follow up a forming brush filled gully with a prominent dead tree seen farther up the gully. Almost 300 feet farther the gully begins to top out on a ridge where you will need to turn left and start west up the ridge.
- QD-09
Lat/Lon (WGS84): N 36.07001
W -115.47371
Elev: NaN Feet
Shortly after turning west up the ridge is the base of vertical rock you can not go up. Continue west following the cairned route down through some boulder debris for about 200 feet to drop into a wide vegetated area near the base of another long gully going up to the northwest.
- QD-10
Lat/Lon (WGS84): N 36.07014
W -115.47452
Elev: NaN Feet
Base of a wide vegetated gully going up to the nothwest. Follow northwest up the gully for about 700 feet to where it tops out at the crest of a ridge line.
- QD-11
Lat/Lon (WGS84): N 36.07123
W -115.47629
Elev: NaN Feet
Gully tops out as it meets the crest of a ridge and a huge sheer drop off on the other side. There are sometimes cairns near the top of the gully lead to a scramble up to the left to get out of the gully up onto the ridge. Once on the ridge, continue northwest up the ridge line following a well cairned route.
- QD-12
Lat/Lon (WGS84): N 36.07184
W -115.47714
Elev: NaN Feet
Route drops off of ridge and into a steep gully still continuing up to the northwest. Follow up the heavily cairned route northwest up the steep gully and some 4th class scrambling. Viewed from the bottom the scrambling looks more difficult than it is. After about 300 feet, the route levels off into a wide level vegetated area just below Indecision Peak.
- QD-13
Lat/Lon (WGS84): N 36.07235
W -115.47792
Elev: 6,330 Feet
Wide open vegetated level area just below Indecision Peak. Walk west through a wide semi flat vegetated area which slowly transforms into a ridge running down to the west. Follow the ridge west with a mix of scrambling and walking and the occasional cairn.
Note:
If you want to go to Indecision Peak for the views or to sign the register, it is an easy 3 minute scramble about 150 feet north up to the peak.
- QD-14
Lat/Lon (WGS84): N 36.07279
W -115.47983
Elev: NaN Feet
Small cave like feature under a boulder. Depending on your chosen route to walk this area you might not notice this cave. Continuing west along the ridge from here begins to have more scrambling and goes up onto a very minor peak about 300 feet away.
- QD-15
Lat/Lon (WGS84): N 36.07275
W -115.48089
Elev: NaN Feet
Small minor peak. Scramble west down to a small saddle. Do not drop into the forming ravine on the right (north) as that is not the canyon you are aiming for.
Note / navigation aid:
As you drop down to the saddle look along the ridge about 300 feet beyond the saddle and note a redish rock and dirt area. The route past the saddle will follow just right (northish) of the ridge and go over to the red dirt and rock area.
- QD-16
Lat/Lon (WGS84): N 36.07295
W -115.48204
Elev: 6,290 Feet
Large saddle. Going northwest directly up the ridge is not possible due to vertical sections of rock. Follow northwest along but contouring just to the right (north) of the ridge and route find up to the reddish rock and dirt area. Do not drop down the large ravine to the northeast as that is not the canyon you want to be in.
- QD-17
Lat/Lon (WGS84): N 36.07359
W -115.48264
Elev: 6,349 Feet
Route traverses through the red dirt and rock zone. Continue about 200 feet to the crest of the ridge where views of Questionable Decision Peak come into view.
- QD-18
Lat/Lon (WGS84): N 36.07398
W -115.48293
Elev: 6,380 Feet
Other side of the red dirt and rock area where you can now see Questionable Decision Peak about 0.25 miles northwest and can see the wide ravine of upper Questionable Decision Canyon forming and dropping down to the north. Turn right and route find northish down the ravine about 600 feet to the top of Questionable Decision Canyon.
- yQuestionTp
Lat/Lon (WGS84): N 36.07549
W -115.48193
Elev: 6,080 Feet
Top of a slickrock drainage dropping down at the head of Questionable Decision Canyon. There are two options for rap 1. Scramble down the slot / chute to the top of rap 1 in the water course. Or walk the RDC (east) ledge about 100 feet over to a pile of rocks for an alternate rap 1 from the RDC rim.
|
| Questionable Decision (2) - The Canyon |
- yQuestionTp
Lat/Lon (WGS84): N 36.07549
W -115.48193
Elev: 6,080 Feet
Top of a slickrock drainage dropping down at the head of Questionable Decision Canyon. There are two options for rap 1. Scramble down the slot / chute to the top of rap 1 in the water course. Or walk the RDC (east) ledge about 100 feet over to a pile of rocks for an alternate rap 1 from the RDC rim.
- dQD-R1a
Lat/Lon (WGS84): N 36.07555
W -115.48187
Elev: NaN Feet
Rap 1 - Questionable Decision. Anchored LDC from a tree and drops about 130 feet down a mostly vertical wall.
- dQD-R2
Lat/Lon (WGS84): N 36.07572
W -115.48172
Elev: 6,040 Feet
Rap 2 - Questionable Decision. Anchored from 2 bolted hangers LDC about head high and drops about 40 feet down a narrow slot to small ledge. This rap can be downclimbed but might be a little spicy at the top the top.
Starting from the ledge at the bottom of the rap starts a series of 5 elevator style downclimbs ranging from 20 to 35 feet each before getting to the next rap.
Note: Some of the downclimbs may have anchors depending on choices made by previous parties. If using anchors for these drops be very aware of pinch points that can prevent rope pull. Having a confident down climber go last and provide meat anchor for others can help reduce the odds of getting ropes stuck.
- dQD-R1b
Lat/Lon (WGS84): N 36.07563
W -115.48163
Elev: NaN Feet
Rap 1b - Questionable Decision. This alternate rap 1 is anchored from a pile of rocks on the RDC rim and drops about 125 feet to the canyon floor.
- dQD-R3
Lat/Lon (WGS84): N 36.07581
W -115.48108
Elev: NaN Feet
Rap 3 - Questionable Decision. Anchored LDC from a single bolted hanger and drops about 50 feet over two stages down a slightly sloped slot. This rap can be downclimbed but the first few feet getting into the downclimb is a little awkward and the rest being a pretty easy stem style downclimb. An option to make rope pull easier is to rappel only the first stage, pull the ropes then downclimb the easier second stage.
- QD-19
Lat/Lon (WGS84): N 36.07582
W -115.48091
Elev: NaN Feet
Large boulder with a scramble / downclimb on the RDC side to a pool that when full will be about waist deep with no way to bypass it. On the other side of the pool is a short downclimb over a smaller chokestone before getting to the next rappel.
- dQD-R4
Lat/Lon (WGS84): N 36.07581
W -115.48075
Elev: NaN Feet
Rap 4 - Questionable Decision. Anchored LDC from a single bolted hanger about head high and drops about 60 feet down an almost vertical narrow slot.
Continuing down canyon are three long but easy elevator / stem-style downclimbs in narrow slot with the longest being about 50 to 60 feet. The second downclimb has a chest deep pool at the bottom but with effort you can stem over it.
- dQD-R5
Lat/Lon (WGS84): N 36.07584
W -115.48031
Elev: NaN Feet
Rap 5 - Questionable Decision. Anchored LDC from 2 bolted hangers and drops a total of about 90 feet down a tight slot. Only the first 50 feet needs to be rappelled and the last 40 feet is a moderately easy elevator / stem style downclimb.
Note, in Oct, 2012 then May 2016 there was a nut stuck down in the crack that we could not retrieve.
- dQD-R6
Lat/Lon (WGS84): N 36.07585
W -115.48001
Elev: NaN Feet
Rap 6 - Questionable Decision. Anchored LDC from 2 bolted hangers and drops about 40 feet down a slot that widens creating some free hang on the rappel.
Continuing down canyon is a short stem style downclimb followed by a long sloped downclimb just before getting out to an open vegetated area.
- QD-20
Lat/Lon (WGS84): N 36.07597
W -115.47966
Elev: NaN Feet
Short open and vegetated area after a couple downclimbs. Veer right route east about 125 feet to the top of a pour off dropping down to the north again.
- QD-21
Lat/Lon (WGS84): N 36.07592
W -115.47933
Elev: NaN Feet
Top of a pour off dropping down to the north. Downclimb / scramble down to the top of the next rap about 80 feet down canyon.
- dQD-R7-8
Lat/Lon (WGS84): N 36.07601
W -115.47926
Elev: NaN Feet
Raps 7 and 8 - Questionable Decision
Rap 7 anchored from tree and drops about 40 feet with free hang on the bottom half.
Rap 8, at the bottom of rap 7, anchored from a boulders and drops about 130 feet over two stages. While on rappel you walk over / down an arch that may be easily overlooked because you may be walking on it. The last 30 feet of the rap can be downclimbed.
Continue down through a boulder debris area. Just before reaching the next rap you can downclimb through a hole under a huge boulder.
- dQD-R9-10
Lat/Lon (WGS84): N 36.07665
W -115.47933
Elev: NaN Feet
Raps 9 and 10 - Questionable Decision in a boulder debris area.
Rap 9 anchored from a small tree and drops about 60 feet over a huge boulder to the top of a crack where the next rap starts.
Rap 10, right at the bottom of rap 9, anchored from a boulder and drops about 140 feet through a chute / slot. The lower 50 feet of this rap can be downclimbed with moderate difficulty. Note: The anchor webbing needs to be extended about 35 feet to get to the top of the chute / slot to prevent the many choke stones from catching the rope during pull.
At the bottom of rap 10 is a large sandstone platform. From the platform downclimb a sloped slot about 30 feet down to a large level and very vegetated area with a lot of cairns leading various directions.
- QD-22
Lat/Lon (WGS84): N 36.07691
W -115.47925
Elev: NaN Feet
In this large, level, and heavily vegetated area you will see cairns leading in various directions. Do not be tempted to follow these cairns right or left (east or west). Instead stay in the dirt watercourse and continue north about 70 feet to the top of a 2 steep slots / chutes dropping down to the north.
Note: In this area the many cairns are mostly put there by climbers to help find their routes. The cairns leading right and left (east and west) will be tempting as they follow more level terrain and appear to be well used. I have not explored where the cairns lead to the left (west) but have seen where the cairns to the right (east) lead. The cairns east lead to another route down that is notorious for having a rappel that is much longer, requires the rappeller to drop way off of the fall line and is notorious for sticking ropes. We call that the expensive route. To avoid this issue do not follow cairns right or left.
- QD-23NavChute
Lat/Lon (WGS84): N 36.07712
W -115.47940
Elev: NaN Feet
At this northern end of the vegetated dirt area are 2 chutes dropping down to the north.
DO go down the chute to the left (westish) which has bushes in it, is a little more effort to get over to, has a moderately difficult downclimb to get into the top of and the walls are semi featured.
DO NOT go down the chute on the right (eastish) which is devoid of vegetation, easier to get over to, easier to enter the top of and is a smooth-walled slot.
The first 10 feet of downclimbing into the Correct chute is a little awkward where a handline from a tree at the top may be useful. Once in the chute the scrambling is sloped and easy downclimbing / scrambling for about 90 feet before reaching an 8 foot vertical downclimb.
- QD-24
Lat/Lon (WGS84): N 36.07734
W -115.47925
Elev: NaN Feet
While scrambling down sloped slickrock is a vertical downclimb of about 8 feet that is exposed and very awkward. A partner assist is highly recommended here even though some people may not need one. The geometry of the downclimb bells out out a little and can be awkward and push you out to being uncomfortably exposed. Providing partner assist from above and or below can also be awkward as there is no flat area for good footing.
After this downclimb, continue with more easy sloped scrambling down to a brief level zone.
- QD-25
Lat/Lon (WGS84): N 36.07746
W -115.47921
Elev: NaN Feet
Brief semi level spot with some vegetation and a more open feel. Contour left (west) and continue scrambling down pink and white striped sandstone. As you continue down follow the easiest for about 100 feet then slowly contour to the right (more eastish) down to the start of more slot.
- QD-26
Lat/Lon (WGS84): N 36.07787
W -115.47885
Elev: NaN Feet
Thick vegetation at the start of more deep slot. Dropping down this slot goes over some boulders with two easy downclimbs of about 6 to 8 feet.
- dQD-R11
Lat/Lon (WGS84): N 36.07783
W -115.47854
Elev: NaN Feet
Rap 11 - Questionalbe Decision. Anchored from a choke stone and drops about 15 feet. Optionally this rappel can be downclimbed bit is a little wide and may be awkward for some. The Anchor for the drop is set a little bit down in the slot under your feet and some parties may downclimb this drop and not notice the anchor at all.
Continuing down canyon will be two more easier downclimbs of about 15 feet each before reaching the next rappel.
- dQD-R12-13
Lat/Lon (WGS84): N 36.07791
W -115.47835
Elev: NaN Feet
Raps 12 and 13 - Questionable Decision.
Rap 12 anchored from a pinch point between a choke stone and canyon wall and drops about 140 feet with the last 35 feet being downclimable from a ledge. Very near the bottom of the rap is the top of the next rap.
Note / warning: ust before reaching the top of the rap is a small tree at the top of a vertical slot where you may find climbers anchors. Pass the tree and downclimb the narrow slot down to a brief level spot with a chockstone which is the anchor for the rappel. Just past the choke stone anchor the slot starts down steeply and pinches down to about 1.5 inches wide. To keep from sticking your ropes, it is best to extand the anchor webbing down into this crack and use a traditional pull rigging. To start the rappel, while on rope, you will need to stem out past the crack then gently pendulum back under the crack to then rappel down mostly free hanging. When going back under the crack, be careful not to drag rope on the walls above to prevent cutting your rope. From the top this rappel looks very airy and a little daunting, but once over the skinny crack you can see to the bottom where the rappel ends down in a collection of boulders.
Rap 13 anchored from one of many boulders and drops about 75 feet to a huge shelf where the next rap is.
Note: At the top of this rap is a long sandstone rock wedged between the walls about head high and is remeniscent of a log jambed horizontally between the walls. This wedged rock is very interesting as I have never seen anything quite like it. The wedged rock is sometimes used by climbers for descents after climbing routes.
- dQD-R14
Lat/Lon (WGS84): N 36.07820
W -115.47810
Elev: 4,380 Feet
Rap 14 - Questionable Decision. Anchored from a small tree near the far west of a big ledge and drops about 180 feet to a ledge a short distance above the canyon floor.
Note: There are also some bolted hangers on the far east of the ledge but I have not tried that route down yet.
- yQuestionBt
Lat/Lon (WGS84): N 36.07835
W -115.47797
Elev: 4,280 Feet
Bottom of Questionable Decision where the final rap drops you to a ledge just above the canyon floor. Walk the ledge to the right (east) over to slopes leading down toward First Creek.
|
| Questionable Decision (3) - Exit |
- yQuestionBt
Lat/Lon (WGS84): N 36.07835
W -115.47797
Elev: 4,280 Feet
Bottom of Questionable Decision where the final rap drops you to a ledge just above the canyon floor. Walk the ledge to the right (east) over to slopes leading down toward First Creek.
- QD-27
Lat/Lon (WGS84): N 36.07841
W -115.47771
Elev: NaN Feet
After the slopes leading down toward First Creek become more gentle and allow travel to the east, route find your way east where you will find social trails forming leading to the well used trails following along the south bank of First Creek and back to the trailhead. Staying high and not going down into First Creek seems to work best as you contour around.
- QuestionD24
Lat/Lon (WGS84): N 36.07890
W -115.47451
Elev: NaN Feet
Approximate spot you will start seeing well used trails as you are route finding your way out from the bottom of Questionable Decision.
- QD-01
Lat/Lon (WGS84): N 36.08006
W -115.46407
Elev: NaN Feet
To go to Questionable Decision or Indecision Canyons, you can leave the trail pretty much anywhere in this general area and start walking southwest across open desert. There is no one best spot to leave the trail. While walking the rolling desert you may find a intermittent use trails.
Look southwest and note the approach ridge and notice the wide gently sloped hill coming down from the ridge toward the main trail. Leave the trail when you get near where the bottom of that gradually sloped hill gets closest to the main trail. Leave the trail wherever feels best and start hiking rolling desert toward the hill.
- tFirstCreekTH
Lat/Lon (WGS84): N 36.08138
W -115.44797
Elev: 3,650 Feet
First creekTrail Head on Charleston.
|