Canyoneering Route Description
Micro Death Canyon - 3A(B) III, 4(B) III Pothole Fork
Escalante National Monument, Utah.
2013-05-25, 10 people, 1 Day (Travel time in route 5.7 hours)
 Dry conditions and easy pothole exits.
2014-05-25, 11 people (Travel time in route 4.5 hours)
Wet conditions, both potholes semi keepers.
2020-05-08, 6 people, 1 Day
(Travel time in route 4.5 hours)
2023-05-07, 8 people, 1 Day (Travel time in route 4.75 hours)
Time Required - 4 to 6 hours
Distance - 3.1 miles Total, 0.6 miles Technical
Rappels - 3 Rappels, Longest Rappel 270 feet.
A 300 foot rope left at rap 1 and shorter ropes carried
in canyon (see comments)
The Pothole Fork option will bypass
the 270 foot rap but other gear and skill set considerations are
needed. See gear and general comments sections.
Elevation Range - 5930 - 5360 Feet
Shuttle Required - No Vehicle -
Passenger
Permit Required - No
Rappelling and anchor gear, Ropes and or pull cords for rappels up
to 270 feet and 40 feet of 1 inch webbing for sling placement.
A 300 foot rope and 20 feet of webbing can be left at rap 1 and
retrieved on the hike out. A rope of about 130 feet, a pull
cord / rope and 20 feet of webbing can be carried in canyon. A
potshot should also be on hand just in case but likely will not be
needed.
Wet
suits may be a good idea depending on if the canyon is holding
water.
Pothole Fork:
If you are doing the pothole fork
of Micro Death Hollow, bring pothole escape gear, ascending gear,
potshots, a releasable anchor like the Smooth Operator, 200 foot
rope, and at least two ropes in the 70 foot range. Wet suits
will likely be a good idea.
Micro Death Hollow is a fun half day route with enough fun
packed in to entertain everyone. The first rappel is about 270 feet down a
deep crack dropping you in deep narrow canyon with a couple potholes to play in.
Farther down canyon is a short skinny section where small people can play
through down low while larger canyoneers will need to stem / galumph down canyon
about 10 or 12 feet off the deck using walls with plenty of good features to
make travel easy. The short lived skinny section gives way to narrow
canyon to walk then scenic wash walking down to the final sequence where raps 2
and 3 get you down and out of the lower end of the canyon dumping you down to
the Escalante River. The exit is a ramble up the cliff bands along the
Escalante offering great views over the area. On the exit you will pass
back by rap 1 where you can retrieve your rope.
Note:
Death Hollow Pothole Fork entry option.
Pothole Fork Entry for Micro Death Hollow Canyon is rated 4(B) III and is an alternate entry about 300 feet down on the LDC side may also be used to
bypass the first rap and first pothole in the main fork. The Pothole
Fork of Death
Hollow is about 370 feet long and has a series of potholes running down into Micro Death Hollow.
This entry option can eat up a lot of time if you decide to tackle it in the
right conditions. Note worthy obstacles are the pothole directly below rap 1
and the two potholes directly below rap 2 just before dropping into Micro
Death Hollow proper.
The large pothole below rap 1 is large and deep
requiring potshots and ascending gear to get out of. This makes a great
practice spot as you can bypass rap 1 and the potholes just below it by
scrambling around on the LDC side.
The two potholes below rap 2 can also be very
challenging requiring potshots and ascending gear to get out of. Doing a
potshot toss for the last pothole is a long toss and difficult that many
will not be able to make. Fortunately there are anchors high up above rap 2
way off to the LDC (north) where potshots can be lowered using a long rope
(we used a 200 foot rope extended with a 70 foot rope) then the rope dragged
over to and dropped down into the potholes from above. The rope needs
to be very long so there is enough rope to work with as you drag it over to
the top of rap2.
The canyon is rated an A(B) since conditions will vary
depending on how much rain the area has seen and how well the canyon holds
water. On one visit we had dry conditions with very little water and on a
visit the following year on the same date the water in canyon made a couple
of the potholes a little more effort to get out of.
A 300 foot rope and about 20 feet of webbing can be
rigged and left at rap 1 then retrieved on the exit route. A rope of
about 130 feet, a pull cord / rope and 20 feet of webbing can be carried in
canyon for the final two raps at the end of the canyon. If in dry
conditions you will not need a rope as long as 130 feet but if the final
section is filled with water it may be a good idea to combine raps 2 and 3
into one rappel which would then need the 130 feet of rope. A potshot
should also be on hand just in case but likely will not be needed.
Rap 1 is anchored from tree at the head of the canyon
and will use about 270 feet of rope from the tree to the bottom of rap 1.
The vertical portion of rap 1 is a bit over 200 feet but you will need lots
of extra rope to set the anchor back to the tree above the drop at the head
of the canyon. Using a 300 foot rope here works well since you will be
leaving the rope rigged at rap 1 (not hauling it through the canyon)
retrieving it during the exit from the canyon. When retrieving the rope
during exit please do not pull the rope from the anchor as this may cause
severe rope grooves. Please go down the LDC ramp / ledge to the sandy area
and pull the rope from there to reduce rope grooving.
The only other raps in the canyon are raps 2 and 3
right at the end of the canyon. Rap 2 anchored using a dead man anchor and
drops about 25 feet to a pool with an arch to walk / swim under. If full of
water the arch will not be visible and it will look like you are in a deep
keeper pothole. If the arch is not visible it is possible to swim under it
by going under water about 2 feet slightly RDC of center and swim under the
arch.
Rap 3 can be anchored using a retrievable anchor (The
Smooth Operator for example) around the arch and drops about 80 feet down to
the end of the canyon where it drops into open spaces in the Escalante
River. Using a retrievable anchor around the arch will use about 20 feet of
extra rope so about 100 feet of rope will be used for rap 3.
Note:
If combining raps 2 and 3 but
may be a very difficult pull. If using the anchor for rap 2 and
rapping all the way through (which may be needed if full of water), extend
the anchor as far as possible to provide the best pull line possible.
Combining raps 2 and 3 will use about 130 feet of rope.
Note:
Possible
pothole issues. The large pothole at the bottom of rap 1 will be a swimmer for about 20 feet if full.
Most times it is an easy swim out or an easy walk on sand out (if dry).
However the down canyon end is under cut and if sand is washed out the
pothole is difficult to get out of. Have a pot shot on hand just in case and
be prepared to partner assist out. Another pothole a short distance down
canyon after rap 1 can be an easy exit if full of sand or water but also
will be difficult to exit if sand is scoured out. Again Have a pot shot on
hand just in case and be prepared to partner assist out.
Note / Exit Navigation:
The
exit from Micro Death Hollow goes up the Escalante River about 0.5 miles
then exits up a grass covers slope then up the cliffs to the rim above.
If you are actively looking for the exit it is easy to find. However
if you blindly follow the many use trails leading along the sides of the
Escalante River you may pass this exit and not notice the exit out.
Pay attention as you walk up the Escalante so you dont end up wondering
around the river for a long time with no apparent way out.
To get to the Trailhead
From the city of Escalante drive about 4 miles southeast on Hwy
12 to the turn off for Hole-In-The-Rock road on the right (extHoleInRock).
Continue east on Hwy 12 for 2 miles after passing the Hole in
the Rock road to a turn off (exMicroDeath) on the left (north)
side of the road for BLM road 107 going north.
Turn left and follow BLM road 107 for 0.2 miles to a fork in the
road (MicroDeathDP1).
About 0.7 miles farther is a fork in the road (MicroDeathDP2).
Continue straight (north) on BLM road 108 to go to Micro Death
Hollow. Straight ahead the the main road continues but changes
names to BLM road 108. To the left (west) is Big Flat Road. Of
note a faint road also goes off to the right (east).
About 0.6 miles farther is a small parking area (MicroDeathDP3)
by the side of the road.
About 500 feet farther is a fork in the road (MicroDeathDP4),
stay left.
About 250 feet farther the road ends (pkMicroDeath) in a parking
area with room for a lot of cars. Park here to start the Micro
Death Hollow route.
To leave the Exit Vehicle / Escape Pod
No exit vehicle is needed. This is done as a loop route.
GPS coordinate information listed at the bottom. For information about waypoint naming and map symbols, refer to the
Glossary page.

Click the links for maps of the route.
Map of the drive into the route.
Map of the entire route.
Map of the two entry forks.
Map of the technical section and exit.
The Approach:
From
the parking area (pkMicroDeath) walk
east roughly following
the rim for about 700
feet to a break in the
rim where you can walk
down slickrock down to
the north.
At the break in the rim
(MicroDeath01) start to walk down
sloped slickrock down to
the north.
Note:
The canyon that the wash
below is draining into
about 0.4 miles in the
distance is Micro Death
Hollow. Route find down
the slickrock and into
the wash then follow the
wash down to the north
to Micro Death Hollow.
About 0.3 miles down the
slopes is a confluence
of washes
(MicroDeath02).
Continue northwest down
the wash for about 300
feet to the op of Micro
Death Hollow Canyon (yMicroDeathTp)
where there is a drop of
about 15 feet.
The Canyoneering / Technical Section:
Standard
Entry.......
At the
head of the canyon at
the drop of about 15
feet (yMicroDeathTp) you
can downclimb a skinny
crack or walk down
canyon on the LDC (west)
side to a ledge / ramp
to get down to a large
flat sandy area below.
Rap 1 is about 30 feet
down canyon on the other
side of the flat sandy
spot. The easiest place
to anchor rap 1 however
is from a tree at the
head of the canyon above
the 15 foot downclimb.
Before dropping down the
15 feet, anchor the 300
foot rope from the tree
and leave it there to be
retrieved on the exit.
Rap 1 (dMicroDeathR1)
anchored from tree at
the head of the canyon
and will use about 270
feet of rope from the
tree to the bottom of
rap 1. The vertical
portion of rap 1 is a
bit over 200 feet but
you will need lots of
extra rope to set the
anchor back to the tree
above the drop at the
head of the canyon.
Note:
Using a 300 foot rope
here works well since
you will be leaving the
rope here and retrieving
it during the exit from
the canyon. When
retrieving the rope
during exit please do
not pull the rope from
the anchor as this may
cause severe rope
grooves. Please go down
the LDC ramp / ledge to
the sandy area and pull
the rope from there to
reduce rope grooving.
At the bottom of rap 1
is a large pothole that
will be a swimmer for
about 20 feet if full.
If sand is scoured out
the down canyon lip is
undercut and may be
difficult to get out of.
Have one potshot handy
just incase. After the
pothole is a section
with easy galumphing
about 15 feet off the
deck for about 100 feet.
As the walls widen out
to allow travel on the
canyon floor again you
soon com to a pothole
that may require partner
assist to get out of if
sand is scoured out. As
you exit the pothole the
canyon widens briefly.
Canyon widens briefly
(MicroDeath03) just
after getting out of a
pothole that may require
partner assist.
Continuing down canyon
is easy walking between
narrow walls which
slowly widen out into a
wide v-slot to walk in.
About 300 feet down
canyon some potholes
join in from the LDC
(west) side
(MicroDeath04) where the
Pothole Fork of Micro
Death Hollow drops into
the main canyon. Continue
walking down open
v-slot. As you continue
the walls slowly become
more narrow and you may
turn side ways in a few
spots to continue down
canyon.
Pothole Fork
Entry:
At the
head of the canyon at
the drop of about 15
feet (yMicroDeathTp) do
not downclimb into the
canyon. Instead
walk about 300 feet down
canyon along the LDC
(west) rim to the top of
the Pothole Fork (yMicroD-PHF-Tp).
From the head of the
Pothole Fork of Micro
Death Hollow (yMicroD-PHF-Tp),
you can either downclimb
down into then through
the first pothole or
walk around the pothole
on the RDC side.
Note:
The Pothole Fork of
Micro Death Hollow packs
serious punch for those
who like to play in
large potholes. 3 or
more potshots, a Smooth
Operator with pull cord,
200 foot rope and a few
other shorter ropes is
recommended.
Rap 1 (dMicroD-PHFR1) is
anchored from an arch
down in the first
pothole and uses about
95 feet of rope down
into and across a large
pothole below. Please
use a retrievable anchor
using as little rope as
practical to keep rope
grooving to a minimum.
Optionally you can
anchor from on of the
trees on the RDC side
but you will need a
little longer rope.
The pothole at the
bottom of rap 1 is deep
with an undercut lip
and, if not full of
water or sand, will
require potshots to get
out of. Escaping this
pothole can be very
difficult in some
conditions. There is a
smaller pothole on the
RDC side where the
potshots can be placed
for a very secure hold.
The potshots can be
lowered from the top of
rap 1 using a 65 foot
rope. After the potshots
are lowered into the
small pothole the rope
can be dropped down into
the large pothole to be
used by someone to
escape.
Note:
Optionally you can
scramble down the steep
featured slickrock on
the LDC (north) side to
bypass this rap and the
3 potholes below.
Note:
When we were there May
2020 the water was 8
feet down from the lip
of the pothole and was
still swimming depth
with water making the
escape challenging.
After getting out of the
pothole below rap 1,
there are 2 more
potholes (MicroD-PHF-1)
with the first being a
difficult escape and the
second being easy to
step around on the RDC
side. Optionally both
potholes can be
scrambled around by
going up and over on the
LDC side.
Throwing potshots to get
past the fist pothole
requires one to toss a
potshot almost 50 feet
to get past a sharp lip
that is just beyond the
second pothole. This is
a difficult throw due to
the long distance but is
a good practice spot as
you can easily bypass
these potholes by
scrambling around the
LDC side if needed.
About 60 feet down
canyon is a large
pothole easily walked /
scrambled around on the
RDC side (MicroD-PHF-2).
About 80 feet down
canyon is rap 2.
Rap 2 (dMicroD-PHFR2a)
is anchored from a tree
on the RDC (southeast)
side about 20 feet back
from the lip and uses
about 175 feet of rope
to go over both potholes
and into Micro Death
Hollow. Depending
on conditions the
potholes can be
difficult to get out of
and will likely require
a lot of work to set
potshots for exit.
Note:
When we were there May
2020 The first pothole
was mostly full of water
and had water and an
undercut lip below
waterline making it a
little tricky to get out
of. The second and
final pothole had water
about 8 feet down from
the lip and was chest
deep water with a sandy
bottom and required the
rope and potshots as
well as ascending gear
to get out of.
Warning /
Note:
Before sending
everyone down rap 2, be
sure you have potshots
set to exit the final
pothole. Optionally you
could use anchors way
out on the LDC
(northwest) side up on
ledges and rap past the
potholes, but I have not
measured the rope length
needed for that. A long
length of webbing may
be needed to extend far
enough to make a 200
foot rope work.
Warning / Note:
Tossing potshots for the
final pothole is not
possible from the top of
rap 2 and will be a long
difficult toss from the
lip between the two
potholes below rap 2.
The alternative we used
was to
scramble up the ledges
way out to the LDC
(northwest) side then
lower a few full
potshots down to below
the final potholes then
walk the top part of
that rope back over
to the top of rap 2 and
drop it down into the
potholes for use as an
escape rope. To do this
a 200 foot rope extended
by another rope of about
70 feet works well. To
get the correct fall
line of the potshots you
are lowering, you will
need to go about 90 feet
north of the top of rap
2 (dMicroD-PHFR2b). If you do not go far
enough out, the potshots
will be pulled into the
final pothole and not be
useful. The 200 foot
rope and extension is so
you have enough rope to
both lower the potshots
then drag the end over
to the top of rap 2. As
you scramble along the
ledges you may find
multiple anchors rigged
from various bushes.
Be sure to find one far
enough out that you can
lower the potshots to
below the final pothole.
Continuing Down
Canyon after the two
entry options join:
From where the Standard
Entry down the main
canyon and the Pothole
Fork Entry meet
(MicroDeath04) continue
down canyon about 550 feet farther
is a drop (MicroDeath05)
of about 15 feet down
into skinny walls where
you will need to turn
sideways in places to
continue. You can stay
high with moderate
galumphing / easy
stemming but will
eventually need to
downclimb to the canyon
floor. This skinny
section goes for about
500 feet before the
canyon widens out again
to easy walking.
As the canyon widens out
(MicroDeath06) to easy
walking and slowly gets
much wider enjoy the
open spaces.
About 700 feet farther
the LDC (west) side
walls get low
(MicroDeath07) and
featured making a climb
up out of the side
possible with some
effort.
about 250 farther the
canyon gets narrow again
(MicroDeath08) and
presents a few moderate
downclimbs with only
about 400 feet of canyon
left.
About 250 feet farther
is raps 2 and 3
(dMicroDeathR3)
Rap 2 anchored using a
dead man anchor and
drops about 25 feet to a
pool with an arch to
walk / swim under. If
full of water the arch
will not be visible and
it will look like you
are in a deep keeper
pothole. If the arch is
not visible it is
possible to swim under
it by going under water
about 2 feet slightly
RDC of center and swim
under the arch.
Rap 3 can be anchored
using a retrievable
anchor (The Smooth
Operator for example)
around the arch and
drops about 80 feet down
to the end of the canyon
where it drops into open
spaces and the Escalante
River. Using a
retrievable anchor
around the arch will use
about 20 feet of extra
rope so about 100 feet
of rope will be used for
rap 3.
Note:
Raps 2 and 3 can be
combined but this may be
a very difficult pull.
If using the anchor for
rap 2 and rapping all
the way through (which
may be needed if full of
water), extend the
anchor as far as
possible to provide the
best pull line possible.
Combining raps 2 and 3
will use about 130 feet
of rope.
After rap 3 the canyon
opens up to the wide
Escalante River.
Walk about 150 feet over
toward the river
(yMicroDeathBt).
The Exit:
From the
end of Micro Death
Hollow (yMicroDeathBt)
turn left and walk north
up the Escalante River
where travel is a mix of
walking up the river and
a intermittent use
trails.
About 0.25 miles up
river a side drainage
joins (MicroDeath09) in
from the Right (north).
If you can see past the
vegetation you may be
able to see a 40 foot
dry fall about 70 feet
back in the drainage. To
exit Micro Death Hollow
continue west up the
Escalante River.
About 650 feet farther
up river is a spot
(MicroDeath10) on
the right (north) side
where you could make
your way up out of the
Escalante up a vegetated
dirt slope. To exit
Micro Death Hollow
continue northwest up
the Escalante River.
Note:
While not easily seen
while walking up the
Escalante, there are use
trails up on the left
(south). You can try to
find your way up the
vegetated side up to the
use trails or continue
walk up the Escalante.
About 600 feet farther
side drainage
(MicroDeath11) that
joins in from the Right
(north). To exit Micro
Death Hollow continue
west up the Escalante
River.
About 250 feet farther
is a grass covered dirt
slope (jMicroDeathEx) on
the left (south) side
has use trails forming
that lead up out of the
Escalante.
Note:
There are use trails
leading along both sides
of the Escalante River
and these use trails
leading up out of the
river may be overlooked
if you are not looking
for them. It is easy to
see use trails following
the river and mindlessly
follow them. This hike
out spot is relatively
easy to find if you are
actively looking for it.
If you blindly follow
the use trails running
along the river you may
walk right by this exit.
About 670 feet up from
the river use trails up
out of the Escalante
River meet
(MicroDeath12)
semi-steeply sloped
slickrock. Route find
your way southwest up
along the left (west)
side of a wide shallow
slickrock drainage for
about 350 feet to where
the upper end meets a
steep slickrock wall.
Where the upper end of
the slickrock drainage
ends and meets
(MicroDeath13) a steep
slickrock wall. Turn
left and walk east along
a narrow ledge for about
300 feet to where it
widens out. About half
way across the ledge is
a small section where
the ledge is narrow and
care should be taken not
to slip.
Be careful at the narrow
spot (MicroDeath14)
along the ledge, this
spot is not difficult
but does have some
exposure which can
result in a little
pucker factor.
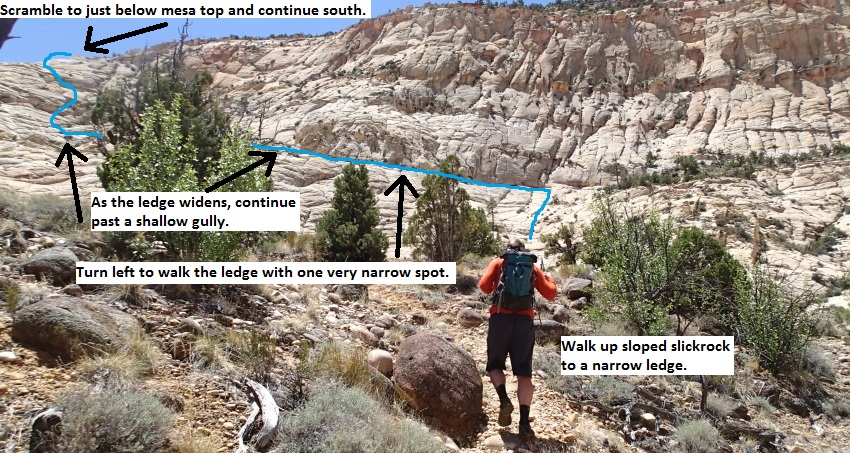
A little over 100 feet
after the narrow spot
the ledge widens out to
wide open slickrock
(MicroDeath15). Continue
east about 300 feet to
just after crossing a
shallow gully.
Just after crossing over
a small shallow gully
(MicroDeath16) running
up to the south, route
find and scramble your
way south up the sloped
ledgey slickrock staying
east of the gully (the
gully will be on your
right / west).
About 325 feet up the
ledges the scramble up
gets to where you can
veer south
(MicroDeath17) and walk
easy ledges on gently
sloped slickrock to the
south. Here you
will be a short distance
down from the dirt mesa
above. Continue south
for about 400 feet to a
small flat grassy area.
Note:
The large drainage on
the left (east) is Micro
Death Hollow and you
will be roughly rim
walking it back to the
head of the canyon.
From the small flat
grassy area
(MicroDeath18) continue
south for about 300 feet
to a larger flat grassy
area with some rock
outcroppings.
From the large flat
grassy area
(MicroDeath19) with a
couple rock
outcroppings, continue
south about 300 feet
past the grassy area to
where you can then route
find south down into a
side drainage about 450
feet farther.
Once down in the open
drainage (MicroDeath20)
continue southeast
almost 400 feet over to
the top of where
potholes drop down into
Micro Death Hollow.
Where the series of
potholes drops into
Micro Death Hollow (yNanoDeathTp)
cross over and follow
use trails southeast
about 300 feet back to
the head of Micro Death
Hollow where you can
retrieve your rope from
rap 1. Please
stay off the crypto when
following the use
trails.
Note:
The upper portion of
this pothole section is
sometimes used as an
alternate entry into
Micro Death Hollow.
I have not used this
entry but have come to
call it Nano Death
Hollow. Looking
closely at the LDC side
side webbing can be seen
a ways down rigged from
bushes to rap next to
the potholes down into
Micro Death Hollow.
Looking at Google Earth
there are a few potholes
in a short section just
up canyon of here that
may be good to check out
if doing the Nano Death
Hollow entry.
After getting back to
the head of Micro Death
Hollow (yMicroDeathTp)
retrieve the 300 foot
rope, please walk out to
the LDC side to pull the
rope up to help reduce
rope grooves.
Reverse the approach
route back up to the
parking area (pkMicroDeath).
Downloadable GPX files
available at
BG-Gear Store
(easier than manual entry and a great way to support
Bluugnome).
Waypoint naming convention and map symbol information can be found on the Glossary page.
Elevations are approximate.
BEFORE
manually entering coordinates set your system to WGS84 datum and Lat/Lon hddd.ddddd° coordinate format.
Inconsistent datum's and coordinate formats will result in location errors.
Click to show / expand the list of waypoints below........
| Micro Death Hollow (1) - Drive to Trailhead |
- exMicroDeath
Lat/Lon (WGS84): N 37.74304
W -111.50122
Elev: NaN Feet
Exit off of Highway 12 onto BLM road 107 to the north. Drive north down BLM Road 107 to get to Micro Death Hollow.
- MicroDeathDP1
Lat/Lon (WGS84): N 37.74554
W -111.50271
Elev: NaN Feet
Fork off of BLM Rd 107. Stay right / straight at the fork to travel northish. The fork to the left (west) goes out to a cattle wattering area.
- MicroDeathDP2
Lat/Lon (WGS84): N 37.75599
W -111.50330
Elev: NaN Feet
Fork in the road. Continue straight (north) on BLM road 108 to go to Micro Death Hollow. Straight ahead the the main road continues but changes names to BLM road 108. To the left (west) is Big Flat Road. Of note a faint road also goes off to the right (east).
- MicroDeathDP3
Lat/Lon (WGS84): N 37.76344
W -111.50162
Elev: NaN Feet
Small parking area by the side of the road.
- MicroDeathDP4
Lat/Lon (WGS84): N 37.76422
W -111.50031
Elev: NaN Feet
Fork in the road, stay left.
- pkMicroDeath
Lat/Lon (WGS84): N 37.76487
W -111.50021
Elev: 5,930 Feet
Road ends in a parking area with room for a lot of cars. Park here to start the Micro Death Hollow route.
From the parking area walk east roughly following the rim for about 700 feet to a break in the rim where you can walk down slickrock down to the north. Optionally you can scramble directly down the draiange just east of here.
|
| Micro Death Hollow (2) - Approach |
- pkMicroDeath
Lat/Lon (WGS84): N 37.76487
W -111.50021
Elev: 5,930 Feet
Road ends in a parking area with room for a lot of cars. Park here to start the Micro Death Hollow route.
From the parking area walk east roughly following the rim for about 700 feet to a break in the rim where you can walk down slickrock down to the north. Optionally you can scramble directly down the draiange just east of here.
- MicroDeath01
Lat/Lon (WGS84): N 37.76458
W -111.49778
Elev: NaN Feet
Break in the rim where you can walk down sloped slickrock down to the north.
Note: The canyon that the wash below is draining into about 0.4 miles in the distance is Micro Death Hollow. Route find down the slickrock and into the wash then follow the wash down to the north to Micro Death Hollow.
- MicroDeath02
Lat/Lon (WGS84): N 37.76864
W -111.49640
Elev: NaN Feet
Confluence of washes. Continue northwest down the wash.
- yMicroDeathTp
Lat/Lon (WGS84): N 37.76929
W -111.49724
Elev: 5,710 Feet
Top of Micro Death Hollow Canyon.
Standard Entry:
At the head of the canyon is a drop of about 15 feet where you can downclimb a skinny crack or walk down canyon on the LDC (west) side to a ledge / ramp to get down to a large flat sandy area below. Rap 1 is about 30 feet down canyon on the other side of the flat sandy spot. The easiest place to anchor rap 1 however is from a tree at the head of the canyon above the 15 foot downclimb.
Before dropping down the 15 feet, anchor the 300 foot rope from the tree and leave it there to be retrieved on the exit.
Pothole Fork Entry:
Walk about 300 feet down canyon on the LDC (west) rim to the head of the Pothole Fork of Micro Death Hollow.
|
| Micro Death Hollow (3) - Pothole Fork |
- yMicroDeathTp
Lat/Lon (WGS84): N 37.76929
W -111.49724
Elev: 5,710 Feet
Top of Micro Death Hollow Canyon.
Standard Entry:
At the head of the canyon is a drop of about 15 feet where you can downclimb a skinny crack or walk down canyon on the LDC (west) side to a ledge / ramp to get down to a large flat sandy area below. Rap 1 is about 30 feet down canyon on the other side of the flat sandy spot. The easiest place to anchor rap 1 however is from a tree at the head of the canyon above the 15 foot downclimb.
Before dropping down the 15 feet, anchor the 300 foot rope from the tree and leave it there to be retrieved on the exit.
Pothole Fork Entry:
Walk about 300 feet down canyon on the LDC (west) rim to the head of the Pothole Fork of Micro Death Hollow.
- yMicroD-PHF-Tp
Lat/Lon (WGS84): N 37.76981
W -111.49808
Elev: 5,690 Feet
Top of the Pothole Fork of Micro Death Hollow.
To descend the Pothole Fork of Micro Death Hollow, you can either downclimb down into then through the first pothole or walk around the pothole on the RDC side.
Note:
The Pothole Fork of Micro Death Hollow packs serious punch for those who like to play in large potholes. 3 or more potshots, a Smooth Operator with pull cord, 200 foot rope and a few other shorter ropes is recommended.
When exiting back to the cars, cross over the upper end of potholes and follow use trails southeast about 300 feet back to the head of Micro Death Hollow where you can retrieve your rope from rap 1. Please stay off the crypto when following the use trails.
- dMicroD-PHFR1
Lat/Lon (WGS84): N 37.76989
W -111.49793
Elev: NaN Feet
Rap 1 - Micro Death Hollow Pothole Fork. Anchored from an arch down in the first pothole and uses about 95 feet of rope down into and across a large pothole below. Please use a retrievable anchor using as little rope as practical to keep rope grooving to a minimum. Optionally you can anchor from on of the trees on the RDC side but you will need a little longer rope.
The pothole at the bottom of rap 1 is deep with an undercut lip and, if not full of water or sand, will require potshots to get out of. Escaping this pothole can be very difficult in some conditions. There is a smaller pothole on the RDC side where the potshots can be placed for a very secure hold. The potshots can be lowered from the top of rap 1 using a 65 foot rope. After the potshots are lowered into the small pothole the rope can be dropped down into the large pothole to be used by someone to escape.
Note: Optionally you can scramble down the steep featured slickrock on the LDC (north) side to bypass this rap and the 3 potholes below.
Note: When we were there May 2020 the water was 8 feet down from the lip of the pothole and was still swimming depth with water making the escape challenging.
- MicroD-PHF-1
Lat/Lon (WGS84): N 37.77012
W -111.49769
Elev: NaN Feet
After getting out of the pothole below rap 1, there are 2 more potholes with the first being a difficult escape and the second being easy to step around on the RDC side. Optionally both potholes can be scrambled around by going up and over on the LDC side.
Throwing potshots to get past the fist pothole requires one to toss a potshot almost 50 feet to get past a sharp lip that is just beyond the second pothole. This is a difficult throw due to the long distance but is a good practice spot as you can easily bypass these potholes by scrambling around the LDC side if needed.
- MicroD-PHF-2
Lat/Lon (WGS84): N 37.77028
W -111.49766
Elev: NaN Feet
Large pothole easily walked / scrambled around on the RDC side.
- dMicroD-PHFR2a
Lat/Lon (WGS84): N 37.77043
W -111.49754
Elev: NaN Feet
Rap 2 - Micro Death Hollow Pothole Fork. Anchored from a tree on the RDC (southeast) side about 20 feet back from the lip and uses about 175 feet of rope to go over both potholes and into Micro Death Hollow. Depending on conditions the potholes can be difficult to get out of and will likely require a lot of work to set potshots for exit.
Note: When we were there May 2020 The first pothole was mostly full of water and had water and an undercut lip below waterline making it a little tricky to get out of. The second and final pothole had water about 8 feet down from the lip and was chest deep water with a sandy bottom and required the rope and potshots as well as ascending gear to get out of.
Warning / Note:
Before sending everyone down rap 2, be sure you have potshots set to exit the final pothole. Optionally you could use anchors way out on the LDC (northwest) side up on ledges and rap past the potholes, but I have not measured the rope length needed for that. A long length of webbing may be needed to extend far enough to make a 200 foot rope work.
Warning / Note:
Tossing potshots for the final pothole is not possible from the top of rap 2 and will be a long difficult toss from the lip between the two potholes below rap 2. The alternative we used was to scramble up the ledges way out to the LDC (northwest) side then lower a few full potshots down to below the final potholes then walk the top part of that rope back over to the top of rap 2 and drop it down into the potholes for use as an escape rope. To do this a 200 foot rope extended by another rope of about 70 feet works well. To get the correct fall line of the potshots you are lowering, you will need to go about 90 feet north of the top of rap 2. If you do not go far enough out, the potshots will be pulled into the final pothole and not be useful. The 200 foot rope and extension is so you have enough rope to both lower the potshots then drag the end over to the top of rap 2. As you scramble along the ledges you may find multiple anchors rigged from various bushes. Be sure to find one far enough out that you can lower the potshots to below the final pothole.
- dMicroD-PHFR2b
Lat/Lon (WGS84): N 37.77077
W -111.49772
Elev: NaN Feet
One of a few anchors on the ledges to north and above rap 2 that can be used to lower potshots to below the final pothole or used as an alternate rap station for rap 2 to bypass the potholes entirely. Have not measured what rope length would be needed if rappelling past the potholes but a long webbing extension would likely be needed to make a 200 foot rope work.
- MicroDeath04
Lat/Lon (WGS84): N 37.77064
W -111.49731
Elev: NaN Feet
The Pothole Fork of Micro Death hollow joins in from the LDC (west) side. Continue walking down open v-slot. As you continue the walls slowly become more narrow and you may turn side ways in a few spots to continue down canyon.
|
| Micro Death Hollow (4) - The Canyon |
- yMicroDeathTp
Lat/Lon (WGS84): N 37.76929
W -111.49724
Elev: 5,710 Feet
Top of Micro Death Hollow Canyon.
Standard Entry:
At the head of the canyon is a drop of about 15 feet where you can downclimb a skinny crack or walk down canyon on the LDC (west) side to a ledge / ramp to get down to a large flat sandy area below. Rap 1 is about 30 feet down canyon on the other side of the flat sandy spot. The easiest place to anchor rap 1 however is from a tree at the head of the canyon above the 15 foot downclimb.
Before dropping down the 15 feet, anchor the 300 foot rope from the tree and leave it there to be retrieved on the exit.
Pothole Fork Entry:
Walk about 300 feet down canyon on the LDC (west) rim to the head of the Pothole Fork of Micro Death Hollow.
- dMicroDeathR1
Lat/Lon (WGS84): N 37.76937
W -111.49726
Elev: NaN Feet
Rap 1 - Micro Death Hollow. Anchored from tree at the head of the canyon and will use about 270 feet of rope from the tree to the bottom of rap 1. The vertical portion of rap 1 is a bit over 200 feet but you will need lots of extra rope to set the anchor back to the tree above the drop at the head of the canyon.
Note:
Using a 300 foot rope here works well since you will be leaving the rope here and retrieving it during the exit from the canyon. When retrieving the rope during exit please do not pull the rope from the anchor as this may cause severe rope grooves. Please go down the LDC ramp / ledge to the sandy area and pull the rope from there to reduce rope grooving.
At the bottom of rap 1 is a large pothole that will be a swimmer for about 20 feet if full. If sand is scoured out the down canyon lip is undercut and may be difficult to get out of. Have one potshot handy just incase. After the pothole is a section with easy galumphing about 15 feet off the deck for about 100 feet. As the walls widen out to allow travel on the canyon floor again you soon com to a pothole that may require partner assist to get out of if sand is scoured out. As you exit the pothole the canyon widens briefly.
- MicroDeath03
Lat/Lon (WGS84): N 37.76985
W -111.49732
Elev: NaN Feet
Canyon widens briefly just after getting out of a pothole that may require partner assist. Continuing down canyon is easy walking between narrow walls which slolwy widen out into a wide v-slot to walk in.
- MicroDeath04
Lat/Lon (WGS84): N 37.77064
W -111.49731
Elev: NaN Feet
The Pothole Fork of Micro Death hollow joins in from the LDC (west) side. Continue walking down open v-slot. As you continue the walls slowly become more narrow and you may turn side ways in a few spots to continue down canyon.
- MicroDeath05
Lat/Lon (WGS84): N 37.77221
W -111.49702
Elev: NaN Feet
Drop of about 15 feet down into skinny walls where you will need to turn sideways in places to continue. You can stay high with moderate galumphing / easy stemming but will eventually need to downclimb to the canyon floor. This skinny section goes for about 500 feet before the canyon widens out again to easy walking.
- MicroDeath06
Lat/Lon (WGS84): N 37.77331
W -111.49708
Elev: NaN Feet
The canyon widens out to easy walking again and slowly gets much wider.
- MicroDeath07
Lat/Lon (WGS84): N 37.77466
W -111.49606
Elev: NaN Feet
The LDC (west) side walls get low and featured making a climb up out of the side possible with some effort.
- MicroDeath08
Lat/Lon (WGS84): N 37.77470
W -111.49517
Elev: NaN Feet
Canyon gets narrow again and presents a few moderate downclimbs with only about 400 feet of canyon left.
- dMicroDeathR3
Lat/Lon (WGS84): N 37.77462
W -111.49430
Elev: NaN Feet
Micro Death Hollow - Raps 2 and 3.
Rap 2 anchored using a dead man anchor and drops about 25 feet to a pool with an arch to walk / swim under. If full of water the arch will not be visible and it will look like you are in a deep keeper pothole. If the arch is not visible it is possible to swim under it by going under water about 2 feet slightly RDC of center and swim under the arch.
Rap 3 can be anchored using a retrievable anchor (The Smooth Operator for example) around the arch and drops about 80 feet down to the end of the canyon where it drops into open spaces and the Escalante River. Using a retrievable anchor around the arch will use about 20 feet of extra rope so about 100 feet of rope will be used for rap 3.
Note:
Raps 2 and 3 can be combined but this may be a very difficult pull. If using the anchor for rap 2 and rapping all the way through (which may be needed if full of water), extend the anchor as far as possible to provide the best pull line possible. Combining raps 2 and 3 will use about 130 feet of rope.
- yMicroDeathBt
Lat/Lon (WGS84): N 37.77446
W -111.49385
Elev: 5,360 Feet
Bottom of Micro Death Hollow where it dumps into the wide open Escalante River. To exit trun left and walk west up the Escalante.
|
| Micro Death Hollow (5) - Exit |
- yMicroDeathBt
Lat/Lon (WGS84): N 37.77446
W -111.49385
Elev: 5,360 Feet
Bottom of Micro Death Hollow where it dumps into the wide open Escalante River. To exit trun left and walk west up the Escalante.
- MicroDeath09
Lat/Lon (WGS84): N 37.77744
W -111.49503
Elev: NaN Feet
Side drainane joins in from the Right (north). If you can see past the vegetation you may be able to see a 40 foot dry fall about 70 feet back in the drainage. To exit Micro Death Hollow continue west up the Escalante River.
- MicroDeath10
Lat/Lon (WGS84): N 37.77761
W -111.49721
Elev: NaN Feet
Spot on the right (north) side where you could make your way up out of the Escalante up a vegetated dirt slope. To exit Micro Death Hollow continue northwest up the Escalante River.
Note:
While not easily seen while walking up the Escalante, there are use trails up on the left (south). You can try to find your way up the vegetated side up to the use trails or continue walk up the Escalante.
- MicroDeath11
Lat/Lon (WGS84): N 37.77843
W -111.49856
Elev: NaN Feet
Side drainage joins in from the Right (north). It looks like you can also find your way up to the north side rim up dirt slopes here. To exit Micro Death Hollow continue west up the Escalante River.
- jMicroDeathEx
Lat/Lon (WGS84): N 37.77895
W -111.49920
Elev: 5,400 Feet
A grass covered dirt slope on the left (south) side has use trails forming that lead up out of the Escalante.
Note:
There are use trails leading along both sides of the Escalante River and these use trails leading up out of the river may be overlooked if you are not looking for them. It is easy to see use trails following the river and mindlessly follow them. This hike out spot is relatively easy to find if you are actively looking for it. If you blindly follow the use trails running along the river you may walk right by this exit.
- MicroDeath12
Lat/Lon (WGS84): N 37.77740
W -111.50018
Elev: NaN Feet
Use trails up out of the Escalante River meet semi-steeply sloped slickrock. Route find your way southwest up along the left (west) side of a wide shallow slickrock drainage for about 350 feet to where the upper end meets a steep slickrock wall.
- MicroDeath13
Lat/Lon (WGS84): N 37.77682
W -111.50096
Elev: NaN Feet
Upper end of the slickrock drainage ends as it meets a steep slickrock wall. Turn left and walk east along a narrow ledge for about 300 feet to where it widens out. About half way across the ledge is a small section where the ledge is narrow and care should be taken not to slip.
- MicroDeath14
Lat/Lon (WGS84): N 37.77681
W -111.50046
Elev: NaN Feet
Narrow spot along the ledge where you will need to be careful not to slip off. This spot is not difficult but does have some exposure which can result in a little pucker factor.
- MicroDeath15
Lat/Lon (WGS84): N 37.77679
W -111.49993
Elev: NaN Feet
Ledge widens out to wide open slickrock. Continue east about 300 feet to just after crossing a shallow gully.
- MicroDeath16
Lat/Lon (WGS84): N 37.77637
W -111.49905
Elev: NaN Feet
Just after crossing over a small shallow gully running up to the south. Route find and scramble your way south up the sloped ledgey slickrock staying east of the gully (the gully will be on your right / west).
- MicroDeath17
Lat/Lon (WGS84): N 37.77546
W -111.49905
Elev: NaN Feet
Scramble up gets to where you can veer south and walk easy ledges on gently sloped slickrock to the south. Here you will be a short distance down from the dirt mesa above. Continue south for about 400 feet to a small flat grassy area.
Note: The large drainage on the left (east) is Micro Death Hollow and you will be roughly rim walking it back to the head of the canyon.
- MicroDeath18
Lat/Lon (WGS84): N 37.77432
W -111.49904
Elev: NaN Feet
Small grassy area. Continue south for about 300 feet to a larger flat grassy area with some rock outcroppings.
- MicroDeath19
Lat/Lon (WGS84): N 37.77337
W -111.49878
Elev: NaN Feet
Large flat grassy area with a couple rock outcroppings. Continue south about 300 feet past the grassy area to where you can then route find south down into a side drainage about 450 feet farther.
- MicroDeath20
Lat/Lon (WGS84): N 37.77059
W -111.49887
Elev: NaN Feet
Down in an open portion of a large side drainage. Continue southeast almost 400 feet over to the top of where potholes drop down into Micro Death Hollow.
- yMicroD-PHF-Tp
Lat/Lon (WGS84): N 37.76981
W -111.49808
Elev: 5,690 Feet
Top of the Pothole Fork of Micro Death Hollow.
To descend the Pothole Fork of Micro Death Hollow, you can either downclimb down into then through the first pothole or walk around the pothole on the RDC side.
Note:
The Pothole Fork of Micro Death Hollow packs serious punch for those who like to play in large potholes. 3 or more potshots, a Smooth Operator with pull cord, 200 foot rope and a few other shorter ropes is recommended.
When exiting back to the cars, cross over the upper end of potholes and follow use trails southeast about 300 feet back to the head of Micro Death Hollow where you can retrieve your rope from rap 1. Please stay off the crypto when following the use trails.
- yMicroDeathTp
Lat/Lon (WGS84): N 37.76929
W -111.49724
Elev: 5,710 Feet
Top of Micro Death Hollow Canyon.
Standard Entry:
At the head of the canyon is a drop of about 15 feet where you can downclimb a skinny crack or walk down canyon on the LDC (west) side to a ledge / ramp to get down to a large flat sandy area below. Rap 1 is about 30 feet down canyon on the other side of the flat sandy spot. The easiest place to anchor rap 1 however is from a tree at the head of the canyon above the 15 foot downclimb.
Before dropping down the 15 feet, anchor the 300 foot rope from the tree and leave it there to be retrieved on the exit.
Pothole Fork Entry:
Walk about 300 feet down canyon on the LDC (west) rim to the head of the Pothole Fork of Micro Death Hollow.
- MicroDeath02
Lat/Lon (WGS84): N 37.76864
W -111.49640
Elev: NaN Feet
Confluence of washes. Continue northwest down the wash.
- MicroDeath01
Lat/Lon (WGS84): N 37.76458
W -111.49778
Elev: NaN Feet
Break in the rim where you can walk down sloped slickrock down to the north.
Note: The canyon that the wash below is draining into about 0.4 miles in the distance is Micro Death Hollow. Route find down the slickrock and into the wash then follow the wash down to the north to Micro Death Hollow.
- pkMicroDeath
Lat/Lon (WGS84): N 37.76487
W -111.50021
Elev: 5,930 Feet
Road ends in a parking area with room for a lot of cars. Park here to start the Micro Death Hollow route.
From the parking area walk east roughly following the rim for about 700 feet to a break in the rim where you can walk down slickrock down to the north. Optionally you can scramble directly down the draiange just east of here.
|