Canyoneering Route Description
Big Tony Canyon - 4B IV R (X)
Escalante National Monument, Utah.
2012-10-07, 7 people, 1 Day (Travel time in route 9.8 hours)

2018-05-27, 7 people, 1 Day (Travel time in route 10.5 hours) - Group split
(thru X, bypassed X and Pothole Fork). Time incl. 1 hour break
at water.
2019-04-19, 9 people, 1 Day (Travel time in route 9.75 hours)
2022-11-05, 9 People, 1 Day (Travel time in route 10.4 hours) - Group split
(some thru X and some bypassed X)
Time Required - 9 to 11 hours
Distance - 6.9 miles Total, 0.9 miles Technical
Rappels - 2 Rappels, Longest Rappel 70 feet.
Elevation Range - 4155 - 4720 Feet
Shuttle Required - No Vehicle - High Clearance, 4WD
incase deep sand issues.
Permit Required - No
Rappelling and anchor gear, Ropes and or pull cords for rappels up
to 70 feet and 40 feet of 1 inch webbing for sling placement.
Wetsuits recommended as there are spots that can hold waist to chest
deep water and a couple spots where you may need to swim a short
distance. The underground section can be cold and will likely always
be waist deep in water in a narrow slot. Knee and or elbow
pads also recommended. Bring a head light for the deep dark
slot.
Big Tony is a highly recommended route. It has a little
of everything and is a beautiful place. The hike in provides great views
over the area. In canyon there are flat sandy bottomed corridors, narrow
slots with undulating walls, fun downclimbs over twisted geometry, a 400
foot long X section that can easily be bypassed, a deep narrow section of
slot so deep with debris filling in the overhead crack you are essentially
underground. The exit is down a long winding spring fed section of canyon
with tall walls and lots of vegetation. Big Tony is a must do canyon in the
area.
The X section of Big Tony is about 400 feet long and is
easily bypassed by climbing up out of the canyon on the LDC side then
walking a few hundred feet down canyon where you can scramble back into the
canyon to continue. Just down canyon of the X section are a few spots where
you will be forced off the deck 10 to 15 feet into an R rated section. So
even if bypassing the X section the canyon still deserves an R rating. If
your party splits for the X section and some go in and some bypass, the rim
team can walk over to the rim as it rolls off and watch those in the X
section from above which makes for good social fun between groups. I
have been through with someone 5 foot 1 inch tall who has made it through
the X section so height is not a requirement here.
Large people can make it through Big Tony but will have
a couple spots they wall have to stem / scramble up over form 5 to 10 feet
up. There are only a couple of these spots so travel for our larger partners
in crime will travel smoothly for most of the route.
Be sure to bring a head light in case it is needed when
going down through the deep dark slot. Getting up out of the deep dark
slot can be physically taxing since you will need to stem up about 15 or 20
feet on slick clay covered walls.
Pothole Fork option
A small fork
drops in on the LDC (east) side joining the canyon just after the R section.
The route option we chose in 2018 was to go down through the top of Big Tony
down to the X section, split into two groups (some went through the X and
some bypassed via the rim), the two groups rejoined below the X section then
split again (some went down through the R section and some went over to the
Pothole Fork), the two groups rejoined below the R section where the Pothole
Fork rejoins. The pothole fork was not very exciting and I recommend
staying in Big Tony proper and enjoy the deep feeling R section instead.
This route description includes information for the Pothole Fork for those
who just gotta go see it.
To get to the Trailhead
From the city of Escalante drive about 4 miles southeast on Hwy
12 to the turn off for Hole-In-The-Rock road on the right (extHoleInRock). The condition
of the dirt Hole in the Rock road
varies
a lot with recent rains and road maintenance. High clearance
may be needed in extreme cases but most of the time passenger
cars will be fine for the first 30 or 40 miles on Hole in the
Rock road.
Travel about 31.9 miles southeast on
Hole-In-The-Rock road to the turn off for Chimney Rock (exChimneyRk).
Turn left (northeast) onto Chimney Rock Road and drive about 1.9
miles to a sharp left turn in the road (CimneyRk02).
Follow the sharp turn left to drive east. Beyond this sharp
right turn (CimneyRk02) the road has a lot of deep sand.
High clearance / 4WD is recommended.
About 0.7 miles farther is Chimney Rock and a place to park a
few vehicles (ChimneyRock). This is also where the deep
sand ends.
Continue past Chimney Rock for about 1 mile to the end of the
road to park (pkChimCoyoteA)
To leave the Exit Vehicle / Escape Pod
No exit vehicle is needed. This is done as an out and back
route.
GPS coordinate information listed at the bottom. For information about waypoint naming and map symbols, refer to the
Glossary page.

Click the links for maps of the route.
Map of the drive into the route.
Map zoomed in on final part of drive.
Map of the entire route.
Map of zoomed in on lower part of route.
Map of zoomed in on upper part of route.
The Approach:
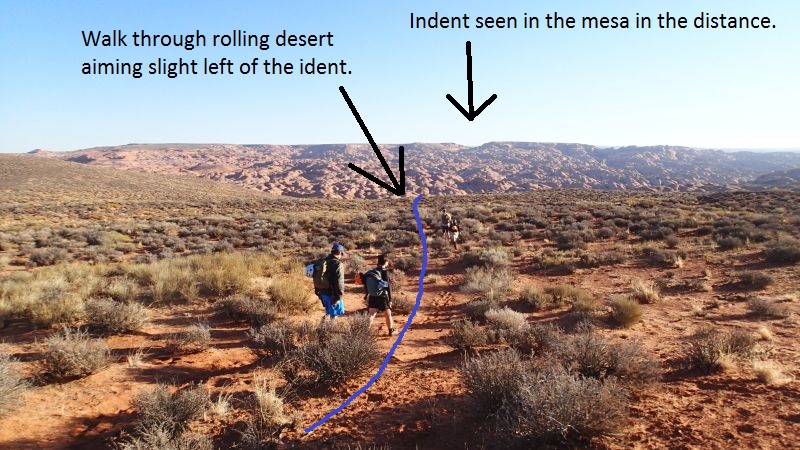
From the parking area (pkChimCoyoteA)
walk northeast toward
the indent seen on the
mesa in the distance.
Aim slight left (west)
of the indent. Walk
through rolling dirt
desert about 0.6 miles
to where the dirt begins
to extend out into
slickrock.
When the dirt begins to
extend out into
slickrock (ChimCoyote11)
continue northeast about
400 feet and starting to
contour down the left
(west) side of the dirt
toward a small short
shallow slot about 400
feet away.
From the top of the
small short shallow slot
(ChimCoyote12) walk
around on the left
(west) side. The route
down into Coyote Gulch
from here will roughly
follow down along the
left (west) side of this
side drainage. Continue
northeast route finding
your way down rolling
slickrock for about 900
feet as you bypass
another slot in this
drainage about 400 feet
long.
After bypassing and
getting to the lower end
(ChimCoyote13) of 400
foot long slot, continue
northeast route finding
your way along rolling
slickrock about 900 feet
to where dirt slopes
lead down into Coyote
Gulch.
From the top of the dirt
slopes (ChimCoyote14)
follow one of many use
trails down into Coyote
Gulch about 200 feet
northeast.
Once down in Coyote
Gulch (jCyoteChimny1)
turn right and walk east
down Coyote Gulch a
little over 500 feet to
a weakness in the side
of the gulch on the LDC
side.
The weakness (jBigTonyApr)
is between a left then a
right turn in the gulch
and right across from a
gate on the RDC side of
Coyote Gulch that does
not appear to have any
function. To go up to
Big Tony, go directly
across from the gate to
a weakness on the LDC
side that allows travel
up the side of the gulch
to the north just left
(west) of what appears
to be a side drainage /
bowl. Route find your
way north then northwest
up the slickrock for
about 0.25 miles until
you get to the top of
the rim looking down
into lower Sleepy
Hollow.
Once on the rim looking
down into lower Sleepy
Hollow / Big Tony
(BigTony01), route find
along rolling slickrock
along the rim for about
1.6 miles up to the head
of Big Tony.
About 0.7 miles up along
the rim you may pass
near a large dirt high
point (BigTony02) while
on the long walk up to
the head of Big Tony.
This is kind of an
arbitrary point since
the terrain is forgiving
and allows for route
finding in a variety of
ways. Depending on
your route through this
area you may or may not
pass by the same point
we have.
About 1 mile farther
along the rim you will
be able to drop down
into Big Tony (yBigTonyTp)
by scrambling down
sloped slickrock down
into the shallow slot
below
The Canyoneering / Technical Section:
From where the
route drops into Big
Tony (yBigTonyTp) the
canyon soon becomes
narrow where you will
need to stem and galumph
a short distance off the
deck and cross over
multiple small potholes
and a few silos that can
be crossed back to feet
before reaching a long
pool about 60 feet long
about 400 feet down
canyon.
The pool (BigTony03) is
about 60 feet long that
tall people can galumph
over (Shorter people
will likely wade to
chest deep).
The next 1000 feet after
the long pool starts
with shallow v-slot to
walk which gives way to
very sculpted, twisted
and undulating walls.
The canyon soon begins
to force you up off the
deck 10 to 15 feet then
back down multiple
times. There are 2
potholes to cross with
the first having an 8
foot downclimb into it
and the second pothole a
little tricky to cross
as you hook around a
left hand corner. Both
potholes will be waist
to chest deep if you go
in (taller people will
likely cross fine). Then
there is a corridor
about 300 feet long with
a boulder debris pile at
the end.
The boulder debris pile
(BigTony04XPas1) is the
start of the 350 feet
long X section in Big
Tony and where you have
a few route options.
To bypass the X section
climb up the boulder
debris and make your way
up to the LDC (east) rim
to bypass the X section
or go drop packs after
the X section so you can
return to do the X with
no packs. Once on the
rim route find your way
about 350 feet down
canyon to a slope where
you can scramble back
down into Big Tony after
the X section.
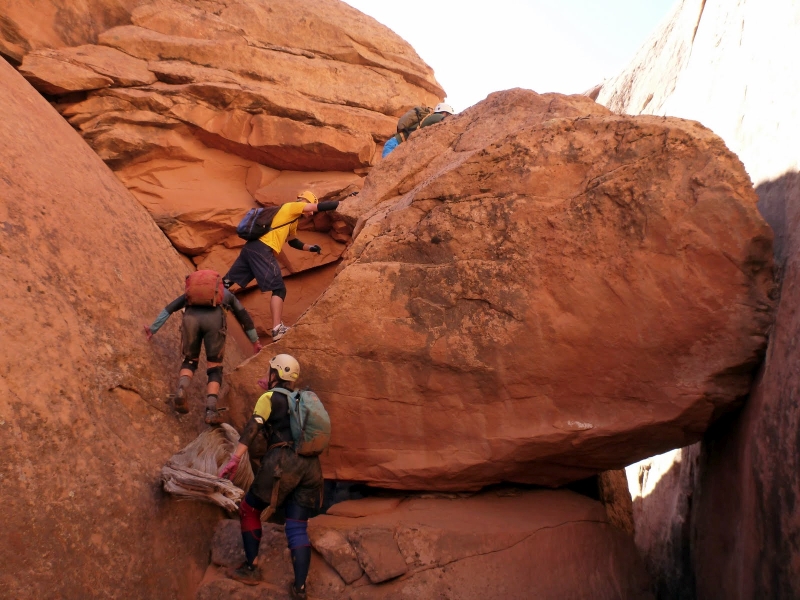
To
travel down the X
section,
scramble under the
boulder debris then
immediately downclimb
all the way to ground.
Once on the ground the
walls remain wide for a
short distance then
pinch in tight. While
still on the floor
squeeze into the crack
continuing down canyon.
As you continue through
the tight walls there
are 3 tubes / wide spots
that you can use to stem
/ upclimb straight up.
Depending on how large
you are will determine
which of the 3 tubes you
can get to. Larger
people in the first
tube, medium people in
the second tube and
smaller people in the
third tube. Any of the
tubes are relatively
easy to stem up with
flowing twisted features
in semi narrow spaces.
The first tube will
require you to stem up
higher and require you
to stem over a silo near
the top. If you are able
to get to the 2nd or 3rd
tube you can avoid the
silo just after the
first tube. After
getting up the tubes to
a comfortable height,
stem / galumph the rest
of the X section. Most
of the X Section you can
be done back to feet but
will be easier if
stemmed and galumphed
since you will go over 5
to 6 silos at about 50
feet up. Smaller people
will need to drop down a
few feet lower crossing
a couple of the silos
where it narrows a
little. The movement in
the X section is
relatively easy and most
fit people accustomed to
stemming should be able
to complete the X
section if they are
willing to take the risk
of being up that high. I
have been through with
someone 5 foot 1 inch
tall who has made it
through the X section so
height is not a
requirement here.
If the group
splits with some people doing
the X section and some
people bypassing, those
on the rim can walk
along with the X
travelers for the last
portion of the X
section.
 If
bypassing the X section
scramble up this boulder
then work your way up one
more small ledge on the way
to the rim. Then route
find your way down canyon to
the re-entry spot.
If
bypassing the X section
scramble up this boulder
then work your way up one
more small ledge on the way
to the rim. Then route
find your way down canyon to
the re-entry spot.
 The
last 6 to 8 feet of the re-entry after bypassing the X section may require a
partner assist depending on skill level. The last part of the scramble
down goes almost vertical with features to get you down into a stem position
between the walls about 5 to 10 feet off the deck, making re-entry an R rating.
The
last 6 to 8 feet of the re-entry after bypassing the X section may require a
partner assist depending on skill level. The last part of the scramble
down goes almost vertical with features to get you down into a stem position
between the walls about 5 to 10 feet off the deck, making re-entry an R rating.
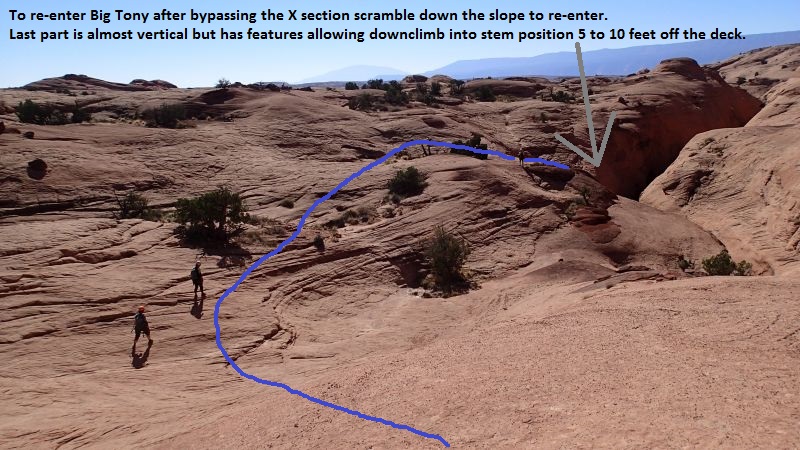 After
making it to the rim when bypassing the X section route find your way over to
the re-entry spot shown.
After
making it to the rim when bypassing the X section route find your way over to
the re-entry spot shown.
Pothole Fork
If you
are going to the Pothole
Fork climb up to the rim
like you are bypassing
the X section.
Once on the rim route
find rolling slickrock
south southwest for
about 800 feet over to
the head of the Pothole
Fork (yPHF-BigTonyTp)
where you can scramble
down gentle slopes into
the canyon. Down
canyon the slot gets
deeper but is still
V-slot with shallow
potholes to bridge /
stem over. About
350 feet down canyon is
the first rap in the
Pothole Fork
(dPHF-BigT-R1) which is
anchored using Sandtrap
if dry or watertrap if
wet and drops about 20
feet to a ledge on the
LDC side where you can
scramble around a
pothole and arch. Down
canyon is a few potholes
to bridge stem over and
a couple easy downclimbs
before reaching rap 2
about 75 feet down
canyon. Rap 2 in
the Pothole Fork
(dPHF-BigT-R2) is
anchored from an arch
about head high on the
RDC side and drops about
25 feet. After the rap
is easy almost level
travel for about 160
feet to the end of the
fork where it rejoins
the main canyon of Big
Tony (BigTony05-PHF).
If you did the Pothole
Fork skip the next
paragraph.
When you get to the end
of the X Section
(BigTony04XPas2) rather
you went through or
bypassed, make your way
down canyon about 1,000
feet to a boulder debris
pile with a side
drainage coming in on
the LDC side. In that
1,000 feet there may be
a lot of wading to waist
deep deep if full with a
couple spots being chest
deep. This section
starts narrow as you
downclimb through and
over a few silos where
you will have short
sections where you will
be 10 to 15 feet off the
deck. Then under a
natural bridge, through
one skinny squeeze spot
that can be climbed up
over about 8 feet if
needed. Shortly after is
one other tight spot to
go over about 5 feet up
or laydown and squirm
under if sand is low and
you are not too large.
After the second squeeze
spot the canyon gives
way to a long sand
bottomed corridor of a
few hundred feet long
with scenic undulating
walls and may have more
wading to waist deep if
full.
From the boulder debris
pile where the Pothole
Fork rejoins (BigTony05-PHF), make
your way down canyon a
little over 100 feet to
rap 1.
Rap 1 (dBigTonyR1) is
anchored from one of
many boulders and drops
about 70 feet.
Just after rap 1 is a
couple more boulder
debris piles to scramble
through and over with
one elevator style
downclimb of about 30
feet mixed in there.
Shortly after is a
skinny section where you
will be 10 to 15 feet
off the deck working
your way down canyon and
down to the floor. Next
is the deep dark slot
where little to no light
enters.
From the start of the
deep dark slot
(BigTony06DrkTp) work
your way down into the
blackness below as you
stem / slide down at an
angle working your way
down from choke stone to
choke stone. This will
get you to the canyon
floor where it is very
dark since the canyon
walls above pinch off to
almost nothing letting
little to no light in.
If dry you will have a
pretty easy travel
through this dark
section as you turn
sideways and shimmy down
canyon. If wet this
section can be a long
wade up to chest deep
and be slick with clay
like mud on the walls.
To get up out of the
lower end this dark
section you will need to
stem up 15 to 20 feet up
mostly vertical walls
with few features. This
can be very difficult if
the canyon is wet and
the walls are coted with
clay like mud (ask me
how I know this). After
stemming up the 20 ish
feet you will galumph
down canyon at that
height for about 80 feet
to get to where you can
walk.
Shortly down canyon is a
boulder debris pile just
after the long dark
section
(BigTony07DrkBt). Travel
down canyon walking and
enjoying deep narrow
canyon with scenic
undulating walls. Soon
will be a section with a
couple short downclimbs
and a long corridor that
can hold a lot of water
making chest to waist
deep wading and one
section of about 60 feet
to swim. The water here
can be pretty cold.
At the other end of the
long swim is more
boulder debris to
scramble over and
through to the top of
the final rap.
Rap 2 (dBigTonyR2) is
anchored from a pinch
point under a large
boulder and drops about
70 feet to a very wide
and vegetated canyon and
the technical section
ends (yBigTonyBt).
The Exit:
From
where the canyon opens
up after rap 2 (yBigTonyBt)
walk the very wet and
vegetated drainage
enjoying the the beauty
for about 1.2 miles to
where Big Tony meets
Coyote Gulch.
Just before reaching the
end you can go up and
over to the right (west)
of a big monolithic rock
(BigTony08) now
traveling up out of the
Big Tony Drainage. As
you get to a large
monolithic rock on the
RDC (west) side of the
drainage travel up to
the right (west) of the
monolith and route find
your way back down into
Coyote Gulch.
About 150 feet farther
you will drop back
down to Coyote Gulch (jBigTonyExt)
a little up stream of
the actual confluence
with the Big Tony
drainage. Turn
right and walk west up
Coyote Gulch about 0.6
miles back to where the
approach route dropped
into Coyote Gulch
(jCyoteChimny1).
Turn left and make your
way southwest up the
dirt slopes and reverse
the approach route back
to the cars.
Downloadable GPX files
available at
BG-Gear Store
(easier than manual entry and a great way to support
Bluugnome).
Waypoint naming convention and map symbol information can be found on the Glossary page.
Elevations are approximate.
BEFORE
manually entering coordinates set your system to WGS84 datum and Lat/Lon hddd.ddddd° coordinate format.
Inconsistent datum's and coordinate formats will result in location errors.
Click to show / expand the list of waypoints below........
| Big Tony (1) - Drive into Trailhead |
- extHoleInRock
Lat/Lon (WGS84): N 37.72769
W -111.53143
Elev: NaN Feet
Turn off to Hole-In-The-Rock road from Hwy 12.
- exHarrisWash
Lat/Lon (WGS84): N 37.60644
W -111.42794
Elev: NaN Feet
Turn off to Harris Wash Road to the east.
- extEgypt
Lat/Lon (WGS84): N 37.54114
W -111.36176
Elev: 5,279 Feet
Turn off to the Egypt Road to the east (left on the drive in on Hole in the Rock road..
- extDryForkTH1
Lat/Lon (WGS84): N 37.46638
W -111.22344
Elev: 4,890 Feet
Turn off of Hole-In-The-Rock road toward Dry Fork trailhead. BLM road 252
This is about 25 miles down Hole in the Rock road.
- exRedwell
Lat/Lon (WGS84): N 37.42104
W -111.16191
Elev: 4,581 Feet
Exit to Red Well on BLM road 254.
- exChimneyRk
Lat/Lon (WGS84): N 37.39317
W -111.14345
Elev: 4,831 Feet
Exit to Chimney Rock off off Hole in the Rock road.
This is about 31.9 miles down Hole in the Rock road.
- CimneyRk01
Lat/Lon (WGS84): N 37.39800
W -111.13679
Elev: 4,878 Feet
Exit off to a faint side road to the east.
- CimneyRk02
Lat/Lon (WGS84): N 37.41562
W -111.12539
Elev: 4,735 Feet
Junction in the road. Turn right (east) to drive out to Chimney Rock which gets deep and sandy beyond this point.. Another road contiues north.
- ChimneyRock
Lat/Lon (WGS84): N 37.41085
W -111.11288
Elev: 4,685 Feet
Chimney Rock with lots of area to park and camp.
- pkChimCoyoteA
Lat/Lon (WGS84): N 37.41648
W -111.09846
Elev: 4,720 Feet
Park at end of dirt road here to start the hike to many canyons in this area. Big Tony, DDI, Lower PINTAC, Headless Hen, Raven and others.
To go toward Big Tony, walk northeast toward the indent seen on the mesa in the distance. Aim slight left (west) of the indent. Walk through rolling dirt desert about 0.6 miles to where the dirt begins to extend out into slickrock.
To go toward Raven and Headless Hen, walk northwest on a bearing of about 326 degrees for about 0.65 miles to where the open desert begins to hit slickrock. A GPS or good navigation skills will be helpful here as there are no obvious landmarks.
|
| Big Tony (2) - Approach |
- pkChimCoyoteA
Lat/Lon (WGS84): N 37.41648
W -111.09846
Elev: 4,720 Feet
Park at end of dirt road here to start the hike to many canyons in this area. Big Tony, DDI, Lower PINTAC, Headless Hen, Raven and others.
To go toward Big Tony, walk northeast toward the indent seen on the mesa in the distance. Aim slight left (west) of the indent. Walk through rolling dirt desert about 0.6 miles to where the dirt begins to extend out into slickrock.
To go toward Raven and Headless Hen, walk northwest on a bearing of about 326 degrees for about 0.65 miles to where the open desert begins to hit slickrock. A GPS or good navigation skills will be helpful here as there are no obvious landmarks.
- ChimCoyote11
Lat/Lon (WGS84): N 37.42328
W -111.09231
Elev: NaN Feet
A section of the dirt desert begins to extend out into slickrock. Continue northeast about 400 feet and starting to contour down the left (west) side of the dirt toward a small short shallow slot about 400 feet away.
- ChimCoyote12
Lat/Lon (WGS84): N 37.42413
W -111.09136
Elev: NaN Feet
Top of a small short shallow slot to walk around on the left (west) side. The route down into Coyote Gulch from here will roughly follow down along the left (west) side of this side drainage. Continue northeast route finding your way down rolling slickrock for about 900 feet as you bypass another slot in this drainage about 400 feet long.
- ChimCoyote13
Lat/Lon (WGS84): N 37.42570
W -111.08949
Elev: NaN Feet
Lower end of the slot about 400 feet long in the side drainage, continue northeast route finding your way along rolling slickrock about 900 feet to where dirt slopes lead down into Coyote Gulch.
- ChimCoyote14
Lat/Lon (WGS84): N 37.42687
W -111.08674
Elev: NaN Feet
Top of dirt slopes leading down into Coyote Gulch. Follow one of many use trails down into Coyote Gulch about 200 feet northeast.
- jCyoteChimny1
Lat/Lon (WGS84): N 37.42729
W -111.08622
Elev: 4,190 Feet
Route down from the end of the Chimney Rock road meets Coyote Gluch here.
To continue to Big Tony, walk east down Coyote Gulch a little over 500 feet to a weakness in the side of the gulch on the LDC side. The weakeness is between a left then a right turn in the gulch and right across from a gate.
- jBigTonyApr
Lat/Lon (WGS84): N 37.42724
W -111.08469
Elev: 4,210 Feet
There is a gate here on the RDC side of Coyote Gulch that does not appear to have any function.
To go up to Big Tony, go directly across from the gate to a weakness on the LDC side that allows travel up the side of the gulch to the north just left (west) of what appears to be a side drainage / bowl. Route find your way north then northeast up the slickrock for about 0.25 miles until you get to the top of the rim looking down into lower Sleepy Hollow.
- BigTony01
Lat/Lon (WGS84): N 37.43017
W -111.08215
Elev: NaN Feet
On the rim of Sleepy Hollow / Big Tony about 0.25 mile after leaving Coyote Gulch. Route find along rolling slickrock along the rim for about 1.6 miles up to the head of Big Tony.
- BigTony02
Lat/Lon (WGS84): N 37.43985
W -111.08077
Elev: 4,620 Feet
Route up to Big Tony passes near a large dirt high point while on the long walk up to the head of Big Tony. This is kind of an arbitrary point since the terrain is forgiving and allows for route finding in a variety of ways.
- yBigTonyTp
Lat/Lon (WGS84): N 37.45259
W -111.07903
Elev: 4,680 Feet
Top of Big Tony where you can scramble down sloped slickrock down into the shallow slot below.
Down canyon of here it soon becomes narrow where you will need to stem and galumph a short distance off the deck and cross over multiple small potholes and a few silos that can be crossed back to feet before reaching a long pool about 60 feet long about 400 feet down canyon.
|
| Big Tony (3) - The Canyon |
- yBigTonyTp
Lat/Lon (WGS84): N 37.45259
W -111.07903
Elev: 4,680 Feet
Top of Big Tony where you can scramble down sloped slickrock down into the shallow slot below.
Down canyon of here it soon becomes narrow where you will need to stem and galumph a short distance off the deck and cross over multiple small potholes and a few silos that can be crossed back to feet before reaching a long pool about 60 feet long about 400 feet down canyon.
- BigTony03
Lat/Lon (WGS84): N 37.45155
W -111.07949
Elev: NaN Feet
Pool about 60 feet long that tall people can galumph over (Shorter people will likely wade to chest deep).
The next 1000 feet after the long pool starts with shallow v-slot to walk which gives way to very sculpted, twisted and undulating walls. The canyon soon begins to force you up off the deck 10 to 15 feet then back down multiple times. There are 2 potholes to cross with the first having an 8 foot downclimb into it and the second pothole a little tricky to cross as you hook around a left hand corner. Both potholes will be waist to chest deep if you go in (taller people will likely cross fine). Then there is a corridor about 300 feet long with a boulder debris pile at the end.
- BigTony04XPas1
Lat/Lon (WGS84): N 37.44906
W -111.08008
Elev: NaN Feet
Boulder debris pile at the end of a corridor.
This is the start of the 350 feet long X section in Big Tony.
To bypass the X section climb up the boulder debris and make your way up to the LDC (east) rim to bypass the X section or go drop packs after the X section so you can return to do the X with no packs. Once on the rim route find your way about 350 feet down canyon to a slope where you can scramble back down into Big Tony after the X section.
To travel down the X section, scramble under the boulder debris then imediately downclimb all the way to ground. Once on the ground the walls remain wide for a short distance then pinch in tight. While still on the floor squeeze into the crack continuing downcanyon. As you continue through the tight walls there are 3 tubes / wide spots that you can use to stem / upclimb straight up. Depending on how large you are will determine which of the 3 tubes you can get to. Larger people in the first tube, medium people in the second tube and smaller people in the third tube. Any of the tubes are reletively easy to stem up with flowing tiwsted features in semi narrow spaces. The first tube will require you to stem up higher and require you to stem over a silo near the top. If you are able to get to teh 2nd or 3rd tube you can avoid the silo just after the first tube. After getting up the tubes to a comfortable height, stem / galumph the rest of the X section. Most of the X Section you can be done back to feet but will be easier if stemmed and galumphed since you will go over 5 to 6 silos at about 50 feet up. Smaller people will need to drop down a few feet lower crossing a couple of the silos where it narrows a little. The movement in the X section is reletively easy and most fit people accustomed to stemming should be able to complete the X section if they are willing to take the risk of being up that high. I have been through with someone 5 foot 1 inch tall who has made it through the X section so height is not a requirement here.
If you have some people doing the X section and some people bypassing, those on the rim can walk along with the X travelers for the last portion of the X section.
- BigTony04XPas2
Lat/Lon (WGS84): N 37.44795
W -111.08004
Elev: NaN Feet
This is the end of the 350 foot long X section where you can also scramble back down from the LDC side if bypassed.
To re-enter Big Tony scramble down the steep slickrock. The last part of the scramble down goes almost vertical with features to get you down into a stem postiton between the walls about 5 to 10 feet off the deck, making re-entry an R rating.
About 1,000 feet down canyon of here is a boulder debris pile with a side drainage coming in on the LDC side. In that 1,000 feet there may be a lot of wading to waist deep deep if full with a couple spots being chest deep. This section starts narrow as you downclimb through and over a few silos where you will have short sections where you will be 10 to 15 feet off the deck. Then under a natural bridge, through one skinny squeeze spot that can be climbed up over about 8 feet if needed. Shortly after is one other tight spot to go over about 5 feet up or laydown and squirm under if sand is low and you are not too large. After the second squeeze spot the canyon gives way to a long sand bottomed corridor of a few hundred feet long with scenic undulating walls and may have more wading to waist deep if full.
- BigTony05-PHF
Lat/Lon (WGS84): N 37.44495
W -111.08077
Elev: 4,525 Feet
Boulder debris pile at the end of a corridor that is a few hundred feet long. At this boulder debris pile is also where the Pothole Fork rejoins the main canyon coming in on the LDC side.
- dBigTonyR1
Lat/Lon (WGS84): N 37.44452
W -111.08035
Elev: NaN Feet
Rap 1 - Big Tony. Anchored from one of many boulders and drops about 70 feet.
Just after rap 1 is a couple more boulder debris piles to scramble through and over with one elevator style downclimb of about 30 feet mixed in there. Shortly after is a skinny section where you will be 10 to 15 feet off the deck working your way down canyon and down to the floor. Next is the deep dark slot where little to no light enters.
- BigTony06DrkTp
Lat/Lon (WGS84): N 37.44389
W -111.07967
Elev: NaN Feet
Approximate start of the deep dark slot in Big Tony.
Work your way down into the blackness below as you stem / slide down at an angle working your way down from choke stone to choke stone. This will get you to the canyon floor where it is very dark since the canyon walls above pinch off to almost nothing letting little to no light in. If dry you will have a pretty easy travel through this dark section as you turn sideways and shimmy down canyon. If wet this section can be a long wade up to chest deep and be slick with clay like mud on the walls.
To get up out of this dark section you will need to stem up 15 to 20 feet up mostly vertical walls with few features. This can be very difficult if the canyon is wet and the walls are coted with clay like mud (ask me how I know this). After stemming up the 20 ish feet you will galumph down canyon at that height for about 80 feet to get to where you can walk.
- BigTony07DrkBt
Lat/Lon (WGS84): N 37.44273
W -111.07874
Elev: NaN Feet
Boulder debris pile just after the long dark section. Travel down canyon walking and enjoying deep narrow canyon with scenic undulating walls. Soon will be a section with a couple short downclimbs and a long corridor that can hold a lot of water making chest to waist deep wading and one section of about 60 feet to swim. The water here can be pretty cold.
At the other end of the long swim is more boulder debris to scramble over and through to the top of the final rap.
- dBigTonyR2
Lat/Lon (WGS84): N 37.44137
W -111.07884
Elev: NaN Feet
Rap 2 - Big Tony. Anchored from a pinch point under a large boulder and drops about 70 feet to a very wide and vegetated canyon. Alternately this can be broken up into two separate raps of about 20 then 50 feet each. Breaking this rap inot two raps may help with rope pull issues.
- yBigTonyBt
Lat/Lon (WGS84): N 37.44123
W -111.07888
Elev: 4,450 Feet
Bottom of Big Tony technical section. Walk the very wet and vegetated drainage enjoying the the beauty for about 1.2 miles to where Big Tony meets Coyote Gulch.
|
| Big Tony (4) - Exit |
- yBigTonyBt
Lat/Lon (WGS84): N 37.44123
W -111.07888
Elev: 4,450 Feet
Bottom of Big Tony technical section. Walk the very wet and vegetated drainage enjoying the the beauty for about 1.2 miles to where Big Tony meets Coyote Gulch.
- BigTony08
Lat/Lon (WGS84): N 37.42688
W -111.07833
Elev: NaN Feet
Going up and over to the right (west) of a big monolithic rock now traveling up out of the Big Tony Drainage. As you get to a large monolithic rock on the RDC (west) side of the drainage travel up to the right (west) of the monolith and route find your way back down into Coyote Gulch.
There is an inscription at this point dated May 16, 1902 - Ezya Mcinelly.
- jBigTonyExt
Lat/Lon (WGS84): N 37.42650
W -111.07838
Elev: 4,155 Feet
Bottom of the Big Tony route where you drop back down to Coyote Gulch a little up stream of the actual confluence with the Big Tony drainage.
- jBigTonyApr
Lat/Lon (WGS84): N 37.42724
W -111.08469
Elev: 4,210 Feet
There is a gate here on the RDC side of Coyote Gulch that does not appear to have any function.
To go up to Big Tony, go directly across from the gate to a weakness on the LDC side that allows travel up the side of the gulch to the north just left (west) of what appears to be a side drainage / bowl. Route find your way north then northeast up the slickrock for about 0.25 miles until you get to the top of the rim looking down into lower Sleepy Hollow.
- jCyoteChimny1
Lat/Lon (WGS84): N 37.42729
W -111.08622
Elev: 4,190 Feet
Route down from the end of the Chimney Rock road meets Coyote Gluch here.
To continue to Big Tony, walk east down Coyote Gulch a little over 500 feet to a weakness in the side of the gulch on the LDC side. The weakeness is between a left then a right turn in the gulch and right across from a gate.
- ChimCoyote14
Lat/Lon (WGS84): N 37.42687
W -111.08674
Elev: NaN Feet
Top of dirt slopes leading down into Coyote Gulch. Follow one of many use trails down into Coyote Gulch about 200 feet northeast.
- ChimCoyote13
Lat/Lon (WGS84): N 37.42570
W -111.08949
Elev: NaN Feet
Lower end of the slot about 400 feet long in the side drainage, continue northeast route finding your way along rolling slickrock about 900 feet to where dirt slopes lead down into Coyote Gulch.
- ChimCoyote12
Lat/Lon (WGS84): N 37.42413
W -111.09136
Elev: NaN Feet
Top of a small short shallow slot to walk around on the left (west) side. The route down into Coyote Gulch from here will roughly follow down along the left (west) side of this side drainage. Continue northeast route finding your way down rolling slickrock for about 900 feet as you bypass another slot in this drainage about 400 feet long.
- ChimCoyote11
Lat/Lon (WGS84): N 37.42328
W -111.09231
Elev: NaN Feet
A section of the dirt desert begins to extend out into slickrock. Continue northeast about 400 feet and starting to contour down the left (west) side of the dirt toward a small short shallow slot about 400 feet away.
- pkChimCoyoteA
Lat/Lon (WGS84): N 37.41648
W -111.09846
Elev: 4,720 Feet
Park at end of dirt road here to start the hike to many canyons in this area. Big Tony, DDI, Lower PINTAC, Headless Hen, Raven and others.
To go toward Big Tony, walk northeast toward the indent seen on the mesa in the distance. Aim slight left (west) of the indent. Walk through rolling dirt desert about 0.6 miles to where the dirt begins to extend out into slickrock.
To go toward Raven and Headless Hen, walk northwest on a bearing of about 326 degrees for about 0.65 miles to where the open desert begins to hit slickrock. A GPS or good navigation skills will be helpful here as there are no obvious landmarks.
|
| Big Tony (5) - Pothole Fork Option |
- BigTony04XPas1
Lat/Lon (WGS84): N 37.44906
W -111.08008
Elev: NaN Feet
Boulder debris pile at the end of a corridor.
This is the start of the 350 feet long X section in Big Tony.
To bypass the X section climb up the boulder debris and make your way up to the LDC (east) rim to bypass the X section or go drop packs after the X section so you can return to do the X with no packs. Once on the rim route find your way about 350 feet down canyon to a slope where you can scramble back down into Big Tony after the X section.
To travel down the X section, scramble under the boulder debris then imediately downclimb all the way to ground. Once on the ground the walls remain wide for a short distance then pinch in tight. While still on the floor squeeze into the crack continuing downcanyon. As you continue through the tight walls there are 3 tubes / wide spots that you can use to stem / upclimb straight up. Depending on how large you are will determine which of the 3 tubes you can get to. Larger people in the first tube, medium people in the second tube and smaller people in the third tube. Any of the tubes are reletively easy to stem up with flowing tiwsted features in semi narrow spaces. The first tube will require you to stem up higher and require you to stem over a silo near the top. If you are able to get to teh 2nd or 3rd tube you can avoid the silo just after the first tube. After getting up the tubes to a comfortable height, stem / galumph the rest of the X section. Most of the X Section you can be done back to feet but will be easier if stemmed and galumphed since you will go over 5 to 6 silos at about 50 feet up. Smaller people will need to drop down a few feet lower crossing a couple of the silos where it narrows a little. The movement in the X section is reletively easy and most fit people accustomed to stemming should be able to complete the X section if they are willing to take the risk of being up that high. I have been through with someone 5 foot 1 inch tall who has made it through the X section so height is not a requirement here.
If you have some people doing the X section and some people bypassing, those on the rim can walk along with the X travelers for the last portion of the X section.
- yPHF-BigTonyTp
Lat/Lon (WGS84): N 37.44622
W -111.07966
Elev: 4,610 Feet
Top entry of Pothole Fork of Big Tony Canyon where you can scramble down gentle slopes into the canyon.
Note: Up canyon of here is shallow wide V-slot for a few hundred feet. Down canyon the slot gets deeper but is still V-slot with shallow potholes to bridge / stem over.
- dPHF-BigT-R1
Lat/Lon (WGS84): N 37.44540
W -111.08020
Elev: NaN Feet
Rap 1 - Pothole Fork of Big Tony. Anchored using Sandtrap if dry or watertrap if wet and drops about 20 feet to a ledge on the LDC side where you can scramble around a pothole and arch. Down canyon is a few potholes to bridge stem over and a couple easy downclimbs before reaching rap 2 about 75 feet down canyon.
- dPHF-BigT-R2
Lat/Lon (WGS84): N 37.44530
W -111.08042
Elev: NaN Feet
Rap 2 - Pothole Fork of Big Tony. Anchored from an arch about head high on the RDC side and drops about 25 feet. After the rap is easy almost level travel for about 160 feet to the end of the fork where it rejoins the main canyon of Big Tony.
- BigTony05-PHF
Lat/Lon (WGS84): N 37.44495
W -111.08077
Elev: 4,525 Feet
Boulder debris pile at the end of a corridor that is a few hundred feet long. At this boulder debris pile is also where the Pothole Fork rejoins the main canyon coming in on the LDC side.
|